Popular Posts

Showing posts with label Customise Blogger. Show all posts

How to Fix Missing Quick Edit Pencil in Blogger Blogspot

Is your custom Blogger template missing its quick edit pencil at the bottom of your Blogger posts (Blogspot posts)? Don't worry. In this Blogger tutorial I discuss how to show a quick edit pencil icon beneath Blogger posts if it is missing. This is a common Blogger problem among custom Blogger templates but fortunately it only takes a couple of minutes to fix.

This Blogger tutorial follows on from my previous Blogspot tutorial about fixing missing Blogger icons. Check out how to show quick edit gadget wrench in Blogger (Blogspot) for help with this issue.

In my previous Blogger tutorials I have also discussed how to fix many other common Blogger problems eg how to fix a missing embedded comment form in Blogger. Take a look at all my Blogger tutorials on how to fix common Blogger problems (Blogspot problems) here

Fix Missing Quick Edit Pencil Blogger Blogspot
The quick edit pencil is a nice Blogger feature that you would not want to be without. A click on this time saving Blogger icon gives you direct access to your Blogger posts without having to go through "Edit Posts"

So if the free custom Blogger template you downloaded from the internet has no quick edit pencil displaying under your Blogger posts when viewing the actual published post then it can be fixed by taking the following the steps below:

  1. Login to Blogger

  2. Go to your Design > Page Elements

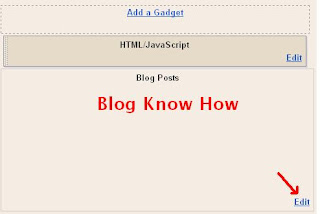
  3. Click on the Blog Posts edit button located in the bottom right hand corner of the widget


  4. A Configure Blog Posts window will pop up displaying a number of different features that can be turned on and off on your blog posts.

  5. Make sure that Show Quick Edit is checked. Tick the box and save if Show Quick Edit is not already checked


  6. Now navigate to an actual published post and check whether the quick edit pencil is now displaying in or around the footer of your blog post. Remember that you must be logged into Blogger to see the quick edit pencil - it is not displayed to your visitors

    If the pencil is there then that is the end of this Blogger tutorial. The pencil just needed to be enabled. So thank you for joining me today and if you have any other issues with Blogger be sure to check out my how to fix common problems in Blogger tutorials or take a look at the list of all the Blog Know How Blogger tutorials

    If the Blogger quick edit pencil is still missing it means that some important code has been omitted from your Blogger template and it will need to be added to get the quick edit pencil to show up

  7. Go to Design > Edit HTML

  8. Back up your template

  9. Check the Expand Widget Templates box by placing a tick in it

  10. Find the following line of code by holding down the CTRL key and F at the same time:

    <b:includable id='postQuickEdit' var='post'>


  11. Check whether the following code is under it:

    <span class='post-icons'>
    <!-- email post links -->
    <b:if cond='data:post.emailPostUrl'>
    <span class='item-action'>
    <a expr:href='data:post.emailPostUrl' expr:title='data:top.emailPostMsg'>
    <img alt='' class='icon-action' height='13' src='http://img1.blogblog.com/img/icon18_email.gif' width='18'/>
    </a>
    </span>
    </b:if>

    <!-- quickedit pencil -->
    <b:include data='post' name='postQuickEdit'/>
    </span> </div>


  12. If part or all of the code is missing copy and paste it above :

    <!-- quickedit pencil -->
    <b:include data='post' name='postQuickEdit'/>


  13. Save changes to your Blogger template

  14. Go to an individual published post page and see your new quick edit pencil displayed under your Blogger post


Tips and Troubleshooting
If you want to change the Blogger quick pencil icon you can by changing the image. Simply replace the image as depicted in red with the URL address of your own image. If your image is a different size you may have to change the width and height as shown in blue for the image to display correctly

<span class='post-icons'>
<!-- email post links -->
<b:if cond='data:post.emailPostUrl'>
<span class='item-action'>
<a expr:href='data:post.emailPostUrl' expr:title='data:top.emailPostMsg'>
<img alt='' class='icon-action' height='13' src='http://img1.blogblog.com/img/icon18_email.gif' width='18'/>
</a>
</span>
</b:if>

<!-- quickedit pencil -->
<b:include data='post' name='postQuickEdit'/>
</span> </div>


In this Blogger tutorial (Blogspot tutorial) I have shown you how to fix a missing Blogger quick edit pencil that is not showing. I have demonstrated how to enable the quick edit pencil in Blogger via Page Elements and I have provided you with the missing code in the event that the quick edit pencil code is missing from your custom Blogger template.

Please let me know if this tutorial has been useful for you by leaving your comments and opinions below.

Related Articles
List of Blog Know How Tutorials for Blogger Blogs
How to Show a Quick Edit Gadget Wrench in Blogger (Blogspot)
How to Fix a Missing Embedded Comment Form in Blogger
How to Fix Common Problems in Blogger

Add a Post Divider Between Blogger Posts

In today's Blogger tutorial I show you how to enhance your Blogger blog (Blogspot blog) by adding a post divider to your Blogger template. Used effectively post dividers can really jazz up your blog and will lend it that individual feel which most of us are hoping to create.

This tweak is very easy and well within the capabilities of any Blogspot blogger. Only a few simple changes to your Blogger template are required and these are in the CSS styling section.

How to add a post divider between posts in Blogger
By way of example I will use a divider that I downloaded from the internet free by searching for free divider graphics. Here are some sample dividers you can use to get started:


URL address:
https://blogger.googleusercontent.com/img/b/R29vZ2xl/AVvXsEjj0dHGQ0vPLtlzVNV2SDxjFkZALQ654dxhGBAWzrqkpQQRWljQaeIk5vJyq4nGtAXnY7P-kJiA8JGXf2oNCx6Edw6Lyy3OAcUq-XZtbs5YR_LantYbVno6UQHK1lP-n-GM8g6nR0-da1U/s400/ribbon.gif


URL address:
https://blogger.googleusercontent.com/img/b/R29vZ2xl/AVvXsEhTwTf5p5078YVvSqBCJLD79brRk3MCEhnOvTaRBZedeqTvrHdaJMgDJCe7lTWZIO0ijT-ZHJaC67j4KmjAelgdWKtUbGSQBro8TauUMDczjmm0CauzrCRTwsBKvI9i4HQoG1z-ulzV00o/s400/bar1.gif


URL address:
https://blogger.googleusercontent.com/img/b/R29vZ2xl/AVvXsEgtCn1pgya_f4bmwghwQt71f3hfjdIJEFegT9QSHSmU5BEHKGpXKkbtMNACNkZIfc9WgJAJUTsAMnbJ_RKuIoytV2EvJ1O0-kmajJSUqLIo1Ni0Hl-KKlXhUf9G6ymdat8Z4e8UGFl86L0/s400/barbsmpl.jpg


URL address:
https://blogger.googleusercontent.com/img/b/R29vZ2xl/AVvXsEjH9uKLaHAVPAUe1h6hodbHmRa5RTCMcDmcHp3JHYn1mObLUrz2c_CBb5P_2L1BBnLVBMnkkS5U8PeyCcy4-oSfoe4vSo1xXHlZtdshFNBqQXV7JrQjO8ia72RzMi0yJh8h8CchbM5pcEE/s400/bar47.gif


How to Add a Divider Between Posts in Blogger

  1. Login to Blogger if not already logged in

  2. From the Dashboard navigate to Layout > Edit HTML

  3. Back up your Blogger template as a precaution by downloading it to your computer

  4. Find the following line of code in your template:

    .post {

    You are likely to have something like this in your template already:

    .post {
    margin:.5em 0 1.5em;
    border-bottom:1px dotted $bordercolor;
    padding-bottom:1.5em;
    }

  5. Paste the following lines of code to this block making sure you paste them before the closing curly bracket:

    background: url(https://blogger.googleusercontent.com/img/b/R29vZ2xl/AVvXsEjj0dHGQ0vPLtlzVNV2SDxjFkZALQ654dxhGBAWzrqkpQQRWljQaeIk5vJyq4nGtAXnY7P-kJiA8JGXf2oNCx6Edw6Lyy3OAcUq-XZtbs5YR_LantYbVno6UQHK1lP-n-GM8g6nR0-da1U/s400/ribbon.gif);
    background-repeat: no-repeat;
    background-position: bottom center;
    margin:.5em 0 1.5em;
    padding-bottom:1.5em;

  6. If any lines are duplicated remove them.

  7. Remove any line beginning with: border-bottom: eg

    border-bottom:1px dotted $bordercolor;

  8. You will now have a block of code which looks like this plus any extra lines from the existing code in this block:

    .post {
    background: url(https://blogger.googleusercontent.com/img/b/R29vZ2xl/AVvXsEjj0dHGQ0vPLtlzVNV2SDxjFkZALQ654dxhGBAWzrqkpQQRWljQaeIk5vJyq4nGtAXnY7P-kJiA8JGXf2oNCx6Edw6Lyy3OAcUq-XZtbs5YR_LantYbVno6UQHK1lP-n-GM8g6nR0-da1U/s400/ribbon.gif);
    background-repeat: no-repeat;
    background-position: bottom center;
    margin:.5em 0 1.5em;
    padding-bottom:1.5em;
    }

  9. Click on Save Template to save your changes

  10. Click on View Blog to see your new post divider between posts

Tips and Troubleshooting
  • To change the divider to one of the above replace the URL address of the image (in red) with the URL address of the new image you want to use.

  • To use your own divider image download to your computer from the internet and then save the image to a photo image service like Photobucket. Replace the divider image URL address (in red) with the URL address of your new image

  • To increase the padding around the divider change the following line of code:

    padding-bottom:1.5em;

    to

    padding-bottom:2.5em;

In today's Blogger tutorial you have learned how to insert a divider between your Blogger posts to enhance the look of your Blogger template (Blogspot template). You can either make your own post divider or download one from the myriad of free website dividers available on the net.

Related Articles
List of Blog Know How Tutorials for Blogger Blogs
How to Add, Delete or Remove Blogger Image Borders
How to Align and Justify Posts in Blogger

How to Align and Justify Blogger Posts

This is the second article in a series about CSS styling tricks and tips for Blogger written with Blogger beginners and novices in mind but suitable for all bloggers who want to customize their existing Blogger template. While the first article dealt with how to add or remove image borders in Blogger today I show you how to align and justify Blogger posts.
Skill Level: Beginner Rating: Easy Time: 1 Minute

Many of the questions that my readers ask me are about how to customize various features of their Blogger template (Blogspot template). Over the coming weeks I will be focusing on some simple CSS styling tricks and tips to help you get more out of your Blogger template. Much can be achieved by learning a little about CSS. So before you rush off to download a custom Blogger template consider customizing your existing Blogger template.

This tutorial is part of a series of articles that I will publishing over the coming weeks about customizing your Blogger template using CSS styling. I will be targeting beginner bloggers and newbies to Blogger as well as more seasoned bloggers so if you want to spice up your Blogger template please read along.

How to Justify Blogger Posts (Blogspot Posts) Using CSS
It is easy to change the text alignment of your Blogger posts with the addition of one extra line in the CSS styling section of your Blogger template (Blogspot template). By default the alignment is set to left align so that the text aligns to the left while the right edge is ragged. You can also have right alignment where the text aligns to the right and the left edge is ragged.

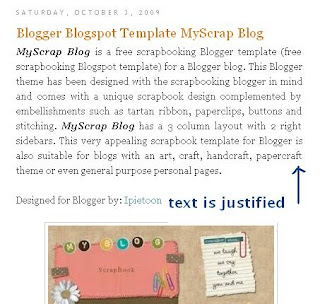
Another not so common option is to justify the text so that both left and right edges are straight. Users of MS Word and other word processing programs will be familiar with justify as an alignment choice. Justify stretches out the text so that each line has an equal width similar to what you will find in newspapers and magazines. I have found justifying my Blogger posts to be a useful feature on several of my blogs and thought some of you might to. Below are instructions on how to justify your Blogger posts so that all your blog's articles are justified but first take a look at the difference in presentation of these 2 blog posts just by justifying the alignment of the text. Makes a big difference don't you think?

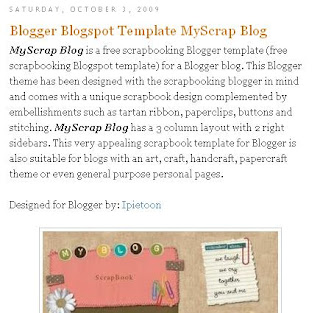
Blogger post text is left aligned
Blogger post text is justified

  1. Before you start check how text is currently aligned on your Blogger posts. If it is left aligned you will be able to follow this trick to justify it. If it is already justified no need to go any further.

  2. Login to Blogger if not already logged in

  3. From the Dashboard click the Layout link for your blog and then click on Edit HTML

  4. Back up your template by downloading it in full as a precaution

  5. Use CTRL + F to find the code block beginning with .post in the CSS styling section of your Blogger template. As templates will differ greatly there are no hard and fast rules about what styling will be in this block. Here is a typical code block taken from the default Minima Blogger template

    .post {
    margin:.5em 0 1.5em;
    border-bottom:1px dotted $bordercolor;
    padding-bottom:1.5em;
    }

  6. Add the following line to the code block before the end brace (the end curly bracket)

    text-align:justify;

    so that your code now looks like:

    .post {
    margin:.5em 0 1.5em;
    border-bottom:1px dotted $bordercolor;
    padding-bottom:1.5em;
    text-align:justify;
    }

  7. Click on Save Template

  8. Click View Blog to see the alignment of all your posts has now changed to justified

Tips and Troubleshooting
  1. If your Blogger template justifies posts and you would like to left align them find the code beginning with .post in your Blogger template and add the following line to the block:

    text-align:left;

    so that your code now looks like:

    .post {
    margin:.5em 0 1.5em;
    border-bottom:1px dotted $bordercolor;
    padding-bottom:1.5em;
    text-align:left;
    }

  2. If you want the posts right aligned you would substitute the word right for left.

In this tutorial you have learned how to justify your Blogger posts to create a straight rather than ragged margin edge. By using this tip to add one line of code to your Blogger template you can enhance the look of your Blogger posts. This tweak only takes a minute but can markedly improve the presentation of your Blogger posts. Please keep reading along for more CSS tips and tweaks in the coming weeks.

Related Articles
List of Blog Know How Tutorials for Blogger Blogs
How to Add, Delete or Remove Blogger Image Borders

Add a Twitter Updates Widget to Blogger

If you are a regular Twitter user and have a bunch of followers you might want to add a Twitter Updates widget to Blogger (Blogspot). In today's tutorial I will show you the easy way to add a Twitter Updates widget to Blogger (Blogspot). It is fairly straightforward to add this Twitter Updates widget to Blogger so please don't be put off if you are a Blogger beginner as you can have this widget up and running in no time.

If you are new to Twitter and don't have an account yet you can sign up to Twitter for free


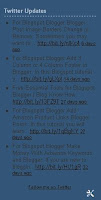
Twitter Updates widget for BloggerHow to Add a Twitter Updates Gadget to Blogger
There are several methods of adding a Twitter Updates widget to Blogger which I will be discussing over the next few posts. Today I will start with the easiest method by far. This Twitter widget won't slow down your blog loading time particularly but I suggest as with all HTML widgets that you place it near the bottom of your column of gadgets and limit the number of updates shown.

This Twitter Updates widget will provide a basic widget only and is fine if you aren't too bothered about styling. The widget uses the styling from your blog based on the Blogger template you are using but unfortunately there is no way to modify its appearance at the moment. If you want something a little more fancy keep an eye out for my future posts about Twitter Updates widgets.

  1. Log in to Blogger if you are not already logged in

  2. Go to Layout > Page Elements

  3. Click Add a Gadget in the Blogger sidebar

  4. Click on More Gadgets to the left and choose the Twitter Updates widget. Blogger may change this so if you don't find it there try looking in Featured or Popular.

  5. Enter your Twitter name (usually your blog name)

  6. Choose the number of updates to display. By default this is set to 5

  7. Uncheck display link to your Twitter page if you do not want visitors to go to your Twitter page for some reason otherwise leave it as is.

  8. Click Update to Preview any changes and then Save

  9. Use Blogger's drag and drop feature to reposition your Twitter gadget in the desired location in sidebar or footer of your Blogger blog. Save any changes

  10. Click View Blog to admire your new Twitter Updates widget

In today's tutorial I have shown you how easy it is to add a Twitter Updates widget to your Blogger blog (Blogspot blog). The Twitter Updates widget will display your latest Twitter tweets on your blog. The disadvantage of this third party Twitter Updates widget is that it has basic styling only and no way to modify it. On the plus side it loads fast and is likely to be trouble free. I will be writing more about Twitter updates widgets in the next couple of posts so keep an eye out. Enjoy!


Related Articles
List of Blog Know How Tutorials for Blogger Blogs
Add Twitter Button or Twitter Badge to Blogger
Add Twitter Followers Counter to Blogger

Add 3 Column or 4 Column Footer to Blogger

In this Blogspot tutorial you will learn how to convert your existing Blogger footer (Blogspot footer) into a 3 column footer or a 4 column footer. With more columns in your Blogger footer you will be have the extra room to accommodate more widgets such as Flickr photos and Twitter updates. Also you will be able to put less frequently used widgets such as recents comments, archives, followers, About Me etc at the bottom of your template so that only the most important widgets are loaded first.

This tweak involves adding code to the footer section of your existing Blogger template to change it to 3 columns or 4 columns. The tutorial is not beyond the capabilities of Blogger newbies and webmasters with intermediate skills but care needs to be taken when modifying your Blogger template so back up before you start. For best results a Blogger template with a width of around 900px is best.

Convert your Blogger footer to a 3 column footer

How to Add a 3 Column Footer to Blogger

  1. Log in to Blogger if not already logged in

  2. Navigate to Layout > Page Elements

  3. Move any existing widgets out of the footer section and place them in the sidebar temporarily and save changes

  4. Navigate to Layout > Edit HTML

  5. Back up your template as a precaution by downloading it to your computer

  6. Find the following section in your Blogger template

    <div id='footer-wrapper'>
    <b:section class='footer' id='footer'/>
    </div>

    If you are having difficulty finding this section trying searching for footer-wrap or something similar as sometimes this section is called something else in some templates.

  7. To Add a 3 Column Footer to Blogger
    Replace all the code located in Step 6 with the following

    <div id='footer-columns'>
    <div id='footer1' style='width: 30%; float: left; margin:0; text-align: left;'>
    <b:section class='footer-column' id='col1' preferred='yes' style='float:left;'/>
    </div>
    <div id='footer2' style='width: 40%; float: left; margin:0; text-align: left;'>
    <b:section class='footer-column' id='col2' preferred='yes' style='float:left;'/>
    </div>
    <div id='footer3' style='width: 30%; float: right; margin:0; text-align: left;'>
    <b:section class='footer-column' id='col3' preferred='yes' style='float:right;'/>
    </div>
    <div style='clear:both;'/>
    </div>

    To Add a 3 Column Footer to Blogger with a Lower Footer Section
    Replace all the code located in Step 6 with the following

    <div id='footer-columns'>
    <div id='footer1' style='width: 30%; float: left; margin:0; text-align: left;'>
    <b:section class='footer-column' id='col1' preferred='yes' style='float:left;'/>
    </div>
    <div id='footer2' style='width: 40%; float: left; margin:0; text-align: left;'>
    <b:section class='footer-column' id='col2' preferred='yes' style='float:left;'/>
    </div>
    <div id='footer3' style='width: 30%; float: right; margin:0; text-align: left;'>
    <b:section class='footer-column' id='col3' preferred='yes' style='float:right;'/>
    </div>
    <div style='clear:both;'/>
    <p/>
    <div id='footer-bottom' style='text-align: center; padding: 10px;'>
    <b:section class='footer' id='col-bottom' preferred='yes'>
    </b:section>
    </div>
    <div style='clear:both;'/>
    </div>

    Add 3 column footer to Blogger with a lower section
    To Add a 4 Column Footer to Blogger
    Replace all the code located in Step 6 with the following

    <div id='footer-columns'>
    <div id='footer1' style='width: 25%; float: left; margin:0; text-align: left;'>
    <b:section class='footer-column' id='col1' preferred='yes' style='float:left;'/>
    </div>
    <div id='footer2' style='width: 25%; float: left; margin:0; text-align: left;'>
    <b:section class='footer-column' id='col2' preferred='yes' style='float:left;'/>
    </div>
    <div id='footer3' style='width: 25%; float: left; margin:0; text-align: left;'>
    <b:section class='footer-column' id='col3' preferred='yes' style='float:left;'/>
    </div>
    <div id='footer4' style='width: 25%; float: right; margin:0; text-align: left;'>
    <b:section class='footer-column' id='col4' preferred='yes' style='float:right;'/>
    </div>
    <div style='clear:both;'/>
    </div>

    Convert Blogger Footer to a 4 Column Footer

  8. Save changes to your Blogger template.

  9. Navigate to Layout > Page Elements. You will now see a 3 column footer, 3 column footer with a lower section or a 4 column footer depending on what option you chose.

  10. Move the desired gadgets to the new Blogger footer columns. Create new widgets to fill up the footer columns if necessary. Save your changes.

  11. Click View Blog to admire your new footer section

Tips and Troubleshooting

  1. To Add Padding Between Footer Columns in Blogger
    To create some padding between the columns add the following code to the style section of your Blogger template - before </b:skin> tag.

    #footer-columns {
    clear:both;
    }

    .footer-column {
    padding: 10px;
    }

  2. To Add a Border to the 3 or 4 Column Blogger Footer

    • For Top Border Only of the 3 or 4 Column Footer
      Paste the following code before the </b:skin> tag

      #footer-columns{
      border-top:1px dotted $bordercolor;
      clear:both;
      margin:0 auto;
      }

      Replace $bordercolor with a hex color if default color is not displayed. Change this color to suit your template. For example


      #footer-columns{
      border-top:1px dotted #113355;
      clear:both;
      margin:0 auto;
      }

    • For a Box Border Around the 3 or 4 Column Footer

      #footer-columns{
      border:1px dotted $bordercolor;
      clear:both;
      margin:0 auto;
      }

      Replace $bordercolor with a hex color if default color is not displayed. Change this color to suit your template. For example

      #footer-columns{
      border-top:1px dotted #113355;
      clear:both;
      margin:0 auto;
      }


In today's Blogger tutorial you have learned how to add a 3 column footer or a 4 column footer to your Blogger template (Blogspot template). You have also learned how to add some styling such as a border above the footer and around the footer. As always I am available to answer questions if you need assistance. Good luck!

Related Articles
List of Blog Know How Tutorials for Blogger Blogs
Customize Blogger Tips

Add Email This Post Link to Blogger

In this article you will learn how to place an email this post link or button at the bottom of each post in a Blogger Blogspot blog.

You may have noticed that some blogs give readers the option below their posts to email the article to themselves or a friend via a link or button. This affords readers yet another way to have access to your posts and a link for them to find you if they want to call back.

This email link should not be confused with the subscribe by email link which once a reader is signed up to will give them regular updates of each post you publish. This email link on the other hand only emails the reader the single post they are interested in.

There are several ways to place an email this post link on your Blogger Blogspot blog. Here are three methods known to me.

Add Email This Post to Blogger - Method 1
The easiest method. Adds an email button to the end of each post.

1. Login to Blogger if not already logged in

2. Navigate to Layout > Page Elements

3. Within the template click the Edit link on Blog Posts

Add Email This Post Button to Blogger
4. A pop up menu will open. Under Select Items check the box labelled Show Email Post Links

5. Click Save

6. Click on View Blog and scroll to the end of your post to see the envelope button which has now appeared.


Add Email This Post to Blogger - Method 2
Another method of adding an email this post link to your blog is to add an all-in-one social bookmarking button to your Blogger Blogspot blog. All in one social bookmarking buttons are minimalist and reduce the clutter of having lots of buttons. Read the following article for information about how to add an Add This Social Bookmarking Button to your Blogger blog

Add Email This Post to Blogger - Method 3
By far the most advanced method and requires a change to your Blogger template. Yet another way to add an email this post link to your Blogger blog is to make use of your Feedburner FeedFlare if you have one. For information about getting a Feedburner FeedFlare for a Blogger feed and configuring it please refer to my article Add a Feedburner FeedFlare to a Blogger Feed

Assuming that you already have a burned feed at Feedburner (if not then read my article on how to Burn a Blogger RSS Feed at Feedburner and a FeedFlare set up follow these instructions to add an email this post link.

1. Click the My Account link at the top right corner of the Blogger navbar and then select Feedburner from the list of Google services or sign in to Feedburner directly.

2. Select your blog feed from the My Feeds List on the My Feeds page

3. From the Feedburner dashboard select the Optimize tab.

4. From the left sidebar menu select FeedFlare

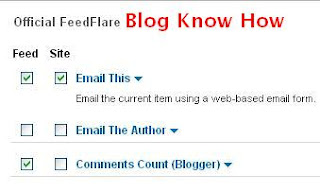
5. On the FeedFlare page enable Email This by checking the box under the Site column. (Note the first column is what appears in the feed and the second column is what will appear on your blog). If you don't have your FeedFlare set up yet you can set up the FeedFlare options for both site and feed together at the same time. Follow my article about adding a Feedburner FeedFlare to Blogger for more on this.

Select Email This from the Site Column on Feedburner FeedFlare page
6. Once you have checked the Email This option under Site and added any other options to the FeedFlare in the feed or site that you would like then click on Save. If this is a new FeedFlare then you will click on a button marked Activate instead.


7. After activating or saving you need to get the code to add to Blogger. Do this by clicking on the dropdown menu labelled Get the HTML code to put FeedFlare on your site and selecting Blogger from the list.

8. A pop up window entitled Adding FeedFlare to your Blogger blog will open with instructions on how to make the necessary changes to your blog. These are a bit confusing so I will break them down a bit here. Don't close this window yet as we will return

9. Login into Blogger if not already logged in

10. Navigate to Layout > Edit HTML.

11. Check the Expand Widgets Template

12. As a precaution back up you template

13. Scroll down to the following code or use CTRL + F to bring up the search tool.

<div class='post-footer'>

Note assumes you are using layout in Blogger. If you don't have this code you are likely to be using a custom template and will need to read the advanced instructions. Any problems just ask.

14. Copy the layout code in the Feedburner pop up window and paste it directly below this line <div class='post-footer'>

15. Click Save Template to save changes

16. Click View Blog to see the link in the footer of your blog posts

Add Email This Link using Feedburner FeedFlare in Blogger

In this article I have suggested three different methods to add an Email This Post link to a Blogger Blogspot blog to give readers the option of emailing their favorite articles directly to themselves. If you get stuck or have problems with any of these methods please just ask and I will try to help.


Related Articles
Add Email Subscription Links to Your Blogger Blogspot Blog
Add a Social Bookmarking Button to your Blogger Blog
Add a Feedburner FeedFlare to a Blogger Feed
Burn a Blogger RSS Feed at Feedburner
List of Blog Know How Tutorials for Blogger Blogs

Add Printer Button or Link to Blogger Blogspot

Today's article will show you how to add a print button or printer link to your Blogger Blogspot blog. The facility to print a hard copy of a post may be important to some visitors especially if you are like me and publish lengthy posts. Adding a printer button or link will add to your blog's functionality and user friendliness.

The reason I am writing this article is in response to a reader who asked me how to print out posts without the sidebar showing up. All the suggested buttons and links print out the post only and not the sidebar, header or footer.

This tutorial involves changing the template code but is not difficult as long as you follow these step by step instructions.

How to Add a Custom Print Button to Your Blogger Blogspot Blog
The following instructions will place a printer button on each individual page of your blog below the post. Only the blog article itself will be printed along with any comments. The sidebar will not be printed.

Example of the printer button to be added: icons

1. Log in to Blogger if not already logged in

2. Navigate to Layout > Edit HTML

3. Back up your template by downloading full template to your computer

4. Check Expand Widgets Template

5. Bring up the search toolbar by using CTRL + F

6. Find this line by typing it into the search box:

<p><data:post.body/></p>

7. Now replace that line with the following code block:


<!-- Add Printer Button by http://blogknowhow.blogspot.com/-->
<span class='noprint'><p><data:post.body/></p></span>
<b:if cond='data:blog.pageType == &quot;item&quot;'>
<a href='javascript:window.print()'>
<img src='http://i1020.photobucket.com/albums/af326/bookwise77/printer-button.gif'/></a></b:if>
<!-- End Add Printer Button by http://blogknowhow.blogspot.com/-->


8. Click on Save Template to save changes

9. Click View Blog to see your button in action

Note: If you want to change the printer icon to your own icon upload your image to a photo storage service like Photobucket and note the URL address of the icon. Now substitute the URL address of the existing image for your image by changing the line beginning with <img src='
Change printer icon to this alternative printer icon icons

So to change the printer image to another printer image the code would look like:

<!-- Add Printer Button by http://blogknowhow.blogspot.com/-->
<span class='noprint'><p><data:post.body/></p></span>
<b:if cond='data:blog.pageType == &quot;item&quot;'>
<a href='javascript:window.print()'><img src='http://i1020.photobucket.com/albums/af326/bookwise77/printer-button-2.gif'/></a></b:if>
<!-- End Add Printer Button by http://blogknowhow.blogspot.com/-->


How to Add a Printer Link to a Blogger Blogspot Blog
You may not want a button and prefer to add a printer link instead. To do this you would follow steps 1 to 6 and then insert the following code instead of the code contained in step 7


<!-- Add Printer Link by http://blogknowhow.blogspot.com/-->
<p><span class='noprint'><data:post.body/></p></span>
<b:if cond='data:blog.pageType == &quot;item&quot;'>
<a href='javascript:window.print()'>Print this post</a>
</b:if>
<!-- End Add Printer Link by http://blogknowhow.blogspot.com/-->

Save the changes to your template and then navigate to an individual post to see your link at the bottom of the post.


How To Add a Combination of Printer Button and Link
If you would like to display a printer button along with a link follow steps 1 to 6 and then insert the following code instead of the code contained in step 7


<!-- Add Combined Printer Button and link by http://blogknowhow.blogspot.com/-->
<span class='noprint'><p><data:post.body/></p></span>
<b:if cond='data:blog.pageType == &quot;item&quot;'>
<span style='background: url(http://i1020.photobucket.com/albums/af326/bookwise77/printer-button.gif) left no-repeat; padding-left: 28px;'>
<a href='javascript:window.print()'>Print this post</a></span>
</b:if>
<!-- End Add Combined Printer Button and link by http://blogknowhow.blogspot.com/-->


In this article I have shown you how to add a print button, a print link and a combined button and link to the bottom of your Blogger Blogspot posts. Enjoy!


Related Articles
List of Blog Know How Tutorials for Blogger Blogs

Add an Affiliate Banner to a Blogger Header

If your intention is to make money from your blog chances are you will want to add an affiliate marketing banner to your Blogger Blogspot header. Doubtless you have seen plenty of websites sporting advertising banners which are creating revenue for the author by way of banner clicks. With a small amount of tweaking to your Blogger template you too will be in a position to boost the revenue earning capacity of your Blogger blog.

Add a Banner to Blogger Header - Sand Dollar Header with Affiliate Banner Ad
Add an Affiliate Banner to Blogger Header
There are a variety of good places for a banner but the header of a blog is by far the most prominent area. Unfortunately Blogger does not have an easy facility for inserting an advertising banner into your Blogger header. To manage this issue you have two choices:

1. Use a custom template that comes banner ready. (There are a number of templates out there with this feature built-in)

2. Or customize your existing standard Blogger template.

This article focuses on choice 2 - how to go about manually editing your template to add an affiliate banner ad. By the end of this tutorial you will have the necessary knowledge and know how to insert a banner into the header of your Blogger blog. The level of difficulty for the additions I am proposing I have rated as easy to intermediate. You will be adding a snippet of code to your template plus pasting in the affiliate marketing banner code.

For the purposes of this example I will be using a 468x60 banner. I have tested this method of banner insertion on the following standard Blogger templates:

Herbert
Rounders
Denim
Thisaway
Son of Moto
Sand Dollar

It will also work on custom templates that don't already come with an advertising banner in the header built in.


How to Insert an Affliate Marketing Banner into a Blogger Blog

1. Login to Blogger.com and navigate to Layout > Edit HTML page of your blog

2. On the Edit HTML page you will see the option to back up your template by downloading it to your system. I strongly advise that you take this opportunity to backup as you are about to make a change to your template where if something goes wrong you may not be able to restore it.

3. Once you have backed up your template place a check in the Expand Widget Templates box

4. Search your template and locate the following lines of code within the header section of the template:(note you can search by using CTRL + F and entering <b:includable id='main'> into the search box

<b:includable id='main'>
<b:if cond='data:useImage'>

5. Now insert the following 2 lines of code directly below <b:includable id='main'> and before <b:if cond='data:useImage'>

<div class='ads'>
</div>

6. Place your merchant affiliate code between the lines of code you just inserted. You will need to copy the code from the affiliate program provider to your template. If you are yet to sign up for an advertising program such as Linkshare you will need to do so before you proceed. Alternatively you could use my banner code in the meantime to test this banner and later substitute it for your own.

<div class='ads'>PLACE YOUR BANNER CODE HERE
</div>

LinkShare_125x125ButtonV2

7. Review the code you have entered. If you have followed the steps above you will now have code that resembles this. (Your affiliate code will of course be different):

<b:includable id='main'>
<div class='ads'>

<a href='http://www.linkworth.com?a=23734' target='_blank'><img align='right' border='0' height='60' src='http://www.linkworth.com/adm/affiliate_manager/affiliate_banners/bann-36.gif' width='468'/></a>

</div>
<b:if cond='data:useImage'>

8. When you are sure you have correctly inserted the code into the template scroll up until you find this line in your template ]]></b:skin>

9. Immediately before this line add the following lines:


/* Header Banner
----------------------------------------------- */
#header .ads{width:480px; height:80px; float:right; padding:20px 0px 0px 0px}

10. Click on Save Template.

11. Click on View Blog to view your new banner.


Troubleshooting
  • If you need to change the alignment or padding around the banner to your own specifications you will need to change the CSS stylesheet code entered in Step 9
  • You can change the alignment of the banner by changing float:right; to float:left; if you would like your banner to left align.
  • If you change your template for another standard Blogger template you may need to re-enter the code in Step 9.

In this tutorial you have learned to how to insert a 468x60 affiliate marketing banner into the header of your Blogger Blogspot blog and will now be on your way to earning revenue from multiple income streams. Well done!!!


Related Articles
List of Blog Know How Tutorials for Blogger Blogs
5 Easy Ways to Make Money from Blogger
Make Money Add Banner Ads to Blogger
Add an Affiliate Banner to a Blogger Sidebar
Add Google Adsense or Banner Above Blogger Header

Blogger Guide to Google Adsense Placement

There are so many places to position Google Adsense in a Blogger Blogspot blog. This article covers the most common places to add Google Adsense ad units and linked units in a Blogger blog together with links to the various articles which explain in detail how to insert the Google Adsense ad unit into Blogger.

Included in this article about Google Adsense placement are articles that cover positioning in the header both above and below the title, in the sidebar, in the footer, between the posts, between the header and the first post, below the post title, in the middle of posts, between the end of an article but before the embedded comment form

Format of Google Adsense Ad Unit

Google Adsense Ad Units

728x90 Leaderboard
728x90 leaderboard under Blogger header
728x90 leaderboard above Blogger header

160x600 Vertical Wide Banner
160x600 vertical wide banner in sidebar or 120x600 or 120x200

336x280 Large Rectangle
336x280 below post title or 250x250 or 300x250


Google Adsense Linked Units

728x15 Linked Unit
728x15 linked unit in Blogger footer or 468x15
728x15 linked unit in Blogger header or 468x15
728x15 linked unit above Blogger header or 468x15


Placement of Google Adsense on Blogger

EASY - CHANGE SETTING ONLY

Add Google Adsense Between Posts in Blogger
Blogger has a setting which allows you to add Google Adsense between posts. Read more about how to Add Google Adsense Between Posts in Blogger


EASY - ADD WIDGET ONLY

Add Google Adsense to a Blogger Sidebar
It is extremely easy to add a Google Adsense ad unit to a Blogger sidebar using a HTML/Javascript gadget or widget. For instructions on adding an ad unit to the sidebar please refer to Add Google Adsense to Blogger Sidebar

Add Google Adsense to a Blogger Footer
It is not so popular to place Google Adsense ad units in a Blogger footer however with the increased use of footers as a place that contains valuable information it is becoming more common to place an ad in the footer particularly a linked unit. For instructions on how to place a Google Adsense 728x15 linked unit in the footer refer to Add Google Adsense to a Blogger Footer


EASY-INTERMEDIATE - MINOR CHANGE TO TEMPLATE CODE AND ADD WIDGET

Add Google Adsense or Banner Above Blogger Header
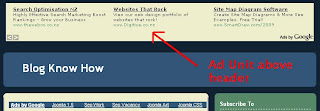
If you have occasion to display either Google Adsense or an affiliate banner above the Blogger header you can by adding a section to the Blogger template. You can add any kind of Google Adsense content or linked ad unit although I suggest that a 728x90 leaderboard would be ideal for this spot.

Add Google Adsense or Banner Above Blogger Header

How to Add Google Adsense or a banner above Blogger header

Add Google Adsense to Blogger Header
The header of a Blogger blog is a popular place to add Google Adsense particularly a linked unit. I have good success adding a linked unit below the blog title in the header of my blog.

Add Google Adsense Above the Title

Place Google Adsense Above the Title

Add Google Adsense Below the Title

Place Google Adsense Below the Title in Blogger

Add Google Adsense Between the Header and the First Post in Blogger
Some templates lend themselves well to having a full length banner below the header. The Minima template for example suits a 728x90 Google Adsense unit just below the header and before the first post. Instructions on how to Add Google Adsense Between the Header and the First Post in Blogger

Add Google Adsense Between the Header and the First Post in Blogger

INTERMEDIATE - INSERT GOOGLE ADSENSE CODE INTO TEMPLATE

Add Google Adsense to Body of Post
Positioning Google Adsense within the body of the post in Blogger is a bit more tricky as it requires adding the Google Adsense code to the template. Before adding the code it must be parsed so the Javascript can be read by Blogger

Add Google Adsense Below Post Title

Add Google Adsense Below Post Title

in this article I have pulled together a number of Google Adsense articles I have written in the past about adding Google Adsense to a Blogger Blogspot blog so that it will provide an easy reference for anyone wanting to find out about Google Adsense placing on Blogger.

Related Articles
Bloggers Guide to Google Adsense Myths
Google Adsense Tips for Blogger Blogs
Better Placement of Google Adsense in Blogger
Add Google Adsense to Blogger Header
Add Google Adsense or Banner Above Blogger Header
List of Blog Know How Tutorials for Blogger Blogs

Add Outbrain Ratings Widget to Blogger

Outbrain provides a free and very stylish content recommendations and ratings widget which can be easily added to your Blogger Blogspot blog. In this tutorial I will discuss the benefits of Outbrain and also provide a step by step walkthrough of the process of adding an Outbrain widget to your Blogger blog and your Feedburner FeedFlare if you have burned your blog feed at Feedburner.

Outbrain Home Page
Benefits of Adding Outbrain to Your Blogger Blog
By adding an Outbrain content and ratings widget to your Blogger blog you will encourage visitors to record their reactions to a post they have just read. Along with features likes polls this is another good method of encouraging visitors to interact with your blog. Outbrain also makes it possible to display your most popular posts within the widget. In addition the Outbrain ratings widget may help drive more traffic to your blog when your visitors use the Recommended Posts feature which is embedded in the widget. By the same token it may also mean that the traffic doesn't stay long as visitors will be wooed away by recommended links so you will have to weigh up the benefits versus the costs for yourself. Outbrain also provides reports on widget activity

How to Add an Outbrain Ratings Widget to Blogger
1. Register at Outbrain. This is a simple sign up process that requires you to click on a confirmation email once you have requested sign up and filled out a simple form.

2. Once registered click on Get the Widget from the footer menu

3. Choose Blogger as your Blogging platform

4. Select the language of your widget if other than English which is the default

5. Click on Get the Widget button and Outbrain will automatically refer you to Blogger in a new window. Sign in to Blogger in the new browser window. Don't close the Outbrain window as we will be returning here.

Outbrain Get Widget page
6. Choose your blog from the drop down menu and click on the Add Widget button.

Add Outbrain Widget to Blogger
7. Navigate to Layout > Page Elements and reposition if necessary your new widget which will now be appearing in the sidebar of your blog. Save any changes you make.

8. Return to Outbrain in your open browser window and click on the click here link to verify your blog. You will receive a message verifying that you have claimed your blog

9. Click on the View Blog link in the menu tab section and view your new Outbrain widget in action.

Outbrain Ratings Widget as it appears at the bottom of a Blogger post


Note that once your readers start to rate your posts by clicking on them the stars will become yellow. 5 yellow stars is an excellent rating


Customizing Your Outbrain Ratings Widget
1. Return to the Outbrain window in your browser

2. Navigate to Manage Posts using the Sidebar Menu on the lefthand side

3. In the list of blogs you will see your blog listed. Click on the settings link

Outbrain Manage Blogs Screen
4. If you leave the default setting you will see recommended links appearing as pictured above in #9. If you don't want any recommendations you can set this to no.

5. If you have set up your blog with the idea of earning a little extra money you may choose to turn off sponsored recommendations. If you leave the radio button set to yes any proceeds from the sponsored links clicked on will go to charity. The charity sponsored can be selected via the drop down menu

6. Outbrain will show the most popular posts in the sidebar of your blog if this feature is enabled. To enable popular posts select the enable radio button.

7. Click on the Submit button


Adding Outbrain to Your Feedburner FeedFlare
If you already have a FeedFlare appearing at the footer of your burned Feedburner feed of your blog you can easily add Outbrain too. Check out my article on adding a Feedburner FeedFlare to Blogger if you are not sure what a FeedFlare is or how to add one to Blogger.

Go to Feedburner and choose your blog from the list of My Feeds. Select the Optimize tab and then FeedFlare from the lefthand sidebar menu. In the Personal FeedFlare section paste the following code (URL) into the text box:
http://widgets.outbrain.com/FeedFlareUnit.xml

and click on the Add New Flare button. Click on Save. Your readers will now be able to rate your blog straight from your Blogger feed.

Outbrain Troubleshooting Tips for Blogger Installation
  • When you install Outbrain on your blog resist the temptation to rate one of your posts as this vote can't be deleted once it is cast. Even when I tried uninstalling and reinstalling the widget the vote did not clear.

  • The Popular Posts feature takes a while to show any posts as it needs at least 2 visits before it will start rating the post

  • If you have other problems with Outbrain try this active Outbrain support forum for answers

In this tutorial you have learned how to install the Outbrain Ratings widget on your Blogger Blogspot blog and customize it. Also some of the benefits of the Outbrain widget were discussed along with a couple of Outbrain installation troubleshooting tips. If you have a moment let me know how you get on installing this widget. Don't forget to bookmark this post for easy reference.

Related Articles
Add a Feedburner FeedFlare to Blogger Feed

Add Missing Embedded Comments Form to Blogger

Today I will show you how to fix your Blogger template if the embedded comments feature is missing or not working. I decided to write this article because I have noticed that the embed a comment below the post feature is often not working in many Blogger custom templates available for download. This is usually because many of these templates were released prior to Blogger enabling embedded comments.

If you have downloaded a custom template that has embed a comment missing then read on as I will show you how to insert the code for embed a comment form into your template. Inserting code into a blog template can be challenging for some but if you follow these instructions it is not beyond even virtual beginners.

1. Login to Blogger if you are not already logged in

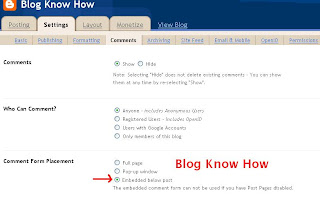
2. Navigate to Settings > Comments. Under Comment Form Placement make sure the Embedded below Post radio button is set. Save any changes you make.

In Blogger Settings Comments Set Comments to Embedded

3. Navigate to Layout > Edit HTML

4. I strongly recommend you back up your template by downloading it to your computer before proceeding

4. Check Expand Widget Templates

5. Use CTRL + F to bring up the Blogger Toolbar

6. Look for the following code block by entering <span class='paging-control-container'> into the find box on the toolbar. Note if you don't have this code look at the alternative option below #7 in this post

<b:if cond='data:post.commentPagingRequired'>
<span class='paging-control-container'>
<a expr:class='data:post.oldLinkClass' expr:href='data:post.oldestLinkUrl'>
<data:post.oldestLinkText/>
</a>
<a expr:class='data:post.oldLinkClass' expr:href='data:post.olderLinkUrl'>
<data:post.olderLinkText/>
</a>
 
<data:post.commentRangeText/>
 
<a expr:class='data:post.newLinkClass' expr:href='data:post.newerLinkUrl'>
<data:post.newerLinkText/>
</a>
<a expr:class='data:post.newLinkClass' expr:href='data:post.newestLinkUrl'>
<data:post.newestLinkText/>
</a>
</span>
</b:if>


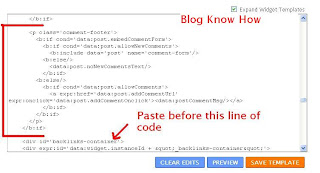
7. Paste the following code into your template immediately after the code block above and before this line of code <div id='backlinks-container'>

<p class='comment-footer'>
<b:if cond='data:post.embedCommentForm'>
<b:if cond='data:post.allowNewComments'>
<b:include data='post' name='comment-form'/>
<b:else/>
<data:post.noNewCommentsText/>
</b:if>
<b:else/>
<b:if cond='data:post.allowComments'>
<a expr:href='data:post.addCommentUrl' expr:onclick='data:post.addCommentOnclick'><data:postCommentMsg/></a>
</b:if>
</b:if>
</p>
</b:if>

Enter the Embed Comments Form into Blogger Template
Alternative Option
If you don't have the code as mentioned in #6 you will likely have the following:

<p class='comment-footer'>
<b:if cond='data:post.allowComments'>
<a expr:href='data:post.addCommentUrl' expr:onclick='data:post.addCommentOnclick'><data:postCommentMsg/></a> </p>
</b:if>

In which case replace with this code:

<p class='comment-footer'>
<b:if cond='data:post.embedCommentForm'>
<b:if cond='data:post.allowNewComments'>
<b:include data='post' name='comment-form'/>
<b:else/>
<data:post.noNewCommentsText/>
</b:if>
<b:else/>
<b:if cond='data:post.allowComments'>
<a expr:href='data:post.addCommentUrl' expr:onclick='data:post.addCommentOnclick'><data:postCommentMsg/></a>
</b:if>
</b:if>
</p>
</b:if>

8. Click on the Save Template button to save your template changes

9. Click on the View Blog link and test your embed comment feature by clicking on the number of comments link found at the bottom of each post. Notice that the post will now be displayed along with the embed a comment form below the post


Troubleshooting
As there are many variations amongst templates neither of these options may work in which case try this solution from Blogger Buster:

Find: <b:include data='post' name='comments' />

Immediately below this line add the following line:
<b:include data='post' name='comment-form'/>


In this tutorial I have shown you how to add the embed comments form into your custom Blogger template if it is missing so that visitors can comment easily.

Related Articles
Embed a Comment Form in Your Blogger Posts

Choose Your Own Blogger Post Date

In this tutorial I will show you how to set a different date from the actual date when posting to your Blogger Blogspot blog and discuss some of the benefits and uses of setting a different date.

Benefits of Setting a Different Date
Blogger permits a Blogger webmaster to set any publication date for a post they choose. This flexibility means that when you publish your entry it can be published retrospectively, in the here and now or for a future date. There are a variety of reasons for setting a particular publishing date for a post:

Set a Retrospective Publication Date
Some examples of situations where you may find it useful to set a post to a retrospective date are:

In order to keep continuity with a sequence of articles. You might use this feature if you forget to post an article in a sequence or decide afterwards to add an extra article to the sequence.

Another application for the retrospective date feature is to create a page such as an About page and attribute a specific date to it. I have gone back and written an About page on several of my blogs long after I have set them up. It is possible to go back several years if you wish. I would recommend setting the date of your About page to prior to your first post so that it appears at the beginning of your feed.

Bear in mind when posting to a retrospective date that the post will still appear in your recent posts feed even though you set a date in the past. While this can be annoying at times it is not much of a problem unless you rarely post to your blog.

Set a Future Publication Date
It is very handy to set a future publication date for your blog entries. One obvious time is when you go on vacation and want to stagger the publication of posts you have already written. Blogger allows you to set up your posts to be published on a specified date and time simply by setting a future date and time.

If you write a lot of articles about a particular theme it can be very useful to publish them in a set sequence. Blogger will allow you to set a future date for each article so that they can be published in the sequence you have chosen. For instance you might have written 7 articles on a theme and wish to publish them every 2 days over two weeks. Blogger will allow you to choose a future date for each of the articles and schedule them for publication on that user defined date and time.


How to Set a User Defined Publication Date

1. Create a post for your Blogger blog as usual

2. Click on the Post Options link found at the bottom left corner of the Compose box and directly above the Publish Post button

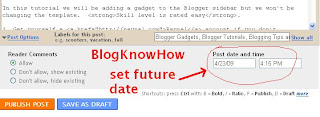
3. Set the specified date and time you wish your post to be published on

Set date options for Blogger posts
4. Click on the Publish Post button

If you have set a retrospective date your post will be published immediately and you will be able to view it in your blog archives.

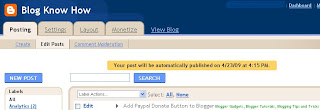
Scheduled Blogger Post Message
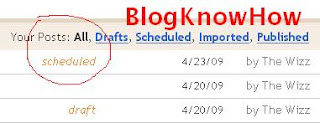
If you set a future date your post will be scheduled for publication. Click on the link to Edit Posts and view your post in the list. It should be at the top of the list. Notice that it will marked "scheduled" in red. When the exact date and time set is arrived at Blogger will publish your post automatically.

Blogger identifies posts as scheduled in Edit Posts list

In this tutorial I have discussed reasons why you might choose to set your own user defined post date for your Blogger posts. I have also shown you how to go about setting a different post date through the Post Options feature in Blogger.

Add Paypal Donate Button to Blogger

If you want to make a few bucks from all the hard work you are putting into your Blogger blog then consider adding a Paypal donate button to your Blogger blog (Blogspot blog).

Paypal Donate ButtonAdding a donation button will encourage all those happy readers to say a big thank you for helping them out. Not everyone will donate but you will get the odd generous soul who will willingly donate some chump change to shout you a coffee.

In this Blogger tutorial we will be adding a gadget to the Blogger sidebar or alternatively you could place it in the foooter of your Blogger template. We will be using a widget to contain our Paypal Donate Button and will not be changing your Blogger template. If you wish to place the donate button into your Blogger posts see the end of this Blogger tutorial for details.

Skill level is rated easy.

How to Add a Paypal Donate Button to Blogger (Sidebar or Footer Gadget)
Note: Updated on January 20 2012 to take account of new Paypal interface

1. Get yourself a Paypal account if you don't already have one

2. Login to your Paypal account

3. Click on the Merchant Services tab

Select Paypal Merchant Services Tab
4. Choose Donations from the list of key features displayed in the right sidebar of the PayPal Website Payments Standard Option (first of 3 payment solutions)
Note Paypal have changed its interface. You now need to select PayPal Website Payments Standard from Merchant Services drop down and then under the buttons in option 1 you will see in pretty tiny writing I must say "There are also buttons for donations and gift certificates." Click on donations.

Select Donations link in Paypal from Paypal Website Payments Standard Options 1 to add a donations button to Blogger Blogspot blog

5. From the Paypal Create a Donation Button screen choose Create Your Button Now link (one of two).


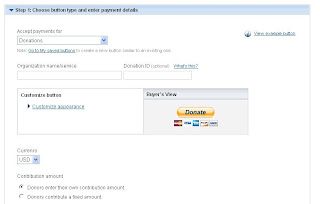
6. Stick with the default button unless you wish to customize it

7. Choose your currency depending on your needs and location

8. Choose Donors enter their own contribution amount radio button unless you want to have a set amount

Paypal Create Button Steps
9. Ensure the Secure Merchant ID radio button is selected. This will prevent spammers getting hold of your email address

10. At Step 2 it is worth saving your button

11. At Step 3 Customize your checkout page by allowing donors to write a short comment by selecting the Yes radio button to special instructions to seller

12. Select the No radio button for Customer's Shipping Address

13. Select the Create Button button

14. Once Paypal creates the donate button code copy it by right clicking your mouse and choosing copy

15. Logout of Paypal

16. Login to Blogger if you are not already logged in

17. Go to Design > Page Elements

18. Click on the Add a Gadget link in the sidebar

19. Choose HTML/Javascript widget from the list provided

20. Paste the button code into the Content box of the dialog box that appears by placing the mouse inside the box and right clicking the mouse and then paste

21. Select a title like "Shout Me a Coffee Today!" or whatever you would like

22. Click on the Save button

23. Drag and drop your new donation gadget into the spot you want it to appear in

24. Click the Save button to ensure your changes are saved

25. Click View Blog to see your new donate button in the sidebar of your Blogger blog

26. Click on your new donate button and you will be taken to the Paypal Checkout screen

Paypal Checkout screen

Tips and Troubleshooting

  1. To Add a Paypal Donate Button to Blogger Posts
    The following instructions will add a Paypal Donate button to all new Blogger posts. Note previous posts will not be changed. You will need to hard code the button into your Blogger template to have the Paypal Donate button added to every Blogger post. (Please ask if you need help with this)

    1. Follow the directions (steps 1-16) as above to get your Paypal button code
    2. In Blogger go to Settings > Formatting
    3. Paste the Paypal Donate Button code into the Post Template box
    4. Save changes
    5. Click on New Post to see that the code will be automatically inserted at the foot of each new post. (you will need to be in Edit Html mode to see the code)

  2. To Add a Paypal Donate Button to Individual Blogger Posts
    1. Follow the directions (steps 1-16) as above to get your Paypal button code
    2. In Blogger go to the post you wish to insert the button code into
    3. Insert the button code taking care to change all instances of double quotes to single quotes
    4. Save post and publish as normal. (If you have trouble with the preview post button in the old editor in Blogger click on compose and then edit html)


This Blogger tutorial has walked you through the steps needed to add a Paypal donate button to your Blogger blog (Blogspot blog) including how to configure your Paypal button at Paypal. I have covered adding the button as a sidebar gadget or footer gadget or alternatively added to Blogger posts. Have fun!


Related Posts
List of Blog Know How Tutorials for Blogger Blogs
Tips for Adding Google Adsense to Blogger
Better Placement of Google Adsense in Blogger
Add Google Adsense to a Blogger Header
Bloggers Guide to Google Adsense Myths
Add Google Adsense or Banner Above Blogger Header
Blogger Guide to Better Google Adsense Placement
Make Money with Adsense Keywords and Blogger
Make Money By Adding Banner Ads to Your Blogger Blog
5 Easy Ways to Make Money from Blogger
Add Chitika Ads to Blogger Blogspot
Make Money Add an Amazon Widget to Blogger
Add Amazon Product Links to Blogger Posts