Popular Posts

Showing posts with label Search Engine Optimisation. Show all posts

Increase Google Page Rank Blogger Blogspot

Today I continue my series of articles on search engine optimization SEO for a Blogger Blogspot blog. The focus of this article is on increasing the Google Page Ranking of your Blogger Blogspot blog. If your blog is like mine and relatively new you will find getting off the lowest rung of the Google Page Ranking a bit of a mission but it can be done particularly if you use solid SEO techniques.

To recap search engine optimization is the process of making your website search engine friendly. As major search engines like Google and Yahoo will drive most of the traffic to your blog the more search engine friendly your blog is the more traffic you are likely to receive.

There are a number of SEO - search engine optimization techniques you can employ on your blog to boost traffic such as adjusting titles tags, making use of meta tags, using keywords and keyword phrases, improving keyword density, submitting your blog sitemap to search engines. I have discussed these in detail in my article SEO Tips for Blogspot Blogger blog.

I have already written a number of other articles about SEO for Blogger Blogspot blogs too including the following articles so if you want help with basic search engine optimization try these:

How to Create Search Engine Friendly Permalinks for Blogger
Add Breadcrumb Navigation to Blogger Blogspot Blog
Add Meta Tags to Blogger Blogspot Blog for Better SEO
Adjust Blogger Title Tags for Better SEO
How to Add a Blogger Sitemap to Major Search Engines
Submit You Blogspot Blog to Yahoo
Add Blogger Sitemap to MSN Live
10 Tips to Build Traffic for Blogspot Blogger Blog

Once you've started employing these SEO (search engine optimization) techniques and tips you are going to want to measure your blog's progress. Two important tools that measure the popularity of websites are Google Page Ranking and Alexa Ranking.

Improve the Google Page Ranking of Your Blogger Blogspot Blog
Google Page Ranking is a tool which ranks websites listed in the Google search engine. Websites are ranked on a scale of 0-10 with 0 being the lowest possible score for a site and 10 the highest. The higher the page ranking of your site, the greater the amount of traffic it receives in comparison to other sites. Check your Google Page Rank.

Google uses a complex formula to rank websites which I am not going to cover here. However there are some basic tips about Google Page Ranking that are useful for any Blogger webmaster to know.
  1. Make sure your posts are keyword rich.
    Google expects good usage of keywords so make sure your Blogger blog posts have a density of 3-5%. Keyword density is calculated by the number of keywords divided by the number of total words on a page. If your blog article is 500 words long and has 10 keywords it has a keyword density of 2%. A keyword density of anywhere between 2% and 7% is considered an acceptable range by Google. Anything percentage higher than 7% may well be regarded as keyword stuffing and your blog is likely to be penalized. You can check the keyword density using tools like

  2. Post to your blog frequently
    Make sure you post frequently as Google prefers fresh pages and does not like out of date sites

  3. Create internal links
    Link to previous articles you have written. If you have not cross linked as you posted it is probably worth going back and doing this even if it is a bit arduous.

  4. Build external links to other sites on an ongoing basis
    Build links on a regular basis by commenting on other related blogs and in forums. Add social bookmarking buttons to your blog to encourage readers to bookmark and share your articles. Be aware though that many sites such as Reddit, Digg and del.icio.us implement the link attribute rel="nofollow" which will not boost your ranking.

    Ensure your blog is properly indexed by major search engines. List your blog in blog directories. Watch out for blog directories though as some require you to put a link on your blog but do not reciprocate with a link. See my article on getting listed in blog directories for further help.

    It is worthwhile to link to other blogs you may own as well but doing this will not boost your page ranking particularly. Google is weighted to give a higher ranking to links from other high ranking blogs especially if they are relevant to the content of your blog. The higher the ranking of the site externally linking to yours the better. So essentially you can't just create a bunch of blogs and link to them with the expectation that your Google Page Rank will miraculously increase overnight. Far better to spend your time concentrating on creating a small group of links to quality sites with a high Google Page Rank than going all over the net creating links to low ranking sites.

  5. Another aspect to consider when building quality external links is to ensure that your keywords and phrases appear in links which point to your site. Google analyzes these links so have the linking text contain your keywords to get the most out of them.

Check the Ranking of Your Blogger Blogspot Blog in Alexa
Alexa.com is a website that measures the traffic levels of websites. An Alexa rank is measured according to the amount of users visiting your website with the Alexa toolbar installed and takes into account page views, number of users and three months of historical data.

The Alexa rank is measured according to the amount of users who’ve visited a website with the Alexa toolbar installed. This is kind of an odd way to measure traffic but that is how it works. However it is a well established measure of the value of your site against others so it is useful to see how highly your blog is rated in Alexa. Provided your blog has been around a month or two you can check out how your blog is ranked by visiting Alexa's site info page
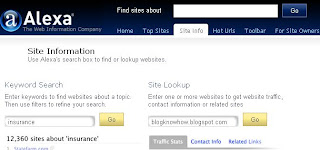
Visit Alexa Site Info Page to check the rank of your Blogger Blogspot blog

Alexa supplies you with statistics and information about your blog's traffic and ranking in handy graphical format


If you want your Blogger Blogspot blog to improve its Google Page Ranking concentrate on building quality external links. Google likes it when your site is getting linked to by other sites. The more the content is related the better. In this article I have given you some pointers about how to boost the Google Page Ranking of your Blogger Blogspot blog. If you have time let me know how you get on. Particularly how quickly you got off the Google Page Rank of 1 and how you did it. I'm sure other readers would be interested too.


Related Articles
List of Blog Know How Tutorials for Blogger Blogs
Blogger Blogspot SEO Tips and Tricks
How to Create Search Engine Friendly Permalinks for Blogger
Add Breadcrumb Navigation to Blogger Blogspot Blog
Add Meta Tags to Blogger Blogspot Blog for Better SEO
Adjust Blogger Title Tags for Better SEO
How to Add a Blogger Sitemap to Major Search Engines
Submit You Blogspot Blog to Yahoo
Add Blogger Sitemap to MSN Live
10 Tips to Build Traffic for Blogspot Blogger Blog
Get Your Blogger Blogspot Blog Listed in Blog Directories

Add Breadcrumb Navigation to Blogger Blogspot

One way you can improve navigation of a Blogger blog (Blogspot blog) is to add breadcrumb navigation to your Blogger blog. There is also a SEO benefit of installing a breadcrumb as major search engines like Google treat anchor text links as important. In this Blogger tutorial I will guide you through the steps to add breadcrumb navigation to a Blogger blog (Blogspot blog).
Whether you are using a custom template or a default Blogger template breadcrumb navigation can be added. It is not difficult and I have updated these instructions on December 4, 2010 to take account of the new generation of default Blogger templates eg Simple.

What Will a Breadcrumb Do on My Blog?
Adding a breadcrumb to your blog provides a form of text-based navigation. A breadcrumb displays the visitor's location within a blog. The advantage of a breadcrumb is that it provides shortcuts to enable visitors to quickly get around your blog by jumping from one part of your blog to another.

To illustrate how adding a breadcrumb would work in your blog let's use an example. A breadcrumb for an individual post would follow this format:

Home > Label > Post Title

Using this post as an example a breadcrumb might be Home > Navigation > Add a Breadcrumb to Blogger Blogspot Blog. In cases where there is more than one label this hack uses the last label listed. If a visitor wanted to look at other posts about navigation all they need do is click on the "Navigation" link in the breadcrumb and they will be taken to a page which will show them all the posts with the "Navigation" label.

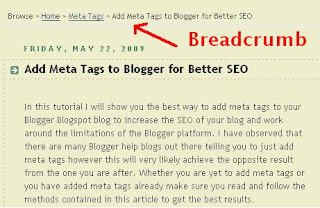
Breadcrumb navigation makes it easy to move around your Blogger Blogspot blog
SEO Benefits of a Breadcrumb
Apart from improving the navigation of your Blogger blog adding a breadcrumb also has SEO benefits. Anchor text such as labels tells search engines about the subject of the linked page. Search engines view a breadcrumb with a text link to relevant keywords in the post as important. Read more about SEO try the following articles:

Blogger Blogspot SEO Tips and Tricks
Add Meta Tags to Blogger for Better SEO

How to Add a Breadcrumb Navigation to your Blogger Blog
It is not difficult to add a breadcrumb to your blog but it does involve adding a snippet of code to your template. Below is a step by step walkthrough which I have aimed at beginners so that anyone reading my blog will be able to follow the instructions. Credit to Hoctro for this hack.

1. Login in to Blogger if you are not already logged in

2. Navigate to Design > Edit HTML

3. Back up your blog using Download Full Template as a precaution in case you accidently overwrite some code and are not able to retrieve it.

4. Check the Expand Widget Template box

5. Add the following CSS code above this line ]]></b:skin>

.breadcrumbs {float: left;width: 590px;font-size: 11px;margin: 5px 10px 20px 10px;padding: 0px 0px 3px 0px;border-bottom: double #EAEAEA;}

Once your breadcrumb is working modify this if you need to so that it blends with the look and style of your template.

6. Find this line of code <b:includable id='main' var='top'>

7. Older XML Blogger templates and custom templates replace the entire block of code below. If you are using the new generation of Blogger templates such as Simple look for alternative instructions further down in this Step)

<b:includable id='main' var='top'>
<!-- posts -->
<div class='blog-posts hfeed'>
<b:include data='top' name='status-message'/>
<data:adStart/>


with

<b:includable id='main' var='top'>
<!-- posts -->
<div class='blog-posts hfeed'>
<!-- disable default status message
<b:include data='top' name='status-message'/>default status message disabled -->
<b:include data='posts' name='breadcrumb'/><data:adStart/>


Update 4 December 2010. Note: if you are using the new generation of Blogger templates eg Simple then do the following instead

Find this code block and add the code in red between <div class='blog-posts hfeed'> and <data:defaultAdStart/>

<b:includable id='main' var='top'>
<b:if cond='data:top.showPlusOne'>
<script expr:src='data:top.plusOneJsUrl'/gt;
</b:if>
<!-- posts -->
<div class='blog-posts hfeed'>
<!--Breadcrumb Hack - disable default status message
<b:include data='top' name='status-message'/>default status message disabled -->
<b:include data='posts' name='breadcrumb'/>

<data:defaultAdStart/>

8. Now immediately before <b:includable id='main' var='top'> paste the following large block of code:


<b:includable id='breadcrumb' var='posts'>
<b:if cond='data:blog.homepageUrl == data:blog.url'>
<!-- No breadcrumb on front page -->
<b:else/>
<b:if cond='data:blog.pageType == "item"'>
<div class='breadcrumbs'>
Browse » <a expr:href='data:blog.homepageUrl' rel='tag'>Home</a>
<b:loop values='data:posts' var='post'>
<b:if cond='data:post.labels'>
<b:loop values='data:post.labels' var='label'>
<b:if cond='data:label.isLast == "true"'> » <a expr:href='data:label.url' rel='tag'><data:label.name/></a> </b:if> </b:loop>
» <span><data:post.title/></span> </b:if> </b:loop> </div>
<b:else/>
<b:if cond='data:blog.pageType == "archive"'>
<div class='breadcrumbs'>
Browse » <a expr:href='data:blog.homepageUrl'>Home</a> » Archives for <data:blog.pageName/> </div> <b:else/>
<b:if cond='data:blog.pageType == "index"'>
<div class='breadcrumbs'>
<b:if cond='data:blog.pageName == ""'>
Browse » <a expr:href='data:blog.homepageUrl'>Home</a> » All posts <b:else/>
Browse » <a expr:href='data:blog.homepageUrl'>Home</a> »
Posts filed under <data:blog.pageName/>
</b:if> </div> </b:if> </b:if> </b:if>
</b:if>
</b:includable>

9. Click on Save Template button

10. Click View Blog and navigate to any post page to see your new breadcrumb in action

Add a Breadcrumb Based on Archives
Follow this hack provided by Purple Moggy if you would like to add a breadcrumb based on year and month. Likely format would be: Home > Year > Month > Blog Title

Tips and Troubleshooting
Some browsers have problems displaying the code above. If experience any issue then use the code in this link Add Breadcrumb Navigation to a Blogger Blog


In this Blogger tutorial you have learned how to add breadcrumb navigation to your Blogger blog (Blogspot blog) to improve SEO and site navigation. Please let me know how you get on. Good luck!


Related Articles
List of Blog Know How Tutorials for Blogger Blogs
Blogger Blogspot SEO Tips and Tricks
Add Meta Tags to Blogger for Better SEO

Blogger Blogspot SEO Tips and Tricks

Want to improve SEO on a Blogspot Blogger blog? This tutorial discusses how bloggers can optimize their blog using SEO techniques to improve indexing of their Blogger Blogspot blog and achieve a better ranking in search engine results.

In this article I will be discussing the following Blogger help tips for SEO:

  • Adding Your Blogger Blog to Major Search Engines
  • Optimizing Blogger Post Titles
  • Utilising Meta Keywords and a Meta Description
  • Using Keywords in Alt Tags and Image Titles
  • Using Target Keywords in Your Post Content
  • Optimizing Blogger Title Tags
  • Optimizing Your Blogger Permalinks
  • Making Use of HTML Heading Tags Within Posts and Post Titles
  • Adding Breadcrumb Navigation to your Blogger Blog

Get Your Blog Listed by Major Search Engines
Add Your Blog to Yahoo and Submit your SitemapGetting listed in the major search engines is a must if you want to get traffic from search engines. I have written several in depth articles about how to add a sitemap to major search engines and how to add your blog to Google, Yahoo and MSN so I will not repeat myself. Follow these articles for step by step walkthroughs

Optimize Your Blogger Post Titles
Major search engines lend a lot of weight to titles so it is important that you craft your post titles carefully. To optimize your post titles make them keyword rich and ensure the title clearly explains what the blog post is about. Try to put your keywords at the beginning of your title for best results and avoid repeating your keywords within the title. Avoid long titles as Google only displays about 65 characters in the search results anyway.

Title tags are important if your Blogger blog is to attract traffic and rank in search engine results. On your blog home page the blog title appears between the title tags while on each individual post page it is the name of the article itself. While the title tags themselves are unseen by the visitor to your blog they are read when search engines crawl your blog.

Search engines use title tags to display your post title as a headline in search engine results. Search engines also display a description of the article either by extracting it from the post content usually by picking up the first 150 characters of your post or by reading the meta description of the post if one exists.

Meta descriptions can be crafted for individual posts in Blogger to good effect. Make descriptions unique for each post and ensure they contain your target keywords and keyword phrases to encourage search engines to extract snippets from them. To find out more about adding a meta description to an individual post please see my article Adding Meta Tags to Blogger Blogspot Blog for Better SEO


Add Meta Tags and Blog Description to Blogger
Adding meta keywords and a blog description to your Blogger Blogspot blog can boost your rankings by helping visitors locate your blog using keyword and keyword phrases. To find out the best method of inserting these into your Blogger blog please refer to my article about Adding Meta Tags to Blogger Blogspot Blog for Better SEO


Use Keywords in Alt Tags and Image Titles
Optimize the images used on your blog by making use of the alt tags and image titles. For some tips on SEO and images please refer to 10 Tips to Build Site Traffic for a Blogspot Blog


Use Target Keywords in Your Post Content
Know Your Blogger blogs keywordsMake sure you know your targeted keywords and use them within your post content. One of the factors in determining rankings is the relevance of the targeted keywords in relationship to the text that appears in the post content.


Change the Order of Post Title and Blog Title for Better SEO
One key change you can make to Blogger that will markedly improve the SEO of your blog is to adjust the title tags.

By default Blogger title tags are not optimized for search engines. The name of the blog appears before the name of the article which is not search engine friendly. Since search engines read left to right and give preference to what appears first having your blog name display before your post title is significant. To improve SEO it pays to adjust the order of title tags so that the your post title appears first:

Blog Title | Post Title

to

Post Title | Blog Title

To find out how to adjust the title tags of a Blogger Blogspot blog please refer to my article Adjust Blogger Title Tags to Improve SEO


Optimize Your Blogger Permalinks
Hand in hand with a title tag is the permanent permalink that is created when a post is published. If the title of the post is more than about 35 characters long you will strike problems with Blogger because it will shorten the title to a 35-40 character permalink. Some very ugly results happen because of this factor. For instance imagine a permalink such as:

http://blogknowhow.blogspot.com/2009/02/how-to-create-improved-permalinks-for.html

A totally useless permalink results because the blogger keyword has been left off. Learn more about crafting titles and working around the limitations of Blogger permalinks in my article How to Create Search Engine Friendly Permalinks

Optimize Blogger Blogspot Blog Permalinks

Improve SEO by Making Use of Headings for Post Titles
Heading tags are important for optimal SEO. Most Blogger.com templates use html header tags sized <h2> or <h3> for the post title. In the past major search engines like Google gave precedence to tags with <h1> ahead of anything else but how important <h1> tags are today is less certain. You could tweak the heading size of your post title if you wish however take care to ensure the look of your template isn't compromised. A bigger font will result and this may mean other parts of your blog will need to be adjusted to compensate. To find out what size your blog title is look for the following lines in your template.

<b:if cond='data:post.title'>
<h3 class='post-title entry-title'>
<b:if cond='data:post.link'>
<a expr:href='data:post.link'>&t/a>
<b:else/>
<b:if cond='data:post.url'>
<a expr:href='data:post.url'></a>
<b:else/>
<data:post.title/>
</b:if>
</b:if>
</h3>
</b:if>

As can be seen this template blog title is in <h3>. To change the size of the tags just substitute the appropriate header tag where <h3> appears


Improve SEO By Making Use of Heading Tags Within Posts
Heading tags can be used to good effect in your posts. Make sure you have only one <h1> heading per page if you have one at all and reserve this for your post title. Make use of <h2> and <h3> headings throughout your post to emphasize key points and targeted keywords. Major search engines do take notice of <h2> and <h3> headings when crawling your blog. To add emphasis to a heading within your blog simply enclose the heading in <h3> tags.


Add Breadcrumb Navigation to your Blogger Blog
There is a hack that can be used to add breadcrumb navigation to a Blogger Blogspot blog. Adding breadcrumb navigation can boost your SEO of your blog as well as improving how readers get around.

Add Breadcrumb Navigation to Blogspot Blogger blog for Better SEO
A breadcrumb provides text-based navigation by displaying the visitor's location within a blog. A breadcrumb provides shortcuts to enable visitors to quickly get around your blog and jump from one part of your blog to another. For example a breadcrumb for a post about meta tags would be Home > Meta Tags >Add Meta Tags to Blogger for Better SEO. An anchor text such as 'meta tags' tells search engines about the subject of the linked page. Search engines view a breadcrumb with a text link to relevant keywords in the post as important.

To find out how to add a breadcrumb navigation to your Blogger Blogspot blog please refer to my article Add Breadcrumb Navigation to a Blogger Blog


This article has focused on providing you with solid Blogger SEO advice, tips and tricks for the Blogspot Blogger. It will help you achieve good SEO results for your blog. Good luck. If you have time let me know about your experiences.


Related Articles
List of Blog Know How Tutorials for Blogger Blogs
10 Tips to Build Site Traffic for a Blogspot Blog
Add Breadcrumb Navigation to Blogger Blogspot Blog
Add Meta Tags to Blogger Blogspot Blog for Better SEO
How to Add a Blogger Sitemap to Major Search Engines
Submit a Blogspot Blog Sitemap to Google
Submit You Blogspot Blog to Yahoo
Add Blogger Sitemap to MSN Live

How to Add a Subtitle to Blogger Posts

This Blogger tutorial shows you how to easily and quickly add a subtitle to your Blogger posts (Blogspot posts) so that both search engines and readers will have more information about your post. I also discuss the benefits of adding subtitles to Blogger articles. This is an easy tweak to your Blogger blog that anyone can carry out in a couple of minutes.

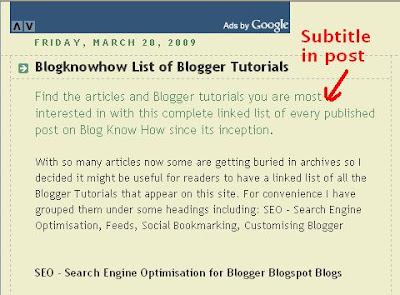
blogger Blog with Subtitle Under Post for Emphasis and Search Engine Friendliness

Benefits of Using Subtitles in Posts
Adding a subtitle which appears below the title of your post can be both eye catching and informative. For instance a titling schema for this post could be:

Title: Add a Subtitle to a Blogger Blog

Subtitle: Make Your Posts More Search Engine Friendly and User Friendly

If you craft your titles and subtitles carefully you will encourage more targeted readers of your blog as they will be able to see at a glance what your post is about rather than reading the whole article. Your traffic therefore might be slightly less but they will be far more targeted to the content of your site resulting in a lower bounce rate.

If the subtitle you choose for your Blogger post is keyword rich then you are also improving your chances of gaining a higher position in search engine result pages because search engines give added weight to headings and to text early on in an article. By adding a subtitle to a Blogger post you have a SEO tool which if used effectively could result in more visitors finding your site because of higher keyword density.

You can of course add a subtitle manually to each post and format it everytime. The advantage of this method over doing it manually though is that all the formatting is in the stylesheet section of your template so you only have to change the colour scheme and font variables in one location and Blogger will look after the rest. Any change will be reflected in each and every post that has the subtitle <div> tags.


How to Add a Subtitle to Blogger Posts
This tutorial guides you through the steps to take to add a subtitle to your Blogger blog. The trick requires only takes a few short minutes and requires only a small snippet of code to be added to your template. Provided the instructions are followed anyone can do this including beginners and new bloggers. Interestingly it is not widely known or written about in technical blogs that a subtitle can be added to your Blogger Blogspot blog posts yet the advantages are considerable.

1. Log in to Blogger and navigate to Design > Edit HTML

2. Find the </b:skin> tag in your template. If you are have difficulty finding it use CTRL + F to bring up the Blogger toolbar at the bottom of your blog and enter the tag </b:skin> into the search box on the toolbar

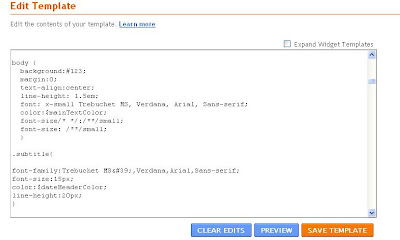
3. Copy and paste the code below into your template making sure that it appears before the </b:skin> closing tag.

.subtitle{
font-family:Trebuchet MS',Verdana,Arial,Sans-serif;
font-size:15px;
color: #ca1717;
line-height:20px;
}

Add a Subtitle to a Blogger post - edit template and customise if desired

Update November 14, 2010. This code inserts a subtitle in red. You will need to change this color to match your template. See later in this post for information on how to add styling or change the color of the subtitle. If you wish to use a known variable as shown in the above image you can. color: $dateheadercolor; could be used for example provided this variable had already been declared in the variables section of the template.

4. Save Template

5. Go to the post you wish to add a subtitle to by clicking on the Posting tab and then the Edit Posts link.

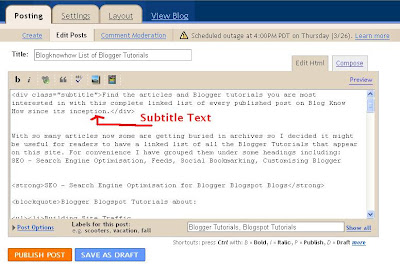
6. Copy and paste the following code into your post ahead of any other text.

<div class="subtitle">Subtitle Text. Please Substitute for your own text</div>

Add a Subtitle to a Blogger Post

7. Substitute your own text between the <div> tags

8. Navigate to Settings > Formatting and under the last option Post Template enter the following into the box:

<div class="subtitle"></div>

This will mean that every time you create a post you will have the tags appear automatically. All you need do is place the text of your subtitle between the tags. If you don't want to use a subtitle for a particular post just delete the tags.

9. Save Changes to Post and click on View Blog to admire your new subtitle.

blogger Blog with Subtitle Under Post for Emphasis and Search Engine Friendliness

Customizing the CSS Styling of a Blogger Subtitle
It is easy to customize your subtitle for a different font type, color and size. Just change the code you added before the </b:skin> tag. If you want a specific color for instance you could change the color I have chosen for another color, increase the font size, and change the font face to Times Roman for instance. Thus your code would become something like this:


.subtitle{

font-family:Georgia, "Times New Roman", Times, serif;
font-size:16px;
color:#ff6600;
line-height:20px;


This Blogger tutorial has shown you how to add a subtitle to your Blogger posts (Blogspot posts) quickly and easily. I have discussed the benefits of inserting a subtitle feature on a Blogger blog including how this might assist search engines to correctly index your blog articles. I have also shown you how to customize your subtitle to your own individual requirements using CSS styling


Related Posts
List of Blog Know How Tutorials for Blogger Blogs

Submit a Blogger Sitemap to Major Search Engines

If you haven't submitted your Blogger website and sitemap to the major search engines yet this article will help you through the process. Submitting your Blogger (Blogspot) blog to the two most popular search engines Google and Yahoo is a must if you want your site crawled and indexed quickly and, of course, to receive visitors. You may also want to cast your net a little wider. If so there are a couple of other search engines worthy of note that you may not have even considered. This article explores the steps involved in submitting your blog and sitemap to 5 major search engines: Google, Yahoo, MSN Live Search, Moreover.com and Ask.com


Submit Your Site and Sitemap to Google
For a step by step walkthrough of how to submit your Blogger blog to Google, verify your site and add a sitemap please refer to my article Submit Your Blogspot Blog Sitemap to Google

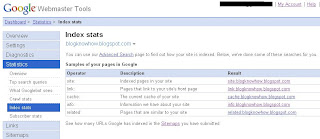
Google Webmaster Tools Index Stats Page

Submit Your Site and Sitemap to Yahoo
Yahoo has a fair share of the search engine market and therefore getting your Blogger blog crawled and indexed needs to be a priority. For an in depth discussion on how to submit your site, verify it and submit a sitemap to Yahoo Site Explorer please see my article Submit Blogspot Sitemap to Yahoo

Yahoo Site Explorer

Submit Your Site and Sitemap to MSN
You can now submit a sitemap directly to MSN at Webmaster Center. For detailed steps in submitting a Blogger site and sitemap to MSN Live Search please refer to my article Add a Blogger Sitemap to MSN Live Search

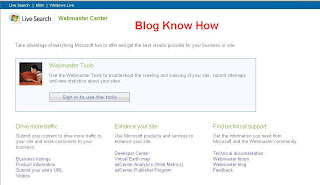
MSN Webmaster Center

Submit Your Site and Sitemap to Moreover.com
Historically submitting your Blog sitemap to Moreover.com expedited indexing in MSN because of a standing arrangement that Moreover would provide the submitted feeds to MSN for crawling and indexing. At the time of writing this article it is not clear if this is still useful as sitemaps can now be submitted to MSN directly. However, it can't do any harm so I suggest giving it a go.

To submit a sitemap to Moreover copy and paste the following line into your internet browser address taking care to replace yoursitename with the actual name of your site:

http://api.moreover.com/ping?u=http://yoursitename.blogspot.com/rss.xml

If all is well you will receive the following success message:

Moreover Sitemap Submission Success MessageSubmit Your Site and Sitemap to Ask.com
It is worth submitting your sitemap to Ask.com, previously known as Ask Jeeves. It is considered an important search engine and owns Excite, Bloglines, MyWay and iWon. Ask.com also is a participant in the Sitemaps Protocol Program.

It is easy to submit your Blogger sitemap to Ask.com. Simply copy (Ctrl + C command) and paste (Ctrl + V command) the following line into your internet browser address bar. Be sure to substitute yoursitename with the actual name of your site.

http://submissions.ask.com/ping?sitemap=http://yoursitename.blogspot.com/rss.xml

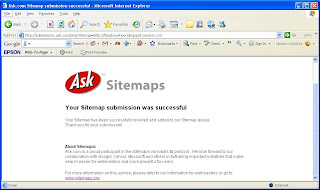
Provided there are no issues you will see the success screen:

Ask.com Sitemap Submission Success Screen

This article explored how to go about submitting your blog and sitemap to 5 major search engines: Google, Yahoo, MSN Live Search, Moreover.com and Ask.com

Related Posts
Submit Your Blogspot Blog Sitemap to Google
Submit Blogspot Sitemap to Yahoo
Add a Blogger Sitemap to MSN Live Search
10 Tips for Blogspot Bloggers on Building Site Traffic

Add a Blogger Sitemap to MSN Bing Webmaster Tools

How to add a Blogger Blog and Blogger Sitemap (Blogspot Sitemap) to Bing Webmaster Tools formerly MSN Live Search. Step by step instructions for Blogspot bloggers who want to improve search engine optimization of their blog.

Although Bing (formerly MSN Live Search) gets a fraction of search engine traffic compared to Google and Yahoo it is still worthwhile submitting your Blogger sitemap (Blogspot sitemap) and blog to Bing. The advantages of adding your blog to Bing is that you will learn more about how your site is crawled and what keywords visitors use to access your blog pages.

Updated 24 November 2010
Due to the significant changes to MSN Live Search (now Bing) and the Webmaster Center the instructions my original instructions are now out of date. I have written a completely new set of instructions (labelled new instructions) that you will find at the top of this blog post which covers how to add a Blogger Blog and Blogger Sitemap to Bing Webmaster Tools. I have chosen to leave the old instructions in place as they do explain how to add a rss feed or atom feed rather than the default posts feed if you prefer.

This Blogger tutorial covers the steps involved to add your Blogspot blog to Bing (MSN). Part One deals with how to add a site to Bing Webmaster Tools while part two takes you through the steps to add a Blogger sitemap to Bing Webmaster Tools. Both these tutorials are rated easy and can be performed by anyone using Blogger.

+++++++ NEW INSTRUCTIONS +++++++

How to Add a Blogger Blog (Blogspot Blog)to Bing Webmaster Tools

  1. Create an account or sign into Bing at MSN. If you have a hotmail account you will already have access to Bing Webmaster Tools

  2. Navigate to the Bing Webmasters Tools page


  3. Installing Skylight is purely optional. Silverlight is Microsoft's competitive product for Adobe Flash. Try it if you wish as it adds some extra functionality but for the purposes of this Blogger tutorial it is not necessary.

  4. From the Bing Webmaster home page click on Add Site

  5. Fill in the URL address of your Blogger blog eg blogknowhow.blogspot.com

    To add a Blogger blog to Bing fill in the URL address of your blog at Bing Webmaster Tools
  6. Click on Submit

  7. Your blog will now appear on the list of added sites under your Bing Webmaster account


  8. Click the Verify Site link at the right of your blog


  9. Choose Option 2 - Add meta tag to your default webpage


  10. Copy the meta tag code that appears in the dialog box by right clicking on it with your mouse and selecting copy. Keep the Bing Webmaster Tools window open as we will be returning


  11. Login to your Blogger account if not already logged in using a different browser window

  12. From the Dashboard go to Design > Edit HTML

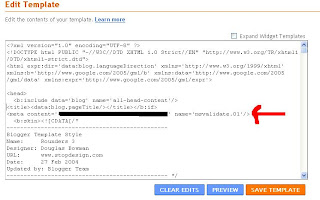
  13. Paste the code below the <head> tag and before <b:skin> and as early as possible

    For the new generation of default Blogger templates I suggest placing the code just below these two lines:

    <head>
    <meta content='IE=EmulateIE7' http-equiv='X-UA-Compatible'/>


    For earlier generations of default Blog templates and custom templates I suggest you place the Bing Webmaster meta tag after these lines:
    <head>
    <b:include data='blog' name='all-head-content'/>

  14. Click on Save Template

  15. Return to Bing Webmaster and click on the Verify button

  16. If successful your Blogger blog will be added to the list of sites. Information about your blog will show not available as it takes at least 48 hours to activate.


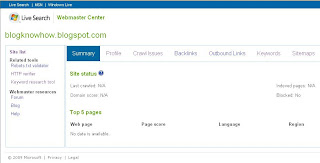
  17. Click on your blog and you will be taken to the site information screen. Notice the menu (bank of tabs) for easy navigation (as pictured). Use the dropdown menu to navigate between your blogs if you add more than one to Bing Webmaster.


How to Add a Blogger Sitemap (Blogspot Sitemap) to Bing Webmaster
  1. Sign in to Bing Webmaster if not already signed in

  2. Click on your Blogger blog from the list of sites

  3. Click on the Crawl tab from the top menu

  4. Click on Sitemaps from the menu on the left hand side


  5. An Add Sitemap dialog box will pop up. Enter the following URL of the default posts feed of your Blogger blog eg

    http://yourblogname.blogspot.com/feeds/posts/default

    Replace the yourblogname with the name of your blog


  6. Click on the Submit button

  7. If you have entered the details of your sitemap correctly you will now be presented with a added sitemap success screen


In this Blogger tutorial I have taken you through the steps involved in submitting a Blogger blog (Blogspot blog) to Bing Webmaster Tools (MSN). I have also shown you how to add a Blogger sitemap to Bing Webmaster Tools by using the default Blogger posts feed.


+++++++ OLD INSTRUCTIONS BELOW THIS LINE +++++++

Steps to Add Your Blog and Sitemap to MSN Live Search

1. Login to MSN Webmaster Center with a hotmail account if you have one otherwise you will need to sign up first.

MSN Live Search Webmaster Center Home Page
2. By default you will be taken to the Site List - Webmaster Tools page.

3. Click on Add a Site and enter the URL address of your site in the box provided

4. Enter the address of your sitemap in the box provided:

http://yoursitename.blogspot.com/atom.xml

Be sure to substitute yoursitename with the actual name of your site

5. Enter your email address if you wish MSN Live Search to contact you if it encounters problems

6. Sign up for periodic news updates if you wish otherwise uncheck the box

7. Click on the Submit button

8. Next you will be taken to the Authenticate Ownership of Website Page. You will be given two authentication options choose the Meta Tag Authentication Method by highlighting the code provided and copying it using Ctrl + C. Keep this browser window open as we will come back here.

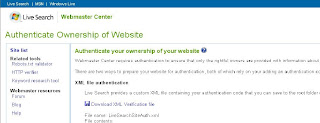
MSN Live Search Authenticate Site Page
9. In a new window of your browser login in to your Blogger blog and navigate to Layout > Edit HTML. It is a good idea to backup your template at this point in case you inadvertently overwrite some code. To backup your site Click on Download Full Template

10. Locate the <head> tag which will be about 5-10 lines from the top. You can paste the code anywhere in the head section. I suggest after this line:

<title><data:blog.pageTitle/></title>

Add MSN Live Search Authentication Code to Blogger Template
11. Save Template

12. Return to MSN Live Search Webmaster Centre and click on the Return to Site List button

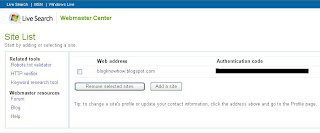
13. All going well you will now be able to see your Blogger website listed in the list of your sites

MSN Site List Page for Blog Know How
14. Click on your site and you will be taken to the Site Summary - Webmaster Tools page

MSN Live Site Summary Page for Blog Know How
15. It is now a matter of waiting for MSNBot to crawl and index your site. You will need patience as this is by no means a fast process. Don't forget to sign out of MSN Webmaster Tools.


For a quicker response you can also try submiting the sitemap of your blog to Moreover.com. Historically Moreover has provided the submitted feeds to MSN for crawling and indexing. I am not entirely certain this is still in force but it is simple to do so worth a shot I say. Simply copy the code below and paste it into your browser address bar

http://api.moreover.com/ping?u=http://yoursitename.blogspot.com/rss.xml

Be sure to substitute yoursitename with the actual name of your site

If successful you will receive the following message:

Thank you for your ping. The moreover database will be updated with the new data from your url - http://yoursitename.blogspot.com/rss.xml as soon as possible


Update 24 November 2010
This ping is no longer working. I suggest you try a ping service or blog and ping tool. If you search under "ping a blog" you will find there are lots of services available.


In this tutorial we have discussed in detail how to submit your Blogger Blogspot blog to MSN Live Search, authenticate your site and add a sitemap.

Related Posts
Submit a Blogger Sitemap to Major Search Engines
10 Tips for Blogspot Bloggers for Building Site Traffic
List of Blog Know How Tutorials for Blogger Blogs

Adjust Blogger Title Tags to Improve SEO

This Blogger tutorial explains how to improve search engine optimization (SEO) of your Blogger blog (Blogspot blog) by optimizing your post title tags for search engines like Google and Yahoo. How to improve search engine results by optimizing post title tags.

By default your Blogger blog (Blogspot blog) does not have search engine optimised title tags. This puts your blog at a disadvantage compared to other blogs that have inbuilt SEO or enhanced SEO modules as these sites are likely to be placed more highly in search engine results.

The title tags of your blog are ordered by blog name first followed by the title of the post. This is not ideal for popular search engines like Google and Yahoo which give more importance to the first words of a title. By way of example take a look at how the title tags of this blog were viewed in a browser before any SEO. Note the order of the tags: Blog Name | Post Name.

How Blogger Title Tags are viewed in an IE browser

When this site was first indexed by Google this is the search engine results this site received. Note how the blog name is first in all the results.

Search engine result for blogknowhow.blogspot.com before the tweak

Fortunately there is a simple tweak to your template which can rectify this problem. By simply reversing the position of the blog name and page title significant improvement can be gained in search engine results. See the difference in the example below:

How Your Blogger Title Tags are viewed in your browser with change

Follow the step by step guide below to achieve higher rankings in search engine results.

Tweak of Title Tags for New Blogger (beta) Blogs

1. Login to your blog at Blogger.com and navigate to Design > Edit HTML

2. Backup your template by downloading it to your computer. This will ensure that you can upload your template before these changes in case of problems.

3. Replace the following line of code (about 5-10 lines from the top):

<title><data:blog.pageTitle/></title>


with (highlight code, Ctrl + C to copy)

<b:if cond='data:blog.pageType == &quot;item&quot;'>
<title><data:blog.pageName/> |
<data:blog.title/></title>
<b:else/>
<title><data:blog.pageTitle/></title>
</b:if>

4. Click on Save Template and then View Blog. Navigate to an individual post. You will see that your page title is now first followed by your blog title. A pipe symbol separates the two.


Below is an example of the change in search engine results since the tweak was implemented for this site. Since optimising for search engine friendly page titles there has been a significant improvement in traffic accessing the site. This didn't happen right away but if you too implement this page title tweak and continue to deliver quality content you are on your way toward higher search engine rankings.

Blog Know How Search Engine Results in Google with Title Tags Tweaked

Troubleshooting
Several readers have reported issues with the line:

<b:if cond='data:blog.pageType == &quot;item&quot;'>


If you experience problems try inserting this line instead which works on many blogs. Ensure you have double quote marks around item followed by a single quote mark:

<b:if cond='data:blog.pageType == "item"'>


For more on this please read the comments section.

UPDATE
Due to the number of readers experiencing problems with their browsers reading this post I have created a PDF file of this article which is free to download

This Blogger tutorial (Blogspot tutorial) has discussed how to adapt the title tags of a Blogger (Blogspot) blog to improve search engine optimization (SEO) by Google,Yahoo and other search engines.

Related Articles
List of Blog Know How Tutorials for Blogger Blogs
Blogspot Blogger SEO Tips and Tricks

Submit Your Blogspot Sitemap to Yahoo

Yahoo Site Explorer Add My Site page
One of the most important ways to attract traffic to your site is to ensure that your Blogger (Blogspot) blog is properly indexed by popular search engines such as Yahoo. If you want to increase your chances of having your site quickly indexed by the Yahoo search engine it pays to submit your site and your feed. In this tutorial we will be covering the process of signing up with Yahoo, authenticating your site and adding your site feed to Yahoo Site Explorer.

Yahoo can be notoriously slow at indexing and will not necessarily include all crawled pages in its search results. For guaranteed inclusion you can opt for a paid service but if you follow the steps below you have a good chance of having your Blogger blog properly indexed relatively quickly and without any cost.

1. Sign up for a free Yahoo Account if you don't already have one.

2. Sign in to Yahoo Site Explorer where you will be taken to the MySites page.

3. Submit your Blogger website by entering the URL of your blog and then clicking on the Add My Site button.

Yahoo Site Explorer Add My Site
4. You will now see your website address included in the site list. The 3 columns to the right contain information about feeds, actions, and status. You will notice that the status of your site will be set to new (represented by a yellow circle). Click on the link to your site or click the Explore button.

5. You will be taken to the results page and should get a message like the one pictured below.

Yahoo site Explorer Results Page
6. From the menu on the left click on the Authentication

7. You will be presented with 2 authentication options. Choose Add a META Tag from the dropdown menu then copy the code provided using Ctrl + C.

8. In a new window of your browser login to your Blogger blog. Keep the window of Site Explorer open as we will be returning.

9. Navigate to Layout > Edit HTML in your Blogger (Blogspot) blog

10. When you arrive at the Template page it is a good idea to make a backup of your site's template as a precaution. Go ahead and download it your computer by clicking on the Download Template link. Remember if you inadvertently overwrite some code you may not be able to restore your template so it is worth taking an extra few moments to do this step.

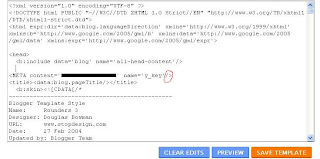
11. Once you have backed up your site locate the Head tag. It will be only a few lines of code down from the top. Now insert the copied code from Yahoo in the position suggested as shown in the picture below using the Ctrl + V command.

Blogger Template Head Tag
12. Once you have pasted the code into the template there is still one further action needed. You will need to add a trailing slash at the end of the new line of code to avoid getting a parse error. Once you have added the trailing slash and are certain you have placed the code in the correct position go ahead and click on the Save Template button.

add yahoo meta tag to blogger template
13. Return to Yahoo Site Explorer and follow the mysite link. You will see that the status of your site has been verified and is represented by a green checkmark.

14. From the lefthand menu select Feeds. You will be taken to the feeds page where you can go ahead and add a feed for your blog by entering the URL of the feed. Notice in the example below I have set an extra parameter to handle redirection of the feed by services such as Feedburner.

Add a Feed to Yahoo
15. Once the feed has been accepted it takes around 24 hours before it is active. After this time and provided there are no errors Yahoo displays "processed" followed by a green tick as can be seen in the picture below.

Yahoo Feed Confirmation
You have now completed the steps involved in having your Blogger (Blogspot) blog crawled and indexed by Yahoo. All that is left to do is to check back periodically to see if Yahoo has indexed your pages. This process can take time so don't expect overnight results. However once Yahoo recognises your feed your pages will be regularly crawled and any updates in content indexed. The process of adding a feed and verifying your site will have gone a long way towards ensuring your site is included in Yahoo search engine results.

Tips for Adding Blogger Blog to Yahoo Site Explorer
Tips for Submitting Your Blogger Blog to Yahoo
Yahoo Search Engine Optimisation for Blogspot Bloggers
SEO For Blogger Blogs with Yahoo
Faster indexing of your Blogger Blog by Yahoo
How to Ensure Your Blogger Blog is Indexed by Yahoo
Speed Up Indexing of Your Blogger Blog by Yahoo
Yahoo Search Engine and Blogger Blogs

In this tutorial you have learned how to submit your Blogger (Blogspot) blog to Yahoo Site Explorer by authenicating your site and adding a feed which Yahoo can use as a sitemap to improve its indexing of your pages.

Submit Your Blogspot Blog to Yahoo

Yahoo Site Explorer Add My Site page
One of the most important ways to attract traffic to your site is to ensure that your Blogger (Blogspot) blog is properly indexed by popular search engines such as Yahoo. If you want to increase your chances of having your site quickly indexed by the Yahoo search engine it pays to submit your site and your feed. In this tutorial we will be covering the process of signing up with Yahoo, authenticating your site and adding your site feed to Yahoo Site Explorer.

Yahoo can be notoriously slow at indexing and will not necessarily include all crawled pages in its search results. For guaranteed inclusion you can opt for a paid service but if you follow the steps below you have a good chance of having your Blogger blog properly indexed relatively quickly and without any cost.

1. Sign up for a free Yahoo Account if you don't already have one.

2. Sign in to Yahoo Site Explorer where you will be taken to the MySites page.

3. Submit your Blogger website by entering the URL of your blog and then clicking on the Add My Site button.

Yahoo Site Explorer Add My Site
4. You will now see your website address included in the site list. The 3 columns to the right contain information about feeds, actions, and status. You will notice that the status of your site will be set to new (represented by a yellow circle). Click on the link to your site or click the Explore button.

5. You will be taken to the results page and should get a message like the one pictured below.

Yahoo site Explorer Results Page
6. From the menu on the left click on the Authentication

7. You will be presented with 2 authentication options. Choose Add a META Tag from the dropdown menu then copy the code provided using Ctrl + C.

8. In a new window of your browser login to your Blogger blog. Keep the window of Site Explorer open as we will be returning.

9. Navigate to Layout > Edit HTML in your Blogger (Blogspot) blog

10. When you arrive at the Template page it is a good idea to make a backup of your site's template as a precaution. Go ahead and download it your computer by clicking on the Download Template link. Remember if you inadvertently overwrite some code you may not be able to restore your template so it is worth taking an extra few moments to do this step.

11. Once you have backed up your site locate the Head tag. It will be only a few lines of code down from the top. Now insert the copied code from Yahoo in the position suggested as shown in the picture below using the Ctrl + V command.

Blogger Template Head Tag
12. Once you have pasted the code into the template there is still one further action needed. You will need to add a trailing slash at the end of the new line of code to avoid getting a parse error. Once you have added the trailing slash and are certain you have placed the code in the correct position go ahead and click on the Save Template button.

add yahoo meta tag to blogger template
13. Return to Yahoo Site Explorer and follow the mysite link. You will see that the status of your site has been verified and is represented by a green checkmark.

14. From the lefthand menu select Feeds. You will be taken to the feeds page where you can go ahead and add a feed for your blog by entering the URL of the feed. Notice in the example below I have set an extra parameter to handle redirection of the feed by services such as Feedburner.

Add a Feed to Yahoo
15. Once the feed has been accepted it takes around 24 hours before it is active. After this time and provided there are no errors Yahoo displays "processed" followed by a green tick as can be seen in the picture below.

Yahoo Feed Confirmation
You have now completed the steps involved in having your Blogger (Blogspot) blog crawled and indexed by Yahoo. All that is left to do is to check back periodically to see if Yahoo has indexed your pages. This process can take time so don't expect overnight results. However once Yahoo recognises your feed your pages will be regularly crawled and any updates in content indexed. The process of adding a feed and verifying your site will have gone a long way towards ensuring your site is included in Yahoo search engine results.

Tips for Adding Blogger Blog to Yahoo Site Explorer
Tips for Submitting Your Blogger Blog to Yahoo
Yahoo Search Engine Optimisation for Blogspot Bloggers
SEO For Blogger Blogs with Yahoo
Faster indexing of your Blogger Blog by Yahoo
How to Ensure Your Blogger Blog is Indexed by Yahoo
Speed Up Indexing of Your Blogger Blog by Yahoo
Yahoo Search Engine and Blogger Blogs

In this tutorial you have learned how to submit your Blogger (Blogspot) blog to Yahoo Site Explorer by authenicating your site and adding a feed which Yahoo can use as a sitemap to improve its indexing of your pages.