Popular Posts

Add Outbrain Ratings Widget to Blogger

Outbrain provides a free and very stylish content recommendations and ratings widget which can be easily added to your Blogger Blogspot blog. In this tutorial I will discuss the benefits of Outbrain and also provide a step by step walkthrough of the process of adding an Outbrain widget to your Blogger blog and your Feedburner FeedFlare if you have burned your blog feed at Feedburner.

Outbrain Home Page
Benefits of Adding Outbrain to Your Blogger Blog
By adding an Outbrain content and ratings widget to your Blogger blog you will encourage visitors to record their reactions to a post they have just read. Along with features likes polls this is another good method of encouraging visitors to interact with your blog. Outbrain also makes it possible to display your most popular posts within the widget. In addition the Outbrain ratings widget may help drive more traffic to your blog when your visitors use the Recommended Posts feature which is embedded in the widget. By the same token it may also mean that the traffic doesn't stay long as visitors will be wooed away by recommended links so you will have to weigh up the benefits versus the costs for yourself. Outbrain also provides reports on widget activity

How to Add an Outbrain Ratings Widget to Blogger
1. Register at Outbrain. This is a simple sign up process that requires you to click on a confirmation email once you have requested sign up and filled out a simple form.

2. Once registered click on Get the Widget from the footer menu

3. Choose Blogger as your Blogging platform

4. Select the language of your widget if other than English which is the default

5. Click on Get the Widget button and Outbrain will automatically refer you to Blogger in a new window. Sign in to Blogger in the new browser window. Don't close the Outbrain window as we will be returning here.

Outbrain Get Widget page
6. Choose your blog from the drop down menu and click on the Add Widget button.

Add Outbrain Widget to Blogger
7. Navigate to Layout > Page Elements and reposition if necessary your new widget which will now be appearing in the sidebar of your blog. Save any changes you make.

8. Return to Outbrain in your open browser window and click on the click here link to verify your blog. You will receive a message verifying that you have claimed your blog

9. Click on the View Blog link in the menu tab section and view your new Outbrain widget in action.

Outbrain Ratings Widget as it appears at the bottom of a Blogger post


Note that once your readers start to rate your posts by clicking on them the stars will become yellow. 5 yellow stars is an excellent rating


Customizing Your Outbrain Ratings Widget
1. Return to the Outbrain window in your browser

2. Navigate to Manage Posts using the Sidebar Menu on the lefthand side

3. In the list of blogs you will see your blog listed. Click on the settings link

Outbrain Manage Blogs Screen
4. If you leave the default setting you will see recommended links appearing as pictured above in #9. If you don't want any recommendations you can set this to no.

5. If you have set up your blog with the idea of earning a little extra money you may choose to turn off sponsored recommendations. If you leave the radio button set to yes any proceeds from the sponsored links clicked on will go to charity. The charity sponsored can be selected via the drop down menu

6. Outbrain will show the most popular posts in the sidebar of your blog if this feature is enabled. To enable popular posts select the enable radio button.

7. Click on the Submit button


Adding Outbrain to Your Feedburner FeedFlare
If you already have a FeedFlare appearing at the footer of your burned Feedburner feed of your blog you can easily add Outbrain too. Check out my article on adding a Feedburner FeedFlare to Blogger if you are not sure what a FeedFlare is or how to add one to Blogger.

Go to Feedburner and choose your blog from the list of My Feeds. Select the Optimize tab and then FeedFlare from the lefthand sidebar menu. In the Personal FeedFlare section paste the following code (URL) into the text box:
http://widgets.outbrain.com/FeedFlareUnit.xml

and click on the Add New Flare button. Click on Save. Your readers will now be able to rate your blog straight from your Blogger feed.

Outbrain Troubleshooting Tips for Blogger Installation
  • When you install Outbrain on your blog resist the temptation to rate one of your posts as this vote can't be deleted once it is cast. Even when I tried uninstalling and reinstalling the widget the vote did not clear.

  • The Popular Posts feature takes a while to show any posts as it needs at least 2 visits before it will start rating the post

  • If you have other problems with Outbrain try this active Outbrain support forum for answers

In this tutorial you have learned how to install the Outbrain Ratings widget on your Blogger Blogspot blog and customize it. Also some of the benefits of the Outbrain widget were discussed along with a couple of Outbrain installation troubleshooting tips. If you have a moment let me know how you get on installing this widget. Don't forget to bookmark this post for easy reference.

Related Articles
Add a Feedburner FeedFlare to Blogger Feed

How To Delete a Blogger Blogspot Blog

I notice I get a lot of traffic to my blog from Blogger Blogspot webmasters searching for tutorials on how to delete their blog so this has prompted me to write this post about deleting a Blogger blog. As most of us are trying to get our blogs up and running this post may not be very useful for you right now however you may have occasion in the future to want to delete a blog so read on in case the day comes when you need to know what you do.

Why Might I Want to Delete a Blogger Blogspot Blog?
There a variety of reasons why you might decide to delete your blog. Here are some common ones:

You have set up a test blog and have now finished with it

You are unhappy with the name you have chosen for your blog and wish to change it. Please note you can change the name of your Blogger blogspot.com subdomain for another subdomain name provided the address is available on Blogger. Or you can change to a custom .com domain name and have Blogger redirect your blog traffic to your new address. You may want to consider these options first before proceeding with deletion)

You have tried blogging and it is not for you and you want to get rid of your blog all together

How to Delete a Blogger Blogspot Blog
1. Login to Blogger if you are not already logged in

2. From the Dashboard select the blog you wish to delete. Make sure you are in the right place if you have more than one blog

3. Navigate to Settings > Basic

4. If you think you may want to come back to your blog at a later date you can use the export tool to export your blog before you delete it. To export your blog click on Export Blog in the Blog Tools menu. If you aren't interested in exporting a copy of your blog to your home computer skip this step

blogger Basic Settings Configuration - Eport Blog - Delete Blog
5. Under the first heading Blog Tools click on the Delete Blog link

6. You will be taken to the Delete Blog screen in Blogger. Check again you have the right blog displayed by checking the name which should appear just above the row of menu tabs.

7. A warning message like the one pictured below will be displaying:

How to Delete a Blogger Blog

8. If you wish to proceed with the deletion then click on the Delete This Blog button

9. You will now be returned to the Dashboard. Notice that your blog is no longer displayed in the list of blogs. If you wish to view your deleted blog you can click on the Show All link at the bottom of the Manage Blogs list in the Dashboard

10. You will now be able to see your deleted blog including details of its deletion date. Follow the link provided to undelete this blog. Blogger allows you 90 days grace.

In this tutorial we have covered some basic reasons why you might want to delete a blog and the steps involved in actually deleting a Blogger Blogspot blog.

Add Missing Embedded Comments Form to Blogger

Today I will show you how to fix your Blogger template if the embedded comments feature is missing or not working. I decided to write this article because I have noticed that the embed a comment below the post feature is often not working in many Blogger custom templates available for download. This is usually because many of these templates were released prior to Blogger enabling embedded comments.

If you have downloaded a custom template that has embed a comment missing then read on as I will show you how to insert the code for embed a comment form into your template. Inserting code into a blog template can be challenging for some but if you follow these instructions it is not beyond even virtual beginners.

1. Login to Blogger if you are not already logged in

2. Navigate to Settings > Comments. Under Comment Form Placement make sure the Embedded below Post radio button is set. Save any changes you make.

In Blogger Settings Comments Set Comments to Embedded

3. Navigate to Layout > Edit HTML

4. I strongly recommend you back up your template by downloading it to your computer before proceeding

4. Check Expand Widget Templates

5. Use CTRL + F to bring up the Blogger Toolbar

6. Look for the following code block by entering <span class='paging-control-container'> into the find box on the toolbar. Note if you don't have this code look at the alternative option below #7 in this post

<b:if cond='data:post.commentPagingRequired'>
<span class='paging-control-container'>
<a expr:class='data:post.oldLinkClass' expr:href='data:post.oldestLinkUrl'>
<data:post.oldestLinkText/>
</a>
<a expr:class='data:post.oldLinkClass' expr:href='data:post.olderLinkUrl'>
<data:post.olderLinkText/>
</a>
 
<data:post.commentRangeText/>
 
<a expr:class='data:post.newLinkClass' expr:href='data:post.newerLinkUrl'>
<data:post.newerLinkText/>
</a>
<a expr:class='data:post.newLinkClass' expr:href='data:post.newestLinkUrl'>
<data:post.newestLinkText/>
</a>
</span>
</b:if>


7. Paste the following code into your template immediately after the code block above and before this line of code <div id='backlinks-container'>

<p class='comment-footer'>
<b:if cond='data:post.embedCommentForm'>
<b:if cond='data:post.allowNewComments'>
<b:include data='post' name='comment-form'/>
<b:else/>
<data:post.noNewCommentsText/>
</b:if>
<b:else/>
<b:if cond='data:post.allowComments'>
<a expr:href='data:post.addCommentUrl' expr:onclick='data:post.addCommentOnclick'><data:postCommentMsg/></a>
</b:if>
</b:if>
</p>
</b:if>

Enter the Embed Comments Form into Blogger Template
Alternative Option
If you don't have the code as mentioned in #6 you will likely have the following:

<p class='comment-footer'>
<b:if cond='data:post.allowComments'>
<a expr:href='data:post.addCommentUrl' expr:onclick='data:post.addCommentOnclick'><data:postCommentMsg/></a> </p>
</b:if>

In which case replace with this code:

<p class='comment-footer'>
<b:if cond='data:post.embedCommentForm'>
<b:if cond='data:post.allowNewComments'>
<b:include data='post' name='comment-form'/>
<b:else/>
<data:post.noNewCommentsText/>
</b:if>
<b:else/>
<b:if cond='data:post.allowComments'>
<a expr:href='data:post.addCommentUrl' expr:onclick='data:post.addCommentOnclick'><data:postCommentMsg/></a>
</b:if>
</b:if>
</p>
</b:if>

8. Click on the Save Template button to save your template changes

9. Click on the View Blog link and test your embed comment feature by clicking on the number of comments link found at the bottom of each post. Notice that the post will now be displayed along with the embed a comment form below the post


Troubleshooting
As there are many variations amongst templates neither of these options may work in which case try this solution from Blogger Buster:

Find: <b:include data='post' name='comments' />

Immediately below this line add the following line:
<b:include data='post' name='comment-form'/>


In this tutorial I have shown you how to add the embed comments form into your custom Blogger template if it is missing so that visitors can comment easily.

Related Articles
Embed a Comment Form in Your Blogger Posts

Choose Your Own Blogger Post Date

In this tutorial I will show you how to set a different date from the actual date when posting to your Blogger Blogspot blog and discuss some of the benefits and uses of setting a different date.

Benefits of Setting a Different Date
Blogger permits a Blogger webmaster to set any publication date for a post they choose. This flexibility means that when you publish your entry it can be published retrospectively, in the here and now or for a future date. There are a variety of reasons for setting a particular publishing date for a post:

Set a Retrospective Publication Date
Some examples of situations where you may find it useful to set a post to a retrospective date are:

In order to keep continuity with a sequence of articles. You might use this feature if you forget to post an article in a sequence or decide afterwards to add an extra article to the sequence.

Another application for the retrospective date feature is to create a page such as an About page and attribute a specific date to it. I have gone back and written an About page on several of my blogs long after I have set them up. It is possible to go back several years if you wish. I would recommend setting the date of your About page to prior to your first post so that it appears at the beginning of your feed.

Bear in mind when posting to a retrospective date that the post will still appear in your recent posts feed even though you set a date in the past. While this can be annoying at times it is not much of a problem unless you rarely post to your blog.

Set a Future Publication Date
It is very handy to set a future publication date for your blog entries. One obvious time is when you go on vacation and want to stagger the publication of posts you have already written. Blogger allows you to set up your posts to be published on a specified date and time simply by setting a future date and time.

If you write a lot of articles about a particular theme it can be very useful to publish them in a set sequence. Blogger will allow you to set a future date for each article so that they can be published in the sequence you have chosen. For instance you might have written 7 articles on a theme and wish to publish them every 2 days over two weeks. Blogger will allow you to choose a future date for each of the articles and schedule them for publication on that user defined date and time.


How to Set a User Defined Publication Date

1. Create a post for your Blogger blog as usual

2. Click on the Post Options link found at the bottom left corner of the Compose box and directly above the Publish Post button

3. Set the specified date and time you wish your post to be published on

Set date options for Blogger posts
4. Click on the Publish Post button

If you have set a retrospective date your post will be published immediately and you will be able to view it in your blog archives.

Scheduled Blogger Post Message
If you set a future date your post will be scheduled for publication. Click on the link to Edit Posts and view your post in the list. It should be at the top of the list. Notice that it will marked "scheduled" in red. When the exact date and time set is arrived at Blogger will publish your post automatically.

Blogger identifies posts as scheduled in Edit Posts list

In this tutorial I have discussed reasons why you might choose to set your own user defined post date for your Blogger posts. I have also shown you how to go about setting a different post date through the Post Options feature in Blogger.

Get More Comments on Your Blogger Blog

Do you want to get more comments on your Blogger Blogspot blog? Maybe you are wondering why you are not getting the level of comments on your blog that you had hoped for? Well don't panic. Traffic takes time to build and commenting on new blogs is always slow at first. You could resort to creating your own comments but I strongly advise against it. Apart from being unethical I find you can often spot ingenuine comments a mile away and its a major turn off. Instead take heart. In this article I will be focusing on 7 strategies you can employ to encourage your readers to comment and to build a great community around you in the process.

Reasons Why a Visitor Might Post a Comment
To start with let's look at some of the reasons people comment in the first place. I find readers tend to comment on my blog when they have found a solution to a problem or understood something that they haven't known about before. Another reason to comment is that they may ask how to questions especially about technical problems or ask for advice. If I write something contentious readers may post to let me know they don't agree or conversely they whole-heartedly agree. Visitors post comments when they have been moved in someway.

Blog Visitor Behaviour
Visitors arrive at your site with an agenda. They are usually looking:

for answers to help them solve a problem

to be entertained, uplifted or informed

to connect with other like-minded people

Visitors get an impression of your blog the moment they arrive at the landing page. They make up their minds in seconds about the value of your blog. If their attention is grabbed right away by the look and feel of your blog they might hang around and read an article or two. Mostly people are looking for fairly instant gratification so make sure you give it to them by making your blog worthy of visits.

It is well documented by other bloggers that readers are more likely to comment if they see that your blog is well patronized and already has some action going on. If it's dead most will leave straight away. Most visitors will not get beyond the first page they arrived at. That's the reality of blogging. However, if your articles are unique and cutting edge in some way then you will capture some of the other 20% who will take more than a passing look. Humans being humans people are more likely to post a comment when they are not the first. Most of us don't want to be first to arrive at a party right and this applies to blogging as well.

7 Strategies to Encourage Visitors to Comment

Don't PanicStrategy #1 - Don't Panic - Be Patient - Build Traffic
If your blog is not getting much traffic commenting will be slow too. If your blog is new, say less than a year old, give it time. Once someone comments often this leads to further comments. Make sure you have attended to SEO and created sufficient backlinks to generate site traffic.

Strategy #2 - Always Post Quality Content
For visitors to post comments on your blog they have to have some kind of warm up to the content. It's that simple. Make sure you post frequent articles of a high quality.

Strategy #3 - Always Respond to New Comments
I make it a rule on my blog that I post a response to every comment made. I want people to come back and to know that there is someone there at the other end. A leading 6 figure blogger, Yaro Starak, made the comment recently that he noticed a sharp decline in comment posting when he stopped responding to each individual comment. Respond to comments and your readers are more likely to return and to even comment again.

Strategy #4 - Ask Questions of Your Readers
Some readers like to engage and you are more likely to capture these visitors by posting a question on your blog like What's the most annoying thing about Blogger? Tell us about your experince for example.

Strategy #5 - Write articles that reference or focus on other Bloggers
Yaro Starak who makes about $40,000 per month from blogging suggested in a recent newsletter that you not just mention other bloggers in your articles but write an article around them as a way to encourage the other blogger to comment on your blog. Haven't tried this one yet but it is on my list so I will let you know how I get on. If you have tried it already what happened?

Strategy #6 - Make it Easy For Visitors to Comment
For visitors to leave comments the commenting process has to be easy. Make sure the following are correctly set on your blog by navigating to Settings > Comments:

Set Show Comments to Yes

Set Allow Anyone to Comment

Set Embed Comment Below Post

Set Moderation to Always (more work but prevents spam)

If you are using a custom template you may have trouble with the embed comment feature. Please refer to my article about how to update your template to incorporate the embed comments below posts feature.

Blogger Settings Comments
Strategy #7 - Comment on Other Blogs
It is a good rule of thumb to comment on a visitors blog if they take the time to comment on yours. I'm not talking about spamming someone else's blog just writing a comment about some aspect of their blog that you appreciated, admired or interested you. And of course you can get a link back to your blog in the process.


This article focused on some of the reasons why visitors leave comments on a blog and discussed some basic blog visitor behaviour. I discussed 7 strategies that will help you encourage visitors to comment more. If you have any other ideas about encouraging comments I'd love to hear them. How about posting a comment to let me know how you encourage your readers to comment.

Add Paypal Donate Button to Blogger

If you want to make a few bucks from all the hard work you are putting into your Blogger blog then consider adding a Paypal donate button to your Blogger blog (Blogspot blog).

Paypal Donate ButtonAdding a donation button will encourage all those happy readers to say a big thank you for helping them out. Not everyone will donate but you will get the odd generous soul who will willingly donate some chump change to shout you a coffee.

In this Blogger tutorial we will be adding a gadget to the Blogger sidebar or alternatively you could place it in the foooter of your Blogger template. We will be using a widget to contain our Paypal Donate Button and will not be changing your Blogger template. If you wish to place the donate button into your Blogger posts see the end of this Blogger tutorial for details.

Skill level is rated easy.

How to Add a Paypal Donate Button to Blogger (Sidebar or Footer Gadget)
Note: Updated on January 20 2012 to take account of new Paypal interface

1. Get yourself a Paypal account if you don't already have one

2. Login to your Paypal account

3. Click on the Merchant Services tab

Select Paypal Merchant Services Tab
4. Choose Donations from the list of key features displayed in the right sidebar of the PayPal Website Payments Standard Option (first of 3 payment solutions)
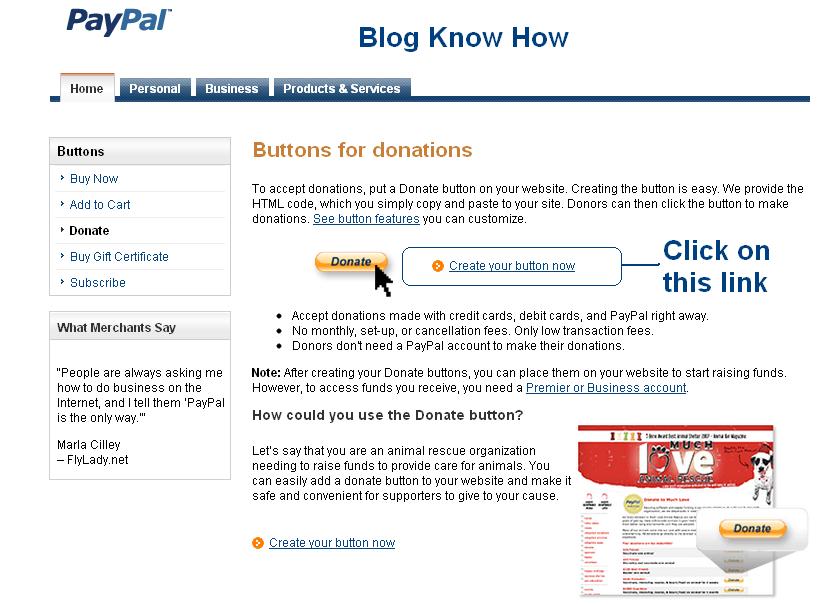
Note Paypal have changed its interface. You now need to select PayPal Website Payments Standard from Merchant Services drop down and then under the buttons in option 1 you will see in pretty tiny writing I must say "There are also buttons for donations and gift certificates." Click on donations.

Select Donations link in Paypal from Paypal Website Payments Standard Options 1 to add a donations button to Blogger Blogspot blog

5. From the Paypal Create a Donation Button screen choose Create Your Button Now link (one of two).


6. Stick with the default button unless you wish to customize it

7. Choose your currency depending on your needs and location

8. Choose Donors enter their own contribution amount radio button unless you want to have a set amount

Paypal Create Button Steps
9. Ensure the Secure Merchant ID radio button is selected. This will prevent spammers getting hold of your email address

10. At Step 2 it is worth saving your button

11. At Step 3 Customize your checkout page by allowing donors to write a short comment by selecting the Yes radio button to special instructions to seller

12. Select the No radio button for Customer's Shipping Address

13. Select the Create Button button

14. Once Paypal creates the donate button code copy it by right clicking your mouse and choosing copy

15. Logout of Paypal

16. Login to Blogger if you are not already logged in

17. Go to Design > Page Elements

18. Click on the Add a Gadget link in the sidebar

19. Choose HTML/Javascript widget from the list provided

20. Paste the button code into the Content box of the dialog box that appears by placing the mouse inside the box and right clicking the mouse and then paste

21. Select a title like "Shout Me a Coffee Today!" or whatever you would like

22. Click on the Save button

23. Drag and drop your new donation gadget into the spot you want it to appear in

24. Click the Save button to ensure your changes are saved

25. Click View Blog to see your new donate button in the sidebar of your Blogger blog

26. Click on your new donate button and you will be taken to the Paypal Checkout screen

Paypal Checkout screen

Tips and Troubleshooting

  1. To Add a Paypal Donate Button to Blogger Posts
    The following instructions will add a Paypal Donate button to all new Blogger posts. Note previous posts will not be changed. You will need to hard code the button into your Blogger template to have the Paypal Donate button added to every Blogger post. (Please ask if you need help with this)

    1. Follow the directions (steps 1-16) as above to get your Paypal button code
    2. In Blogger go to Settings > Formatting
    3. Paste the Paypal Donate Button code into the Post Template box
    4. Save changes
    5. Click on New Post to see that the code will be automatically inserted at the foot of each new post. (you will need to be in Edit Html mode to see the code)

  2. To Add a Paypal Donate Button to Individual Blogger Posts
    1. Follow the directions (steps 1-16) as above to get your Paypal button code
    2. In Blogger go to the post you wish to insert the button code into
    3. Insert the button code taking care to change all instances of double quotes to single quotes
    4. Save post and publish as normal. (If you have trouble with the preview post button in the old editor in Blogger click on compose and then edit html)


This Blogger tutorial has walked you through the steps needed to add a Paypal donate button to your Blogger blog (Blogspot blog) including how to configure your Paypal button at Paypal. I have covered adding the button as a sidebar gadget or footer gadget or alternatively added to Blogger posts. Have fun!


Related Posts
List of Blog Know How Tutorials for Blogger Blogs
Tips for Adding Google Adsense to Blogger
Better Placement of Google Adsense in Blogger
Add Google Adsense to a Blogger Header
Bloggers Guide to Google Adsense Myths
Add Google Adsense or Banner Above Blogger Header
Blogger Guide to Better Google Adsense Placement
Make Money with Adsense Keywords and Blogger
Make Money By Adding Banner Ads to Your Blogger Blog
5 Easy Ways to Make Money from Blogger
Add Chitika Ads to Blogger Blogspot
Make Money Add an Amazon Widget to Blogger
Add Amazon Product Links to Blogger Posts

Add a Feedburner FeedFlare to Blogger Feed

If you have burned your Blogger Blogspot blog feed at Feedburner you can easily add a FeedFlare to the footer of the feed. FeedFlare helps you to distribute, inform and create a community around your content. Adding a FeedFlare to the feed of your blog allows readers to select from a range of social bookmarking links which appear at the end of each post. FeedFlare offers subscribers some easy ways to email, tag, share, and bookmark your blog content by linking them with a range of services such as Stumble Upon, Digg This, Facebook, Technorati, del.icio.us and Mixx.

It is not difficult to add a FeedFlare to your Blogger feed but it does require you to add a snippet of code to the template of your blog. Don't be put off as I will guide you through this process by providing a step by step walkthrough. This tutorial caters for all levels of technical knowledge from the newbie Blogger to the experienced Blogger.

To see a FeedFlare in action right now check out the end of each post in the Blog Know How feed


How to Add a Feed Flare to Your Blogger Feed
If you have yet to burn your Blogger feed at Feedburner please refer to my articles Blogger RSS Feeds and Feedburner and Burn Blogger RSS Feeds at Feedburner for instructions on how to burn your feed and benefits of burning your blog's feed at Feedburner.

1. Login to Feedburner with your Google Account. From the My Feeds page click on the link to your blog

2. By default you will be taken to the Analyze page so you need to select the Optimize tab from the menu

3. Select FeedFlare from the Side Menu

4. To create a simple FeedFlare check the boxes of the options you would like. At a mininum I suggest you select email and comments count (for blogger) in addition to Stumble Upon, Digg This, del.icio.us and Facebook.

5. Once you have selected the desired options you can reorder them in the Preview/Reordering box below using drag and drop to shuffle the links around. I think it is a good idea to have comments either at the beginning or the end of the list as readers are more likely to notice it in this position

6. Click on Activate. Do not close this window as we will be returning here.

7. In a new window login to Blogger if you are not already logged in and navigate to Layout > Edit HTML

8. I strongly suggest you back up your template as a precaution by downloading it to your computer

9. Use CTRL + F to bring up the toolbar and enter the following code into the search box
<div id='post-footer'>
Find Post Footer Code
10. Return to the FeedFlare page at Feedburner and select Blogger from the drop down menu at the bottom of the page to get the HTML Feedburner code. A dialog box will appear with some instructions. Copy the code found in item #1. Editing Blogger Layouts. To copy right click your mouse and choose select all to highlight the code and then right click again and choose copy

11. Paste the Feedburner code into your template directly below the line of code in your template you just located <div id='post-footer'>
Add Feedburner FeedFlare Code into Your Blogger Template
12. Click on the Save Button

13. Return to Feedburner. Immediately below your blog's title and just above the Analyze tab you will see two icons. Click on the RSS icon (left button) which will bring up your blog feed.

Feedburner feed icon
14. Scroll to the bottom of the first post and you will see your new FeedFlare in action.

FeedFlare in Blogger Feed Redirected by Feedburner

Other FeedFlare Options
For smarter looking links you may choose to customize the FeedFlare's appearance by tweaking the CSS.

To prevent stealing of your original content otherwise known as blog scraping or splogging you can add personal FeedFlares such as a permalink to a copyright notice and a permalink to you the author of the blog.


In this tutorial you have learned how to create a FeedFlare at Feedburner which appears at the bottom of each post in your Blogger blog's feed. By adding the FeedFlare to the footer of your Blogger blog you help build an online community around your content by offering your readers some choices about how they share, link to and act on the information contained in your blog

Related Articles
Blogger RSS Feeds and Feedburner
Burn Blogger RSS Feed at Feedburner