"Can I still use the old default templates for my Blogger blog (Blogspot blog)?" is a frequent question I am asked on Blog Know How pretty often. Other people have asked me about the template I am using and how to get it. In answer to the first question as you can see older style templates do work on Blogger. And with respect to the second question the template I am using on Blog Know How is an enhanced version of the Rounders 3 Blogger template which is one of the older style default Blogger templates available from 2006 onwards.
In today's Blogger tutorial I am going to show you how to access the older style default Blogger templates (Blogspot templates) and activate them on your Blogger blog. This tutorial is mostly written for those new to Blogger who might not realise that there are a number of default Blogger layouts released in 2006 that are still perfectly usuable. Also there may be some of you who would like to revert back to an older style Blogger template but are not sure how to find the old templates on Blogger.
How to Access Older Style Blogger (Blogspot) Templates
Note: These instructions assume you are using the updated Blogger interface. If you are using the old Blogger interface (you will have a message at the top of your blog "Try the updated Blogger interface") then start at step 3.
Today I have shown you how to change your Blogger blog over to one of the older style Blogger templates. Remember that in doing so you may sacrifice some of the advanced layout and design features available in Template Designer but it will give you the option of more template options and a time-saving alternative to having to download and try out heaps of free custom Blogger templates available on the internet only to find they don't work properly. And remember that even with free custom Blogger templates most do not work with Blogger Template Designer. Having to manually add a footer or an extra column to your Blogger blog are really minor changes if everything else is working fine.
Related Articles
List of Blog Know How Tutorials for Blogger Blogs
In today's Blogger tutorial I am going to show you how to access the older style default Blogger templates (Blogspot templates) and activate them on your Blogger blog. This tutorial is mostly written for those new to Blogger who might not realise that there are a number of default Blogger layouts released in 2006 that are still perfectly usuable. Also there may be some of you who would like to revert back to an older style Blogger template but are not sure how to find the old templates on Blogger.
A Word of Warning First
At the outset I need to say that by applying an older style Blogger template to an existing blog you may lose some of the advanced design and layout features in the Blogger Template Designer. This may not be a drawback if you are happy to do a bit of tweaking and may actually be a far better alternative than downloading a free custom Blogger template that may have a host of compatibility problems with Blogger especially if it was released a while ago. There are some pretty good free custom Blogger templates out there and there are some which were thrown together and have all sorts of problems which are not easily solvable unless you know how to code in CSS.
So please be warned that you may potentially lose some features in converting to an older Blogger template. For instance if you are using the Simple default Blogger template and already have a three column layout selected with a 2 or 3 column footer then you will find that Blogger will revert to a two column layout and place all your widgets in the sidebar if you select an older style template. You will then need to manually add the footer and the extra sidebar. See my tutorials on how to add a 3 or 4 column footer to Blogger and how to manually add an extra column to Blogger for help with this.
I suggest before you start that you download a full back up of your template and that you upload this to a test blog to see how it looks rather than trying it out on a live blog. However if you decide go ahead and later change your mind and want to revert back to the one of the newer Blogger templates you will need to manually shift your widgets out of the sidebar using the drag and drop feature in Page Elements
How to Access Older Style Blogger (Blogspot) Templates
Note: These instructions assume you are using the updated Blogger interface. If you are using the old Blogger interface (you will have a message at the top of your blog "Try the updated Blogger interface") then start at step 3.
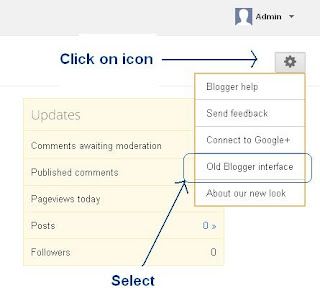
- From Overview in the updated Blogger interface click on the wheel icon at the top right which will give you an array of Blogger options
- Select the Older Blogger Interface from the drop down menu
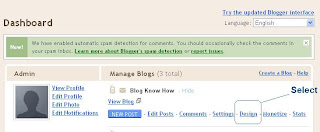
- The older style Blogger Dashboard will now be visible and displaying a list of blogs if you have more than one otherwise just the one. Click on Design from the list of links under the blog title you wish to apply the older Blogger template to.
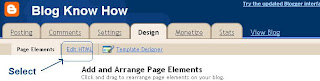
- Click on the Edit HTML link located under the Blogger tabs menu
- Once on the Edit HTML page scroll to the bottom of the page and on the left you will see a heading entitled Old Templates. Click on the Select Layout Templates from the list. Avoid the Classic templates as these date from Blogger's first inception and are really too old to be of use.

- You will now be on the older style Blogger templates page and can scroll through and select a template. Use the preview link to see how your blog looks with one of the older style templates applied. I use the Rounders 3 for Blog Know How by the way although I have adapted it to a 3 column layout.
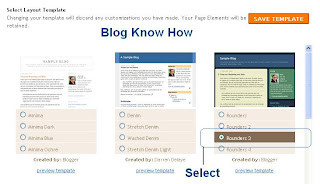
- Once you are sure you want to change over to an older style template click on the save button to apply the older style default Blogger template to your Blogspot blog.
- Click on View Blog at the right of the menus tabs to view your changes and navigate around your blog.


Today I have shown you how to change your Blogger blog over to one of the older style Blogger templates. Remember that in doing so you may sacrifice some of the advanced layout and design features available in Template Designer but it will give you the option of more template options and a time-saving alternative to having to download and try out heaps of free custom Blogger templates available on the internet only to find they don't work properly. And remember that even with free custom Blogger templates most do not work with Blogger Template Designer. Having to manually add a footer or an extra column to your Blogger blog are really minor changes if everything else is working fine.
Related Articles
List of Blog Know How Tutorials for Blogger Blogs