Popular Posts

Add a Twitter Updates Widget to Blogger

If you are a regular Twitter user and have a bunch of followers you might want to add a Twitter Updates widget to Blogger (Blogspot). In today's tutorial I will show you the easy way to add a Twitter Updates widget to Blogger (Blogspot). It is fairly straightforward to add this Twitter Updates widget to Blogger so please don't be put off if you are a Blogger beginner as you can have this widget up and running in no time.

If you are new to Twitter and don't have an account yet you can sign up to Twitter for free


Twitter Updates widget for BloggerHow to Add a Twitter Updates Gadget to Blogger
There are several methods of adding a Twitter Updates widget to Blogger which I will be discussing over the next few posts. Today I will start with the easiest method by far. This Twitter widget won't slow down your blog loading time particularly but I suggest as with all HTML widgets that you place it near the bottom of your column of gadgets and limit the number of updates shown.

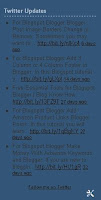
This Twitter Updates widget will provide a basic widget only and is fine if you aren't too bothered about styling. The widget uses the styling from your blog based on the Blogger template you are using but unfortunately there is no way to modify its appearance at the moment. If you want something a little more fancy keep an eye out for my future posts about Twitter Updates widgets.

  1. Log in to Blogger if you are not already logged in

  2. Go to Layout > Page Elements

  3. Click Add a Gadget in the Blogger sidebar

  4. Click on More Gadgets to the left and choose the Twitter Updates widget. Blogger may change this so if you don't find it there try looking in Featured or Popular.

  5. Enter your Twitter name (usually your blog name)

  6. Choose the number of updates to display. By default this is set to 5

  7. Uncheck display link to your Twitter page if you do not want visitors to go to your Twitter page for some reason otherwise leave it as is.

  8. Click Update to Preview any changes and then Save

  9. Use Blogger's drag and drop feature to reposition your Twitter gadget in the desired location in sidebar or footer of your Blogger blog. Save any changes

  10. Click View Blog to admire your new Twitter Updates widget

In today's tutorial I have shown you how easy it is to add a Twitter Updates widget to your Blogger blog (Blogspot blog). The Twitter Updates widget will display your latest Twitter tweets on your blog. The disadvantage of this third party Twitter Updates widget is that it has basic styling only and no way to modify it. On the plus side it loads fast and is likely to be trouble free. I will be writing more about Twitter updates widgets in the next couple of posts so keep an eye out. Enjoy!


Related Articles
List of Blog Know How Tutorials for Blogger Blogs
Add Twitter Button or Twitter Badge to Blogger
Add Twitter Followers Counter to Blogger

Blogger Post Image Borders Change or Remove

Sometimes you may want to remove, delete or change the image border of a custom Blogger template or default Blogger template (Blogspot template). In this Blogger tutorial you will learn how easy it is to make changes to your template so that you can get rid of unwanted image borders around all the images that appear in your blog posts or around a single image in a blog post.

You will also learn how to enhance your Blogger template (Blogspot template) by changing the line color and line style of the existing image borders.

Note this Blogger tutorial applies to custom templates and the previous generation of Blogger templates. If you are using the new default Blogger Template Simple please refer to my Blogger tutorial How to Remove the Image Border in Blogger template Simple for instructions

This Blogspot tutorial is rated easy. It involves making minor alterations to your Blogger template (Blogspot template) but this is well within the capabilities of beginner bloggers and newbies. The changes will take less than 5 minutes to complete and can make the world of difference to your Blogger template.

Blogger image with border Blogger image without border

How to Delete, Remove, Get Rid of the Image Border in Blogger Posts
The following instructions will remove the little border around the images in your Blogger posts.

  1. Login into Blogger if not already logged in

  2. From the Dashboard navigate to your blog. Go to Design > Edit HTML by clicking on the Design tab and then choosing the Edit HTML link

  3. Back up your existing Blogger template by clicking on the Download Full Template button

  4. Find the following code in your Blogger template (no need to check the Expand Widgets Template box as we are only working with the CSS Style Sheet). Note: the code in Blogger templates varies but this is the code you will find on a Blogger Minima template and most other default Blogger templates.


    .post img {
    padding:4px;
    border:1px solid $bordercolor;
    }

    If you do not have this code look for the following:

    img{
    padding: 4px;
    border:1px solid $bordercolor;
    }

  5. There are two ways to get rid of the unwanted border image code. You can either:

    • Remove the following line:

      border:1px solid $bordercolor;
      or

    • Change it to the following
      border:0px;

  6. Click on the Save Template button

  7. Click View Blog to admire your post images minus any image border.

How to Change the Color of the Image Border Around Posts in a Blogger Template
The following instructions will show you how to change the color of the border which appears around images in your Blogger posts

  1. Follow Steps 1 to 4 as per removing the image border from Blogger posts.

  2. There are several methods to change the color of the image border but the easiest is to

    • Change the following line:
      border:1px solid $bordercolor;

      to
      border:1px solid #6698FF;

      The above change will make the border line color sky blue. To change the color (in red) to your own color choice replace with the hex color code for your chosen color

  3. Click the Save Template button to save your changes

  4. Click on View Blog to admire the new color around the images in your Blogger posts

Tips and Troubleshooting

  • To change the image border line style from a solid line to a dotted line change the word solid to dotted eg

    border:1px dotted $bordercolor;

  • To change the image border line style from a solid line to a dashed line change the word solid to dashed eg

    border:1px dashed $bordercolor;

  • To increase the width of the image border change the size from 1px to 2px or 3px eg

    border:3px solid $bordercolor;

  • To Remove The Image Border Around Only One Image paste the following into your image code in your Blogger post:

    style="border:none"
    eg
    <img style="cursor:pointer; cursor:hand;width: 126px; height: 22px;" src="http://3.bp.blogspot.com/_vLeiVavkV_M/SrRp2wb1I_I/AAAAAAAAAAA/XXXXXXXXX/s200/download-now.png" border="0" style="border:none" alt=""id="BLOGGER_PHOTO_ID_XXXXXXXXXXXX" />

In this Blogger tutorial you have learned how to remove, delete and get rid of the line border which appears around images in your Blogger posts (Blogspot posts). You have also learned how to change the line color of the border image to your own chosen hex color. In addition I have shown you how to change the line style from solid to dotted or dashed and to remove the border around a single image. As always any problems with making these changes please let me know. Good luck!


Related Articles
List of Blog Know How Tutorials for Blogger Blogs
How to Remove the Image Border in Blogger Simple Template

Add 3 Column or 4 Column Footer to Blogger

In this Blogspot tutorial you will learn how to convert your existing Blogger footer (Blogspot footer) into a 3 column footer or a 4 column footer. With more columns in your Blogger footer you will be have the extra room to accommodate more widgets such as Flickr photos and Twitter updates. Also you will be able to put less frequently used widgets such as recents comments, archives, followers, About Me etc at the bottom of your template so that only the most important widgets are loaded first.

This tweak involves adding code to the footer section of your existing Blogger template to change it to 3 columns or 4 columns. The tutorial is not beyond the capabilities of Blogger newbies and webmasters with intermediate skills but care needs to be taken when modifying your Blogger template so back up before you start. For best results a Blogger template with a width of around 900px is best.

Convert your Blogger footer to a 3 column footer

How to Add a 3 Column Footer to Blogger

  1. Log in to Blogger if not already logged in

  2. Navigate to Layout > Page Elements

  3. Move any existing widgets out of the footer section and place them in the sidebar temporarily and save changes

  4. Navigate to Layout > Edit HTML

  5. Back up your template as a precaution by downloading it to your computer

  6. Find the following section in your Blogger template

    <div id='footer-wrapper'>
    <b:section class='footer' id='footer'/>
    </div>

    If you are having difficulty finding this section trying searching for footer-wrap or something similar as sometimes this section is called something else in some templates.

  7. To Add a 3 Column Footer to Blogger
    Replace all the code located in Step 6 with the following

    <div id='footer-columns'>
    <div id='footer1' style='width: 30%; float: left; margin:0; text-align: left;'>
    <b:section class='footer-column' id='col1' preferred='yes' style='float:left;'/>
    </div>
    <div id='footer2' style='width: 40%; float: left; margin:0; text-align: left;'>
    <b:section class='footer-column' id='col2' preferred='yes' style='float:left;'/>
    </div>
    <div id='footer3' style='width: 30%; float: right; margin:0; text-align: left;'>
    <b:section class='footer-column' id='col3' preferred='yes' style='float:right;'/>
    </div>
    <div style='clear:both;'/>
    </div>

    To Add a 3 Column Footer to Blogger with a Lower Footer Section
    Replace all the code located in Step 6 with the following

    <div id='footer-columns'>
    <div id='footer1' style='width: 30%; float: left; margin:0; text-align: left;'>
    <b:section class='footer-column' id='col1' preferred='yes' style='float:left;'/>
    </div>
    <div id='footer2' style='width: 40%; float: left; margin:0; text-align: left;'>
    <b:section class='footer-column' id='col2' preferred='yes' style='float:left;'/>
    </div>
    <div id='footer3' style='width: 30%; float: right; margin:0; text-align: left;'>
    <b:section class='footer-column' id='col3' preferred='yes' style='float:right;'/>
    </div>
    <div style='clear:both;'/>
    <p/>
    <div id='footer-bottom' style='text-align: center; padding: 10px;'>
    <b:section class='footer' id='col-bottom' preferred='yes'>
    </b:section>
    </div>
    <div style='clear:both;'/>
    </div>

    Add 3 column footer to Blogger with a lower section
    To Add a 4 Column Footer to Blogger
    Replace all the code located in Step 6 with the following

    <div id='footer-columns'>
    <div id='footer1' style='width: 25%; float: left; margin:0; text-align: left;'>
    <b:section class='footer-column' id='col1' preferred='yes' style='float:left;'/>
    </div>
    <div id='footer2' style='width: 25%; float: left; margin:0; text-align: left;'>
    <b:section class='footer-column' id='col2' preferred='yes' style='float:left;'/>
    </div>
    <div id='footer3' style='width: 25%; float: left; margin:0; text-align: left;'>
    <b:section class='footer-column' id='col3' preferred='yes' style='float:left;'/>
    </div>
    <div id='footer4' style='width: 25%; float: right; margin:0; text-align: left;'>
    <b:section class='footer-column' id='col4' preferred='yes' style='float:right;'/>
    </div>
    <div style='clear:both;'/>
    </div>

    Convert Blogger Footer to a 4 Column Footer

  8. Save changes to your Blogger template.

  9. Navigate to Layout > Page Elements. You will now see a 3 column footer, 3 column footer with a lower section or a 4 column footer depending on what option you chose.

  10. Move the desired gadgets to the new Blogger footer columns. Create new widgets to fill up the footer columns if necessary. Save your changes.

  11. Click View Blog to admire your new footer section

Tips and Troubleshooting

  1. To Add Padding Between Footer Columns in Blogger
    To create some padding between the columns add the following code to the style section of your Blogger template - before </b:skin> tag.

    #footer-columns {
    clear:both;
    }

    .footer-column {
    padding: 10px;
    }

  2. To Add a Border to the 3 or 4 Column Blogger Footer

    • For Top Border Only of the 3 or 4 Column Footer
      Paste the following code before the </b:skin> tag

      #footer-columns{
      border-top:1px dotted $bordercolor;
      clear:both;
      margin:0 auto;
      }

      Replace $bordercolor with a hex color if default color is not displayed. Change this color to suit your template. For example


      #footer-columns{
      border-top:1px dotted #113355;
      clear:both;
      margin:0 auto;
      }

    • For a Box Border Around the 3 or 4 Column Footer

      #footer-columns{
      border:1px dotted $bordercolor;
      clear:both;
      margin:0 auto;
      }

      Replace $bordercolor with a hex color if default color is not displayed. Change this color to suit your template. For example

      #footer-columns{
      border-top:1px dotted #113355;
      clear:both;
      margin:0 auto;
      }


In today's Blogger tutorial you have learned how to add a 3 column footer or a 4 column footer to your Blogger template (Blogspot template). You have also learned how to add some styling such as a border above the footer and around the footer. As always I am available to answer questions if you need assistance. Good luck!

Related Articles
List of Blog Know How Tutorials for Blogger Blogs
Customize Blogger Tips

Add Amazon Product Links to Blogger Posts

In this tutorial you will learn how to deep link a specific Amazon product directly into your Blogger posts so that the link will appear either on every post page or alternatively only on a selected post page. By deep linking a targeted Amazon product directly to your Blogger blog you can expect to increase your Amazon sales and to make extra money from Blogger. If you wish to learn more about adding Amazon widgets to your blog please refer to my earlier tutorial Make Money Add an Amazon Widget to Blogger


This tutorial provides you with a complete walk through of the process of adding Amazon product links to Blogger. I have rated the tutorial as moderate as it involves setting up the Amazon product link, converting the code and adding a block of code to your Blogger template. All these steps are within the capabilities of the average Blogger user provided you follow the step by step instructions below.

How to Deep Link an Amazon Product to Blogger Posts
This tutorial will show you how to add an Amazon Product Link at the foot of every post in your Blogger blog. If you want your link to appear only on a specific individual post page see Tips and Troubleshooting below for instructions.

Difficulty Level: Moderate

  1. Sign in to your Amazon Associates account. If you are not a member sign up is free to both Amazon.com and Endless.com

  2. Click on the Links and Banners tab

  3. Under the Product Links heading choose the Add Product Links Now link

    Add Amazon Product Links to Blogger Tutorial - Choose Add Product Links
  4. From the Product Links page choose your Product Category from the drop down list and enter your search keyword phrase to identify the product you wish to link to. Hit the Go button.

    Add Amazon Product Links to Blogger Tutorial - Search for Desired Product
  5. From the search results choose the individual product you will linking to by clicking on the Get Link button on the right hand side of the product

    Add Amazon Product Links to Blogger Tutorial - Get Link for Specific Product

  6. You will now be taken to the Customize and Get HTML code page.

    • Select Link Type
      By default both the product image and text link will display but you can customize it to display the image only or the text only by checking the box alongside these options

    • Customize Link
      Choose the appearance of your product. With or without a border. Choose color options to suit your blog. I suggest you keep the default setting for the link opening in a new window. Amazon lets you see a live preview of your product on the right so that you can make any adjustments before embedding the code into your blog.

    Add Amazon Product Links to Blogger Tutorial - Customize Link
  7. Once you are satisfied with the product's appearance click on the highlight code button at the foot of the page and copy the HTML code for the Amazon Product Link.

  8. Open a Javascript to HTML converter such as Centricle. Paste your code into the content window and press the Encode button

  9. Highlight and copy the code that has been converted

  10. Login to Blogger if not already logged in

  11. Navigate to Layout > Edit HTML

  12. Back up your Blogger template as a precaution

  13. Check Expand Widget Templates box

  14. There are several places you may wish your product link to appear. I have assumed for the purposes of this tutorial that you want it at the bottom of your post. Therefore find the following code in your template:

    <div class='post-footer-line post-footer-line-3'/>

  15. Directly below this line paste the converted Amazon HTML code

  16. Click on Save Template

  17. Click on View Blog to view your link at the foot of every Blogger post including the home page view.


Tips and Troubleshooting
If you are writing about a lot of different products on your blog you may need to place targeted Amazon product links on your Blogger individual post pages. To have the Amazon Product Link only appear on a specific post page follow these steps.

How To Add an Amazon Product Link to an Individual Blogger Post
Before you get started you will need to know the full URL address of your Blogger post. To get this navigate in a new window to the specific post page of your Blogger blog and copy the address from the address bar at the top of your browser

  1. Follow steps 1 to 13 as per adding an Amazon Product Link to the foot of every Blogger post.

  2. Find the following code:

    <div class='post-footer-line post-footer-line-3'/>

  3. Directly below this line paste the following code:

    <b:if cond='data:blog.url == "your blog post URL including http://"'>
    Paste your Amazon code here
    </b:if>

  4. Replace "your blog post URL including http://" with the URL address of your blog post

  5. Paste over "Paste your Amazon code here" with your converted Amazon HTML code

  6. Click on Save Template

  7. Click View Blog and navigate to the individual post page to see your Amazon Product Link at the foot of your Blogger post (Blogspot post)


In this tutorial you have learned how to add an Amazon Product Link to your Blogger posts (Blogspot posts). I have also shown you how to embed an Amazon Product Link directly into a specific Blogger post. By adding targeted Amazon product links to your Blogger blog you can expect to make extra money from your blog. I would love to hear from anyone about their experiences of adding Amazon widgets or product links to their Blogger blog so if you have the time please let me know how you get on.


Related Articles
List of Blog Know How Tutorials for Blogger Blogs
Make Money Add an Amazon Widget to Blogger
Add Chititka Ads to Blogger Blogspot Blog
Add an Affiliate Banner or Adsense Above Blogger Header
Add an Affiliate Banner to Blogger Header
Add an Affiliate Banner to Blogger Sidebar
Add an Affiliate Banner Below Blogger Post
Make Money Add Banner Ads to Blogger
5 Ways to Make Money from Blogger
Blogger Guide to Google Adsense Placement
Add Paypal Donate Button to Blogger
Blogger Guide to Google Adsense Myths

Make Money With Adsense Keywords and Blogger

If you are new to blogging with Blogger (Blogspot) and wondering how to make money with Adsense this article is for you. If you have Google Adsense on your blog but are disappointed with the revenue generated so far then read on. Even if Google Adsense is performing well for you I am going to give you some tips that will mean you will earn extra money from Google Adsense.

Why Are Keywords So Important for Bloggers?
In order to make money from blogging with Blogger it is important first to understand the significance of keywords and keyword phrases. Via Google Adwords, the sister of Google Adsense, advertisers bid for keywords and keyword phrases. The more frequently these keyword terms are searched for the higher their value. That is why keyword phrases like make money or make money online which receive a huge number of monthly searches are top paying keywords and are worth so much to advertisers.


To make money with Google Adsense all you need do once your blog is receiving traffic is sign up with Google Adsense, receive a unique code and then place Google Adsense ads on your Blogger blog. These ad units are targeted automatically based on the keywords and keyword phrases which appear in the content of your posts. You get paid for every click on one of your Google Adsense ads. The amount you get paid is determined by the value of the keyword or keyword phrases used.

As a webpublisher it is important to be mindful when crafting your content that you use Google keywords and keyword phrases relevant to your blog's content. This does not mean that you stuff your posts with Google keywords to generate higher Google Adsense payments. In fact having too many keywords is known as keyword stuffing and could mean your blog is penalized by Google. A good rule of thumb is to have 3-5% of your content made up of your blog's keywords. A keyword density over 7% is too high and risks penalty.

For help with adding Google Adsense ad units to your Blogger blog please refer to my article Blogger Guide to Google Adsense Placement

Find The Best Google Keywords for Your Blog
These days many bloggers wanting to make money with Adsense build their blogs based on Google keywords. Their plan is to achieve first page positions on Google search pages for each of these keywords and keyword phrases. However, adopting this strategy from the outset would not be the case for most bloggers. Most of us start a blog about something we are interested in and then decide that we would like to make money with Google Adsense.

If Google keywords for your blog is not something that you have paid much attention to up to now then you may be surprised at what a difference it will make to your Google Adsense earnings and SERPs (search engine results page). Just by figuring out your keywords and emphasizing them in your blog posts you can expect to earn extra money with Google Adsense and Blogger. I did an exercise recently where I edited one of my earlier posts and added about 10 more keywords to the content. Not only did I move my article from about 60 in Google searches to 10 the revenue earned from Adsense for this article increased markedly too.

To determine what your keywords are for your blog you will need to conduct some research. Go to Google Adwords Keyword Tool and type in the topic of your blog. For instance if your blog is about making money online you would type in this phrase to receive other keywords that are related to your blog topic.

Try to identify about 10 to 15 Google keywords and keyword phrases that fit with your blog content. Print out this list and keep it handy so you can refer to it often when writing content for your blog.

Write an article around each of these Google keywords or keyword phrases. These 10 to 15 articles will become the backbone content of your blog. Research these articles by performing Google searches and reading what other bloggers who make it to the first couple of pages in the search engine results are writing about. Notice their keywords and keyword phrases, and the tags they have used. This research will help you identify two things:

  • Any gaps not so well covered by fellow bloggers but relating well to your keywords. That will give you a nice opportunity to write a series of articles on the topic

  • How other bloggers in your niche are tailoring their content for success and which keywords are performing well for them

Always write original content. Never copy another bloggers material. Despite being unethical to plagarize duplicated material is easy to identify and can mean that you get penalized by search engines like Google and run the risk of being banned from Google Adsense. My take on what is known as blog scraping is that if you need to copy what some else has written clearly you don't understand your blog topic well enough and you are probably better to write about something you do know something about. Your readers will see through you very quickly if you don't fully understand the depths of your blog topic.

Google Adsense Tips for Blogspot Bloggers (Blogger Bloggers)

  • Add Your Main Keyword to Your Title Tag
    Make sure that your main keyword for each of your 10-15 articles forms part of your title tag as this is important if your article is to rank highly in search engine results. If you can use two keywords or keyword phrases all the better. You will note that I have added three keywords in my title: make money, Google Adsense and Blogger.

  • Use the Main Keyword in the Body of Your Posts
    Make sure you use the main keyword throughout the body of your article. Ensure that your main keyword appears in the first and last paragraph of your post. There are keyword density tools available to help you check the ratio of keywords used.

  • Make Sure You Tag Your Main Keyword
    Tagging your main keyword and other keywords and keyword phrases is also important if readers are to find your article. Your posts will do better in search engine results if they are appropriately tagged. And of course the better your blog is search engine optimized the more traffic your blog will receive and the greater the potential for Google Adsense revenue.

  • Make Sure Your Blog is Search Engine Optimized
    Optimize your Blogger blog by adjusting your title tags and adding meta tags for better SEO. SEO is important as it generates search engine traffic and building traffic is paramount for high earnings from Google Adsense.

  • Develop Backlinks for Your Blog
    Some of the factors that determine how high your articles will appear in search engine results are backlinks and the age of your blog. If you have some good backlinks to highly ranked websites your blog articles are likely to be promoted in search engine results. Use blog directories, forums, and comment on other blogs in your niche to build a good range of backlinks. Submit your best articles to article directories to generate traffic and links. Also submitting your article to social bookmarking sites like Digg and StumbleUpon can provide backlinks and boost traffic at the same time

  • Give Your Old Blogger Posts a Keyword Makeover
    Go back through your previous blog posts and identify posts that are not receiving a lot of traffic. Read through them and look for opportunities to rewrite small portions of the content to insert keywords and keyword phrases. Check the tags too and add any keywords and keyword phrases that may help to boost traffic. Identify any posts that need to be rewritten from a slightly different angle and with more scope for the addition of keywords

  • Publish Posts at Least 250-300 Words Long
    Check the number of your articles Google has indexed. Shorter articles can often be missed out particularly if your blog is only recently created. Plus shorter articles do not give enough scope for Google Adsense to necessarily know what keywords to target when serving ads.

  • Optimize Google Adsense Placement, Size and Appearance
    Some locations for Google Adsense work better than others. Make sure you read up on Google Adsense placement as this will ensure you make the most money from your Adsense ads.

    Some Adsense ad unit sizes are better performers than others. My personal favorite is 336x280 ad unit which I use successfully on most of my blogs.

    Consider the appearance of your Adsense ad unit. Blend it in or make it stand out the choice is yours.

In today's article I have discussed how to make money with Google Adsense and Blogger. I have paid close attention to the use of keywords and keyword phrases in your content as these are the basis for the ads served up by Google. Included in this article are tips on how to locate and identify your keywords, increase your keyword density and use keywords effectively along with other Adsense tips.

Related Articles
List of Blog Know How Tutorials for Blogger Blogs
Blogger Guide to Google Adsense Placement
Blogger Blogspot SEO Tips and Tricks

Make Money Add an Amazon Widget to Blogger

In today's tutorial you will learn how to place an Amazon widget on your Blogger blog (Blogspot blog) to enable you to add a further income stream to your existing Blogger earnings.

Adding an Amazon widget to Blogger is not difficult. No change or very little change to your Blogger template is required. There is some time involved in setting up the widget itself and choosing the products to link to and customizing the look to match your blog however. This tutorial will walk you through the steps involved but first a few need to know facts about Amazon's affiliate program.


Important Details For Bloggers About Amazon's Affiliate Program
  • Amazon have 2 referral structures: Classic Plan and Performance Plan

    • For the Classic Plan - A flat rate commission of 4% is paid

    • For the Performance Plan - A sliding scale between 4% and 8.5% commission is paid on general product items shipped. Consumer electronics is paid at a flat rate of 4%. Kindle, MP3,video on demand and game downloads are at the rate of 10%. View fee structure for Performance Plan

  • Sell 7 items in a month and you will receive 6% commission on sales. Sell in excess of 30 items and receive referral fees at the rate of 6.5%

  • Affiliates earn commission on the total of items shipped not just the first product bought

  • Payment options are direct credit, check or Amazon Gift Certificate. There is a $15 charge for the issue of a check.

  • Payment of referral fees is made once your account reaches $10 provided you have opted for the direct credit or Amazon Gift Certificate option. Otherwise it is $100 for a check (cheque)

  • Amazon offer a choice of 17 different widgets

  • Amazon also offer links and banners and an astore option


Earning Money from Amazon Widgets
Linking to Amazon products on your blog can generate significant income depending on your blog topic and the type of links you choose. I personally find that my sales are not always related to blogging despite the Amazon widget on this blog linking to books about blogging. However I would strongly suggest that you try to match the products offerred to the general content of your blog so that your links are targeted to your blog's audience. Another option is to add a generic Amazon widget such as the Deals Widget to snag those bargain hunters and impulse buyers from your readership.

Placing Amazon Widgets on Blogger
There are 17 different Amazon widgets to choose from. The decision about which widget is best will partly be determined by the type of blog you have and where you want to place the widget.

I have had some success with the Carousel Widget that I have on Blogspot Blogger Guide - another of my blogs. I have found under the header to be a prime location for this gadget and as it is displayed on every page the widget is getting maximum exposure. I have also had moderate success with a sidebar location using the I Recommend widget. I think it is true to say that you will need to experiment a bit to find the best type of widget for your blog.

How to Add an Amazon Widget to a Blogger Blogspot Blog

Difficulty Level: Easy to Moderate

  1. Join Amazon's Referral Program and create an affiliate account at Amazon. You will need to supply your direct deposit details as Amazon charges to issue affiliate checks (cheques)

  2. Once your affiliate registration is confirmed (this is a fast process) you will then be ready to start to create an Amazon widget for your blog. So go ahead and login to your affiliate account at Amazon and click on the widgets tab

  3. Now comes the fun part - choosing a widget. Amazon currently have 17 different widgets to choose from. The Amazon help section is good and I suspect will answer most of your questions if you get stuck.

  4. Choose your widget. For the purposes of this demonstration let's choose a Recommended Product Links widget. Click on the Add to Your Webpage button

  5. From the drop down select a product line eg Cameras and Photo. Select a subcategory eg General Bestsellers. Click the Continue button.


  6. Select the size of widget according to the location where it will be placed on your blog eg 160x600 in the sidebar of Blogger. Click on the Select This Size button at the right of the example widget


  7. Now you will need to customize your widget. Click on Customize Link Appearance and enter link and text colors to suit your blog. Ensure that the widget opens in a new window unless you are quite happy for your readers to leave your blog. Leave this window open in the meantime as we will be returning


  8. In a new window login to Blogger if not already logged in

  9. Navigate to Layout > Page Elements

  10. Click on Add Gadget in the sidebar and choose HTML/Javascript from the list of available gadgets

  11. Copy the widget code which contains Amazon's tracking code and paste it into the content area of the gadget. Add a title if you wish. Click the Save button

  12. Use the drag and drop feature to reposition your widgets in the sidebar in the order that you want them to appear. Save any changes

  13. Click on View Blog and admire your new widget in the sidebar of your blog

Tips and Troubleshooting
Some placements of Amazon widgets will require tweaks to your Blogger template. For instance the Carousel widget which I mentioned earlier I inserted under the header in my blog. To place an Amazon widget or for that matter any widget below the header and above the first post in Blogger do the following:

  1. Login to Blogger if not already logged in

  2. Navigate to Layout > Edit HTML

  3. Find the following line of code

    <b:section class='crosscol' id='crosscol' showaddelement='no'/>

  4. Replace the no with yes and click the Save button

  5. Navigate to Layout > Page Elements

  6. You will see that you can now add a gadget below the header

In this tutorial you have learnt about adding Amazon widgets to a Blogger Blogspot blog in order to earn cash from referral fees. Most bloggers earn around 4 to 6.5% in commission for items shipped from Amazon. While not the best affiliate scheme Amazon referral fees can add up to tidy sum at the end of the month. I would recommend giving it a try. You will need to experiment to get the best fit of location and widget. Good luck and let me know how you get on.

Related Articles
Add Amazon Product Links to Blogger Posts
List of Blog Know How Tutorials for Blogger Blogs
Add Chititka Ads to Blogger Blogspot Blog
Add an Affiliate Banner or Adsense Above Blogger Header
Add an Affiliate Banner to Blogger Header
Add an Affiliate Banner to Blogger Sidebar
Add an Affiliate Banner Below Blogger Post
Make Money Add Banner Ads to Blogger
5 Ways to Make Money from Blogger
Blogger Guide to Google Adsense Placement
Add Paypal Donate Button to Blogger
Blogger Guide to Google Adsense Myths

Add Social Bookmark Buttons to Blogger

In today's Blogger tutorial (Blogspot tutorial) you will learn how to place social bookmark buttons in the sidebar, footer and below each post in a Blogger Blogspot blog. This is a social bookmarking script for individual buttons or icons rather than the Add This all-in-one solution that I have previously written about. These free social bookmark buttons will encourage social bookmarking SEO by having your visitors save their favorite content and hopefully share it on social media sites such as Digg, Technorati and Stumble Upon thereby helping to grow your blog traffic.

I personally prefer to use an Add This social bookmark button because individual buttons can create a cluttered busy look. However, I also realize that the Add This social bookmarking button is not necessarily that recognizable to visitors who may have otherwise bookmarked your pages had the button been more recognizable to them.

YahooTwitterTechnoratiStumble UponRedditGoogleFacebookDiggDel.icio.us

Diggdel.icio.usMySpaceYahooTwitterTechnoratiStumble UponReddit


How to Add Social Bookmark Buttons to Blogger Sidebar or Footer

1. Login to Blogger if not already logged in

2. Navigate to Page Layout > Page Elements

3. Click on Add Gadget in Sidebar or Footer

4. Select HTML/Javascript gadget from the list of available gadgets

5. Copy and paste the social bookmarking button code into the content box that is available for free download below. Note you will only be able to add the small social bookmarking buttons to the sidebar unless you only want a few of them.

Download Code for Large Buttons (48x48)
Download Code for Small Buttons (24x24)

6. Add a title such as Bookmark and Share if you wish

7. Click on the Save button

8. Use the drag and drop feature in the sidebar to reposition the new widget if necessary and save again

9. Click on View Blog to admire new social bookmarking buttons


How to Add Social Bookmark Buttons Below Every Post in Blogger

1. Login to Blogger if not already logged in

2. Navigate to Page Layout > Edit HTML

3. Back up your template as a precaution by downloading it to your computer

4. Check the Expand Widget Templates box

5. Find the following line of code using CTRL + F

<p><data:post.body/></p>

or

<data:post.body/>

6. Paste the button code below directly below this line

Download Code for Large Buttons (48x48)
Download Code for Small Buttons (24x24)

7. Click on the Save Template button to save

8. Click on View Blog to admire your new social bookmarking button set at the bottom of your blog


Tips and Troubleshooting
  • To center the social bookmarking buttons
    <p><data:post.body/></p>
    <div align='center'>
    Your social bookmarking button code goes here
    <br/>
    </div>

  • To have your social bookmarking buttons only appear on post pages you will need to enclose the code in an if statement

    <p><data:post.body/></p>
    <b:if cond='data:blog.pageType == "item"'>
    Your social bookmarking button code goes here
    <br/>
    </b:if>

  • To center the social bookmarking buttons and have them appear only on post pages
    <p><data:post.body/></p>
    <b:if cond='data:blog.pageType == "item"'>
    <div align='center'>
    Your social bookmarking button code goes here
    <br/>
    </div></b:if>

  • To center the social bookmarking buttons and have them appear only on post pages
    <p><data:post.body/></p>
    <b:if cond='data:blog.pageType == "item"'>
    <div align='center'>
    Your social bookmarking button code goes here
    <br/>
    </div></b:if>

  • To add extra social bookmarking buttons to this set download the Aqauticus Icon Set

  • To change the social bookmarking buttons for another set simply do the following:

    1. To find other social bookmarking buttons please do check out my article Best Free Social Bookmark Button Sets for Blogger first as very likely you will find something suitable in that collection. Download your preferred icon set. These will be in a zip file so you will need to unzip them and take a look at what sizes are on offer. Most icon sets come in at least several sizes.

    2. Upload your button images to Blogger or to an image storage site like Photobucket or Flickr. One easy way to upload to Blogger is to create a post called images that you never publish. Then upload the images you want individually (that's the drawback). Copy the URL address of the button image and paste it into the social bookmarking button code replacing existing URLs

    3. Change the URL address of each button in the button code I have supplied. That's the code beginning with scr='


In today's tutorial you have learned how to add social bookmark buttons using a social bookmarking script to the sidebar, footer and below each post in a Blogger blog (Blogspot blog). I have supplied you with the code for a small and large social bookmarking button set to get you started. I suggest you download the codes first and install them on your blog. Then it is just a simple matter of changing the URL address of the social bookmarking buttons if you wish to substitute these for a new set of social bookmarking buttons. Also in this tutorial I offered you some tips and troubleshooting suggestions for adding your social bookmarking buttons to Blogger. If there are other issues that crop up for you as always please ask. I am interested in hearing from anyone about how they got on installing these social bookmark buttons.


Related Articles
List of Blog Know How Tutorials for Blogger Blogs
Add a Social Bookmarking Button to Blogger
Best Free Social Bookmark Icon Sets for Blogger