Popular Posts

Showing posts with label CSS in Blogger. Show all posts

How to Add Borders to a Blogger Footer Blogspot

In this Blogger tutorial I expand on my previous article about how to add a 3-4 column footer to Blogger by showing you how add border styling to the new footer. You will learn how to add a border around all of your footer columns or around only part of the footer columns. You will also learn how to add different border styles and border colors to customize your 3-4 column footer.

If you have just landed here and need instructions on how to add a 3 or 4 column footer to your Blogger blog then please refer to how to add a 3 or 4 column footer to a Blogger template (Blogspot template)

This is a walkthrough designed to assist bloggers with no experience of CSS styling who want to enhance their Blogger template with borders and other CSS styling. By following these examples you will gain the knowledge you need to make many types of custom changes to the borders of your new Blogger footer. For help with changing the background of your blogger footer please see my article How to Change the Background a Blogger Footer.

How to Add Borders to the Footer of a Blogger Template
To add lines (commonly known as borders) to a Blogger template footer we need to add some CSS styling.

Before beginning to add borders there are 3 values to consider:

  • width of the border (line thickness eg 1px, 2px, 3px and so on)
  • line style of the border (solid, dotted, dashed, double)
  • color of the border (hex color)

  1. How to Add a Border Around the Outside of a Blogger Footer
    First we add the border property and then add the border style, border width and the border color values. In these following examples just by changing these values we can achieve lots of different results.

    • To Add a Dashed Border Around the Outside of a Blogger Footer
      With the following code a dashed black line 1px thick will be added around the outside of the footer.

      #footer-columns {

      margin:0 auto;
      clear:both;
      }

      Change to:

      #footer-columns {
      border: 1px dashed #000000;
      clear:both;
      margin:0 auto;
      }


    • To Add a Dotted Border Around the Outside of a Blogger Footer
      By changing the dashed black line to a dotted border it is simple to get a different line style.

      #footer-columns {
      clear:both;
      margin:0 auto;
      }

      Change to:

      #footer-columns {
      border: 1px dotted #000000;
      clear:both;
      margin:0 auto;
      }


    • To Add a Solid Border (Blue 3px thick) Around the Outside of a Blogger Footer
      To add extra emphasis we can change the line color and its thickness. Here I have made the line blue rather than black and thickened it from 1px to 3px.

      #footer-columns {
      clear:both;
      margin:0 auto;
      }

      Change to:

      #footer-columns {
      border: 3px solid #336699;
      clear:both;
      margin:0 auto;
      }


  2. To Add a Partial Border to a Blogger Footer
    Sometimes we might want to add a border to only one part of the footer area rather than the whole thing. Again we add the border property but we append it with the following values: (top, bottom, left, right) depending on where we want to place the border.

    • To Add a Solid Border to the Top of a Blogger Footer
      #footer-columns {
      clear:both;
      margin:0 auto;
      }

      Change to:

      #footer-columns {
      border-top: 1px solid #000000;
      clear:both;
      margin:0 auto;
      }


    • To Add a Solid Border to the Bottom of a Blogger Footer
      #footer-columns {
      clear:both;
      margin:0 auto;
      }

      Change to:

      #footer-columns {
      border-bottom: 1px solid #000000;
      clear:both;
      margin:0 auto;
      }

    • To Add a Dashed Border to the Top of a Blogger Footer
      #footer-columns {
      clear:both;
      margin:0 auto;
      }

      Change to:

      #footer-columns {
      border-top: 1px dashed #000000;
      clear:both;
      margin:0 auto;
      }

    • To Add a Dotted Border to Both Top and Bottom of a Blogger Footer
      #footer-columns {
      clear:both;
      margin:0 auto;
      }

      Change to:

      #footer-columns {
      border-top: 1px dotted #000000;
      border-bottom: 1px dotted #000000;

      clear:both;
      margin:0 auto;
      }

    • To Add a Dotted Border 4px thick to Both Top and Bottom of a Blogger Footer
      #footer-columns {
      clear:both;
      margin:0 auto;
      }

      Change to:

      #footer-columns {
      border-top: 4px dotted #000000;
      border-bottom: 4px dotted #000000;

      clear:both;
      margin:0 auto;
      }


    • To Add a Blue Solid Border 5px thick to Both Top and Bottom of a Blogger Footer
      #footer-columns {
      clear:both;
      margin:0 auto;
      }

      Change to:

      #footer-columns {
      border-top: 5px solid #336699;
      border-bottom: 5px solid #336699;

      clear:both;
      margin:0 auto;
      }


In this Blogger tutorial (Blogspot tutorial) I have shown you how to make some simple customizations to the borders of a Blogger footer. This tutorial is intended as an extension of my earlier tutorial on adding a three or four column footer to Blogger. However it is also suitable if you are using a custom template and want to enhance the footer styling further. You have learned how to add borders to a Blogger footer and change the position, color, width and styling.

If you want to know more about CSS styling I will be publishing further articles in the future. Look out for my next article in this series How to Add Backgrounds to a Blogger Footer.

Related Articles
List of Blog Know How Tutorials for Blogger Blogs
How to Add a 3 or 4 Column Footer to a Blogger Template

How to Add a Table to Blogger Blogspot Post

This Blogger tutorial (Blogspot tutorial) explains how to put a table into a Blogger post. You will learn how to create tables in Blogger ranging from a simple table to a more complex table with alternating colors.

We will start with a basic table and gradually add CSS styling to the table to improve the look and functionality until we have built the table pictured directly below. No knowledge of CSS and HTML is assumed so this Blogger tutorial is suitable for absolute blogging beginners.


A Blogger Table Caption
Table Header Table Header Table Header
Table Cell Table Cell Table Cell

Tables are a useful way to display information particularly tabulated information. Tables are good whenever you want to align information so that it is easy to read and understand. You can add text, hyperlinks and even images to a table which makes them very useful for presenting information.

There is no easy way to add tables in Blogger yet. Even if you are using the new editor you will note that no table button is provided. Fortunately it is easy enough to use a bit of CSS styling to spruce up a table and enter this manually into a Blogger post.

How to Add a Table to Blogger Posts
First you will learn how to add a simple table to Blogger. We are going to start with a table with 3 columns and 4 rows including a header row. Then I will show you step by step how to add different features to the table including how to add extra rows, a background color to the header, a border, a caption, change the size of the table, center align the table and more.


Table Header Table Header Table Header
Table Cell Table Cell Table Cell


  1. In Blogger open either a new post or an existing post that you wish to add a table to

  2. Click on the Edit HTML tab on your Blogger editor

  3. Copy the following code into your Blogger post which will produce the basic table as shown above:

    <table border="2" bordercolor="#0033FF" style="background-color:#99FFFF" width="100%" cellpadding="3" cellspacing="3">
    <tr>
    <th>Table Header</th>
    <th>Table Header</th>
    <th>Table Header</th>
    </tr>
    <tr>
    <td>Table Cell</td>
    <td>Table Cell</td>
    <td>Table Cell</td>
    </tr>
    <tr>
    <td>Table Cell</td>
    <td>Table Cell</td>
    <td>Table Cell</td>
    </tr>
    <tr">
    <td>Table Cell</td>
    <td>Table Cell</td>
    <td>Table Cell</td>
    </tr>
    </table>


  4. Make changes to the table to suit your own Blogger template if necessary by changing the following:

    <table border="2" bordercolor="#0033FF" style="background-color:#99FFFF" width="100%" cellpadding="3" cellspacing="3">

    • Border width (blue)
    • Border color (black)
    • Background color (red)
    • Table width (orange) Can be a percentage or actual width eg 500px

  5. Now we are going to fix an annoying problem in Blogger which renders too much white space above the table. We do this by adding the following styling denoted in red directly above the table tag and adding a closing </div> at the end of the table code

    <style type="text/css">.nobrtable br { display: none }</style>
    <div class="nobrtable">

    <table border="2" bordercolor="#0033FF" style="background-color:#99FFFF" width="100%" cellpadding="3" cellspacing="3">
    <tr>
    <th>Table Header</th>
    <th>Table Header</th>
    <th>Table Header</th>
    </tr>
    <tr>
    <td>Table Cell</td>
    <td>Table Cell</td>
    <td>Table Cell</td>
    </tr>
    <tr>
    <td>Table Cell</td>
    <td>Table Cell</td>
    <td>Table Cell</td>
    </tr>
    <tr">
    <td>Table Cell</td>
    <td>Table Cell</td>
    <td>Table Cell</td>
    </tr>
    </table></div>

  6. Let's add some further styling to our table header to improve the look of our table as denoted in red. Change the background color and color attributes to suit your own color scheme if you wish


    Table Header Table Header Table Header
    Table Cell Table Cell Table Cell
    Table Cell Table Cell Table Cell
    Table Cell Table Cell Table Cell


    <style type="text/css">.nobrtable br { display: none }</style>
    <div class="nobrtable">
    <table border="2" bordercolor="#0033FF" style="background-color:#99FFFF" width="100%" cellpadding="3" cellspacing="3">
    <tr style="background-color:#0033FF; color:#ffffff; padding-top:5px; padding-bottom:4px;">
    <th>Table Header</th>
    <th>Table Header</th>
    <th>Table Header</th>
    </tr>
    <tr>
    <td>Table Cell</td>
    <td>Table Cell</td>
    <td>Table Cell</td>
    </tr>
    <tr>
    <td>Table Cell</td>
    <td>Table Cell</td>
    <td>Table Cell</td>
    </tr>
    <tr>
    <td>Table Cell</td>
    <td>Table Cell</td>
    <td>Table Cell</td>
    </tr>
    </table>


  7. Now let's add another row to our table for Blogger so you can see how this is done


    Table Header Table Header Table Header
    Table Cell Table Cell Table Cell
    Table Cell Table Cell Table Cell
    Table Cell Table Cell Table Cell
    Table Cell Table Cell Table Cell


    <style type="text/css">.nobrtable br { display: none }</style>
    <div class="nobrtable">
    <table border="2" bordercolor="#0033FF" style="background-color:#99FFFF" width="100%" cellpadding="3" cellspacing="3">
    <tr style="background-color:#0033FF; color:#ffffff; padding-top:5px; padding-bottom:4px;">
    <th>Table Header</th>
    <th>Table Header</th>
    <th>Table Header</th>
    </tr>
    <tr>
    <td>Table Cell</td>
    <td>Table Cell</td>
    <td>Table Cell</td>
    </tr>
    <tr>
    <td>Table Cell</td>
    <td>Table Cell</td>
    <td>Table Cell</td>
    </tr>
    <tr>
    <td>Table Cell</td>
    <td>Table Cell</td>
    <td>Table Cell</td>
    </tr>

    </table>


  8. In this step we are going to center the contents of our Blogger table. This can be done in several ways but we are going to take a short cut here by assigning a style to every table row


    Table Header Table Header Table Header
    Table Cell Table Cell Table Cell
    Table Cell Table Cell Table Cell
    Table Cell Table Cell Table Cell
    Table Cell Table Cell Table Cell


    <style type="text/css">.nobrtable br { display: none } tr {text-align: center;} </style>
    <div class="nobrtable">
    <table border="2" bordercolor="#0033FF" style="background-color:#99FFFF" width="100%" cellpadding="3" cellspacing="3">
    <tr style="background-color:#0033FF; color:#ffffff; padding-top:5px; padding-bottom:4px;">

  9. Now we are going to jazz up our Blogger table by adding alternating colored rows to improve readibility and appearance. By far the easiest way to do this is to assign a class.


    Table Header Table Header Table Header
    Table Cell Table Cell Table Cell
    Table Cell Table Cell Table Cell
    Table Cell Table Cell Table Cell
    Table Cell Table Cell Table Cell


    <style type="text/css">.nobrtable br { display: none } tr {text-align: center;} tr.alt td {background-color: #eeeecc; color: black;}</style>
    <div class="nobrtable">
    <table border="2" bordercolor="#0033FF" style="background-color:#99FFFF" width="100%" cellpadding="3" cellspacing="3">
    <tr style="background-color:#0033FF; color:#ffffff; padding-top:5px; padding-bottom:4px;">
    <th>Table Header</th>
    <th>Table Header</th>
    <th>Table Header</th>
    </tr>
    <tr class="alt">
    <td>Table Cell</td>
    <td>Table Cell</td>
    <td>Table Cell</td>
    </tr>
    <tr>
    <td>Table Cell</td>
    <td>Table Cell</td>
    <td>Table Cell</td>
    </tr>
    <tr class="alt">
    <td>Table Cell</td>
    <td>Table Cell</td>
    <td>Table Cell</td>
    </tr>
    </table>


  10. It is also easy to add a caption to your Blogger table. For a caption above the table simply add the caption line as shown in red. For a caption below the table add the caption line in red and a style as shown in blue


    A Blogger Table Caption
    Table Header Table Header Table Header
    Table Cell Table Cell Table Cell
    Table Cell Table Cell Table Cell
    Table Cell Table Cell Table Cell
    Table Cell Table Cell Table Cell


    <style type="text/css">.nobrtable br { display: none } tr {text-align: center;} tr.alt td {background-color: #eeeecc; color: black;} tr {text-align: center;} caption {caption-side:bottom;} </style>
    <div class="nobrtable">
    <table border="2" bordercolor="#0033FF" style="background-color:#99FFFF" width="100%" cellpadding="3" cellspacing="3">
    <caption>A Blogger Table Caption</caption>
    <tr style="background-color:#0033FF; color:#ffffff; padding-top:5px; padding-bottom:4px;">
    <th>Table Header</th>
    <th>Table Header</th>
    <th>Table Header</th>
    </tr>
    <tr class="alt">
    <td>Table Cell</td>
    <td>Table Cell</td>
    <td>Table Cell</td>
    </tr>
    <tr>
    <td>Table Cell</td>
    <td>Table Cell</td>
    <td>Table Cell</td>
    </tr>
    <tr class="alt">
    <td>Table Cell</td>
    <td>Table Cell</td>
    <td>Table Cell</td>
    </tr>
    </table>


  11. One more important property needs to be addressed in our new Blogger table to improve the look. We can reduce the double border into a single one. The easiest way to do this is to change the cellspacing to zero as denoted in red. Or, alternatively we can apply the border collapse property to our table as shown in blue. Note: Border collapse may not be supported by all browsers particularly if the cellspacing attribute is defined also)


    A Blogger Table Caption
    Table Header Table Header Table Header
    Table Cell Table Cell Table Cell
    Table Cell Table Cell Table Cell
    Table Cell Table Cell Table Cell
    Table Cell Table Cell Table Cell


    <style type="text/css">.nobrtable br { display: none } tr {text-align: center;} tr.alt td {background-color: #eeeecc; color: black;} tr {text-align: center;} caption {caption-side:bottom;}</style>
    <div class="nobrtable">
    <table border="2" bordercolor="#0033FF" style="background-color:#99FFFF; border-collapse:collapse;" width="100%" cellpadding="10" cellspacing="0">
    <caption>A Blogger Table Caption</caption>
    <tr style="background-color:#0033FF; color:#ffffff; padding-top:5px; padding-bottom:4px;">
    <th>Table Header</th>
    <th>Table Header</th>
    <th>Table Header</th>
    </tr>
    <tr class="alt">
    <td>Table Cell</td>
    <td>Table Cell</td>
    <td>Table Cell</td>
    </tr>
    <tr>
    <td>Table Cell</td>
    <td>Table Cell</td>
    <td>Table Cell</td>
    </tr>
    <tr class="alt">
    <td>Table Cell</td>
    <td>Table Cell</td>
    <td>Table Cell</td>
    </tr>
    </table>


  12. Now go ahead and add your data to your new Blogger table. Filling in each instance of "Table Header" and "Table Cell" with your own data. The information you add to the Blogger table can be text, hyperlinks or even an image

  13. Save your changes to the Blogger table by saving and publishing your post

Please feel free to use this Blogger table as a template whenever you need to add a table to your Blogspot post. If you want to regularly add a table to your Blogger posts that consistently looks the same you could consider adding the table CSS styling to your Blogger template.

In this Blogger tutorial (Blogspot tutorial) I have demonstrated how to build a complex table in HTML and CSS to insert into a Blogger post. You have learned how to manipulate a variety of table properties and attributes to create a table for Blogger that matches the color scheme of your blog and is functional and appealing.

Related Articles
List of Blog Know How Tutorials for Blogger Blogs
How to Change the Bullet Point Style in Blogger (Blogspot)
How to Remove Image Border in Blogger Template Simple
How to Change or Delete Image Borders in Blogger Posts
How to Add CSS Styling to Blockquotes in Blogger
How to Add, Delete or Remove Blogger Image Borders
How to Align and Justify Posts in Blogger
How to Add a Divider Between Blogger Posts
How to Add or Change a Background Image in a Blogger Template

Add a Comments Counter Button to Blogger Blogspot

In this Blogger tutorial (Blogspot tutorial) you will learn how to add a comments counter button to Blogger (Blogspot) to show off the number of comments each of your posts has received.

A comment counter button (bubble) will have the effect of encouraging visitors to comment on your Blogger blog and also help to highlight the credibility of your articles.


Installing this Blogger hack to add a comment counter button only takes a few minutes. The changes needed to add the comment bubble to Blogger while not difficult do involve adding a small snippet of code to your Blogger template in two places. For this reason I strongly urge you to back up your Blogger template before attempting this blogger hack.

Blogger Tutorial Difficulty - easy to medium


How to Add a Comments Counter Bubble to Blogger
A Step-by-Step Walkthrough
The following steps will insert a fully clickable comments counter button on the same line as the post title in Blogger. The comments counter is right aligned by default.

  1. Log in to Blogger and the blog you wish to apply these changes to

  2. Select Design > Edit HTML

  3. Click on Download Full Template to back up your template before you make any changes

  4. Check the Expand Widget Templates box

  5. In the CSS Styling section of your Blogger template and just before the ]]></b:skin>

    .comments-button {
    width : 48px;
    height : 48px;
    background : url(https://blogger.googleusercontent.com/img/b/R29vZ2xl/AVvXsEjs2d6Zxmb8zLB2Tb4vrkKIOtwuGcgt87e2sVJ8W6VqpjeAGPRp03ulohrpZuJ9FS6xWEs_m96zPfZE4H6K2IuPsxwNYkmb_cDPA4IscdQkBYrTU91SZCNLqaLMiPYvK6P3BU2S0Aap0oD_/s200/comment-counter-bubble.png) no-repeat;
    float : right;
    font-size : 18px;
    margin-top : -15px;
    margin-right : 2px;
    text-align : center;
    padding-top:10px;
    }

  6. Now find the following block of code using CTRL key + F

    <b:includable id='post' var='post'>
    <div class='post hentry uncustomized-post-template'>
    <a expr:name='data:post.id'/>
    <b:if cond='data:post.title'>
    <h3 class='post-title entry-title'>
    <b:if cond='data:post.link'>
    <a expr:href='data:post.link'><data:post.title/></a>

  7. Copy this code block:

    <b:if cond='data:post.allowComments'>
    <a class='comments-button' expr:href='data:post.addCommentUrl' expr:onclick='data:post.addCommentOnclick'><data:post.numComments/></a>
    </b:if>

  8. Insert as follows:

    <b:includable id='post' var='post'>
    <div class='post hentry uncustomized-post-template'>
    <a expr:name='data:post.id'/>
    <b:if cond='data:post.title'>
    <h3 class='post-title entry-title'>
    <b:if cond='data:post.allowComments'>
    <a class='comments-button' expr:href='data:post.addCommentUrl' expr:onclick='data:post.addCommentOnclick'><data:post.numComments/></a>
    </b:if>

    <b:if cond='data:post.link'>
    <a expr:href='data:post.link'><data:post.title/></a>

  9. Save template and then view blog to admire your new comment counter badge.


Tips and Troubleshooting
  1. If you prefer you can replace the button image I have provided with your own image. You can find other buttons easily enough by doing a Google search with a term like "speech button icons".

    Upload your button to a hosting service such as Photobucket and change the URL address of the image in the CSS styling section. The following example will render a smaller blue button. Note I have reduced the font size to accommodate the change. You may need to play around with the settings to get the font sizing right for your image.

    .comments-button {
    width : 48px;
    height : 48px;
    background : url(https://blogger.googleusercontent.com/img/b/R29vZ2xl/AVvXsEjPVOclvOE_V92N1LKKzQX0uf7Z9niQxAYEReNn5RuOY8wSqq7DzxD97lc4Cc4-BVUpjn0n-4Z2uT2Cb44RQvqzqsLqkBxe7wFgC0phcUUBM4hBv7ZqosyzEypQu6eUXmmVbfI4ftJNR1cK/s200/comment-counter-bubble-2.png) no-repeat;
    float : right;
    font-size : 14px;
    margin-top : -15px;
    margin-right : 2px;
    text-align : center;
    padding-top:10px;
    }


  2. If you want your comment counter to be left aligned instead of right you will need to change the CSS styling from float:right; to float:left;

In today's Blogger tutorial I have covered how to add a comments counter to a Blogger blog (blogspot blog) that will appear to the right of your blog post title. A comments counter is a way to encourage visitors to comment and is a way of showing off the credibility of your blog posts. Good luck! Any comments about installing this blogger hack are most welcome.


Related Articles
List of Blog Know How Tutorials for Blogger Blogs
Tips to Add Digg Button to Blogger Blogspot
Add Twitter Followers Counter to Blogger
Add Twitter Badge or Button to Blogger
Add a Social Bookmarking Button to Blogger
Add Social Bookmark Buttons to Blogger

How to Remove or Change the Blog Title Border in Blogger (Blogspot) - Minima Template

In this Blogger tutorial I discuss how to change the blog title border color or remove the border in a Blogger template (Blogspot template) by changing either the CSS styling of the border manually or by using the Blogger Template Designer feature.

Lots of bloggers have updated their Blogger template to the new default series of Blogger templates for 2010. There are however many of you who are still using the default Minima template from 2006 (and there are lots of good reasons to do so) so this tutorial is for you and anyone else who is using a custom Blogger template based on Minima.

You will learn how to change the border styling around the blog title to suit your individual requirements. You can either change the border color or remove the border altogether. If you want to remove the border around images in Blogger posts (Blogspot posts) then please refer to my Blogger tutorial How to Add, Change or Remove the Border Image in Blogger Posts

Remove or Change the Blog Title Border in Blogger (Blogspot)
There are two simple ways to remove the border around the blog title in Blogger. We are going to hide the border rather than actually remove the code that creates it by making the border color transparent. I will also show you how to change the border color.

Method 1 discusses how to do this using the Blogger Template Designer while Method 2 describes how to change the blog title border manually by changing the code.


Method 1 - Using Blogger Template Designer
  1. Log in to Blogger
  2. From the Dashboard go to Design > Template Designer
  3. Go to Templates > Advanced > Border Color


  4. Choose the down arrow color picker to activate the color palette window
  5. Choose transparent which is below the color palette to remove the border around the blog title completely. You now will see the blog title border disappear. Or choose a new color from the color palette to change the color

    Remove Blog Title Border in Blogger
    Remove Blog Title Border

    Change Blog Title Border Color in Blogger
    Change Blog Title Border Color

  6. Click on Apply to Blog to save your changes


Method 2
If the Blogger Template Designer is not working on your template for some reason you can tweak the code in your template to remove the border around the blog title

  1. Log in to Blogger
  2. From the Dashboard go to Design > Edit HTML
  3. Back up your Blogger template
  4. Find the border color variable which will be near the top of the template code


  5. Change the border color value to transparent to remove the border altogether so that your code now looks like this:

    <Variable name="bordercolor" description="Border Color"
    type="color" default="#ccc" value="transparent">


    or change the value to a color of your choice eg

    <Variable name="bordercolor" description="Border Color"
    type="color" default="#ccc" value="#ff7f00">

  6. Save your template and view your blog to see that the border around the blog title has been removed or changed color

    Remove Blog Title Border CSS Styling in Blogger


Tips and Troubleshooting
Below are some tips to help you further customize the blog title border width. You can either remove the inner border, thicken the outer border or thicken both borders around the blog title in Blogger.

  1. To change the width of the border around the blog title in Minima change the following:

    #header {
    margin: 5px;
    border: 1px solid $bordercolor;
    text-align: center;
    color:$pagetitlecolor;
    }

    to

    #header {
    margin: 5px;
    border: 10px solid $bordercolor;
    text-align: center;
    color:$pagetitlecolor;
    }

    This code increases the border width from 1px to 10px

  2. To remove the inner border around the blog title in Minima change the code to the following:

    #header {
    margin: 5px;
    border: 10px solid $bordercolor; (remove this line)
    text-align: center;
    color:$pagetitlecolor;
    }

  3. To increase the width of the outer border around the blog title in Minima change this code

    #header-wrapper {
    width:660px;
    margin:0 auto 10px;
    border:10px solid $bordercolor;
    }


In this Blogger tutorial you have learned two methods to change the color of the border around a blog title in Blogger blog (Blogspot blog). I have also shown you how to increase the size of the border width. This tutorial applies particularly to the default Blogger template Minima but also is relevant for any blogger using a custom Blogger template based on Minima. Good luck!


Related Articles
List of Blog Know How Tutorials for Blogger Blogs
How to Add CSS Styling to Blockquotes in Blogger
How to Add, Delete or Remove Blogger Image Borders
How to Align and Justify Posts in Blogger
How to Add a Divider Between Blogger Posts
How to Add or Change a Background Image in a Blogger Template

How to Highlight Author Comments in Blogger Posts

In this Blogger tutorial I will show you how to highlight the author comments section of your Blogger template (Blogspot template) using CSS styling.

Benefits of Adding CSS Styling to Author Comments
If you are using a default Blogger template chances are it is difficult to differentiate between comments made by visitors and comments made by you, the blog author. If you only have a few comments per post that may not be enough of an issue for you. If however, you have some posts with lots of comments you may need to make your remarks stand out from those of your visitors. We can do that by adding CSS styling to highlight your author comments.

What Will I Learn in This Tutorial?
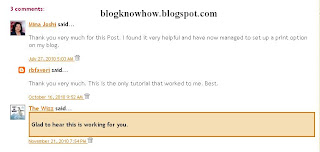
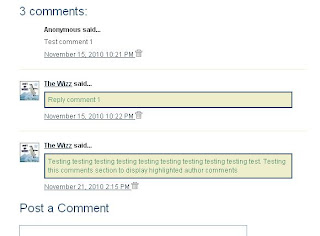
In this Blogger tutorial you will learn how to easily add some highlighting to your comments so that they will never get lost in the crowd again. This requires a small amount of tweaking to your Blogger template which is not difficult to do if care is taken. The image below shows one example of what can be achieved using this Blogger hack and some CSS styling.


Will This Blogger Hack Work on My Template?
I have tested this Blogger hack on both the old generation of Blogger templates (Minima and Sand Dollar) and the latest generation of default Blogger templates eg Simple. It will also work on custom templates as the comments code is likely to be very similar.

If you are using a custom Blogger template and run into difficulty you can also try this alternative method to highlight author comments in Blogger posts

How to Add CSS Styling to Author Comments in a Blogger Post
The following instructions will highlight author comments in the comments section of a Blogger post. The code creates a shaded box around the comments made by the blog author. These changes will not affect the CSS the styling of any of the other comments made.

Instructions to Add CSS Highlighting to Author Comments in Blogger

  1. Login to Blogger

  2. From the Dashboard go to Design > Edit HTML

  3. Back up your template by downloading it to your computer

  4. Check the Expand Widget Templates checkbox on the top righthand side

  5. Use CTRL + F by entering the following into the search box

    <dd class='comment-body'>

  6. Immediately above this line paste the following code:

    <b:if cond='data:comment.author == data:post.author'>
    <dd class='comment-body-author'>
    <p><data:comment.body/></p>
    </dd>
    <b:else/>

  7. Now look for this code block

    <dd class='comment-body'>
    <b:if cond='data:comment.isDeleted'>
    <span class='deleted-comment'><data:comment.body/></span>
    <b:else/>
    <p><data:comment.body/></p>
    </b:if>
    </dd>

    and paste </b:if> immediately after it.

  8. Your code will now look like this:

    <div expr:id='data:widget.instanceId + &quot;_comments-block-wrapper&quot;'>
    <dl expr:class='data:post.avatarIndentClass' id='comments-block'>
    <b:loop values='data:post.comments' var='comment'>
    <dt expr:class='&quot;comment-author &quot; + data:comment.authorClass' expr:id='data:comment.anchorName'>
    <b:if cond='data:comment.favicon'>
    <img expr:src='data:comment.favicon' height='16px' style='margin-bottom:-2px;' width='16px'/>
    </b:if>
    <a expr:name='data:comment.anchorName'/>
    <b:if cond='data:blog.enabledCommentProfileImages'>
    <data:comment.authorAvatarImage/>
    </b:if>
    <b:if cond='data:comment.authorUrl'>
    <a expr:href='data:comment.authorUrl' rel='nofollow'><data:comment.author/></a>
    <b:else/>
    <data:comment.author/>
    </b:if>
    <data:commentPostedByMsg/>
    </dt>


    <b:if cond='data:comment.author == data:post.author'>
    <dd class='comment-body-author'>
    <p><data:comment.body/></p>
    </dd>
    <b:else/>


    <dd class='comment-body' expr:id='data:widget.instanceId + data:comment.cmtBodyIdPostfix'>
    <b:if cond='data:comment.isDeleted'>
    <span class='deleted-comment'><data:comment.body/></span>
    <b:else/>
    <p>
    <data:comment.body/>
    </p>
    </b:if>
    </dd>

    </b:if>

    </dd>
    <dd class='comment-footer'>
    <span class='comment-timestamp'>
    <a expr:href='data:comment.url' title='comment permalink'>
    <data:comment.timestamp/>
    </a>
    <b:include data='comment' name='commentDeleteIcon'/>
    </span>
    </dd>
    </b:loop>
    </dl>
    </div>

  9. Now using CTRL + F again find this line ]]></b:skin>

  10. Paste the following immediately before ]]></b:skin>

    .comment-body-author {
    background: #f5deb3;
    border: 2px solid #de7008;
    padding: 5px;
    }

  11. Save your template changes

  12. Click on View Blog and go to a post that you have commented on to see the CSS styling has highlighted your comments.


Alternative Method to Add Highlighting to Author Comments in Blogger
The following method will also add highlighting to author comments in Blogger and can be used if you have difficulty with the first method. It does however involve changing some code rather than just adding some so this is not as desirable in terms of future proofing your template for Blogger updates.


  1. Login to Blogger

  2. From the Dashboard go to Design > Edit HTML

  3. Back up your template by downloading it to your computer

  4. Check the Expand Widget Templates checkbox on the top righthand side

  5. Find the following section of code by using CTRL + F and entering <data:comment.body/> into the search box

    <span class='deleted-comment'><data:comment.body/></span>
    <b:else/>
    <p><data:comment.body/></p>
    <b:include data='comment' name='commentDeleteIcon'/>
    </b:if>

  6. Replace with the following code after <span class='deleted-comment'> and before </b:if> as shown in red:

    <span class='deleted-comment'>
    <!--Highlight Author Comments Start-->
    <b:if cond='data:comment.author == data:post.author'>
    <p class='comment-body-author'><data:comment.body/></p>
    <b:else/>
    <p><data:comment.body/></p>
    </b:if>
    <!--Highlight Author Comments End-->

    </b:if>

  7. Use CTRL + F to find ]]></b:skin> that closes the CSS styling section

  8. Paste the following code immediately above ]]></b:skin>

    p.comment-body-author {
    background: #eeeecc;
    border: 2px solid #335577;
    padding: 5px;
    color:#558866;
    }

  9. Save your template

  10. Click on View Blog and navigate to a post that you have commented on to see the that your comments will now be highlighted


In this Blogger tutorial you have learned two different methods to add CSS styling to highlight the author comments in your Blogger posts. Obviously there is still some work to do on your part to adjust the colors in the CSS styling to match the color scheme of your blog. Good luck!


Related Articles
List of Blog Know How Tutorials for Blogger Blogs
Embedding a Comment Form Below Each Post
How to Get More Comments on Your Blogger Blog
Add Missing Embedded Comment Form to Blogger

Add CSS Styling to Blockquotes in a Blogger Template

Today I continue the series of Blogger tutorials (Blogspot tutorials) by showing you how to apply CSS styling to blockquotes in a Blogger template. Other articles I have already published on the subject of CSS styling include:

How to Add, Delete or Remove Blogger Image Borders
How to Align and Justify Posts in Blogger
How to Add a Divider Between Blogger Posts
How to Add or Change a Background Image in a Blogger Template.

Today's tutorial on Blogger blockquotes will be useful if you are using a default Blogger template or a third party custom template. It will show you how to change your blockquote area in the following ways:

  • Add a background color to the blockquote
  • Add a border around the background of the blockquote
  • Add or change the color of the blockquote text
  • Add or change padding around the text
  • Add or change the margin
  • Add a background image

Blogger beginners you can relax as I have written this Blogger tutorial with you in mind. I will walk you through the steps of styling the blockquote section and you will see that it is not as daunting as it first appears. This Blogger tutorial assumes no knowledge of CSS styling. I have rated the difficulty level as easy to medium because it does involve making adjustments to your Blogger template.

How to Change the Blockquote Section of a Blogger Template

First of all let's take a look at the CSS Styling for the blockquote section of a default Minima Blogger template.

.post-body blockquote {
line-height:1.3em;
}

.post blockquote {
margin:1em 20px;
}

.post blockquote p {
margin:.75em 0;
}

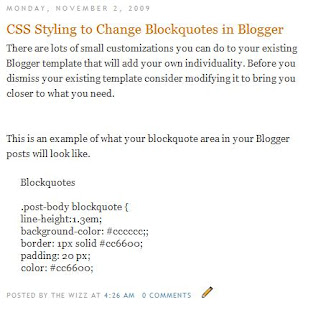
As you can see the blockquotes area of this Minima template has minimal styling. Apart from line height and margin indentation there has been no additional code added to improve the look of the template.

Minima Blockquotes No Extra CSS Styling
Let's go ahead and give the blockquotes in your Blogger posts some styling. I will use the Minima template to show you but you can do the same for another default template or custom template. As always back up your Blogger template by downloading it to your computer before you begin to make any changes.

  1. CSS Styling to Add a Background Color to Blockquotes
    Adding a background color to the blockquote area can be achieved in 1 of 2 ways.

    1. One way is to enter the hex color directly into the styling as I have done below. This code will add a light grey background to the blockquote area.

      .post-body blockquote {
      line-height:1.3em;
      background-color: #cccccc;
      }

    2. Another way to add a background color using CSS styling for the blockquote area is to make use of the variable names already set up. The border color is light grey #cccccc by default in a Minima template. The advantage of this option is that if you decide to change the border color under Layout > Fonts and Colors the blockquote color will automatically change to the new color too.

      .post-body blockquote {
      line-height:1.3em;
      background-color: $bordercolor;
      }

      If you wanted the background color to be the same as the blog title color rather than the border color you would write this instead

      .post-body blockquote {
      line-height:1.3em;
      background-color: $titlecolor;
      }

  2. CSS Styling to Add a Border Around Blockquotes
    You have your background in place now let's add a narrow border around the background to add some more definition. The following will add a 1px solid border around the outside of your blockquote area in your Blogger posts.

    .post-body blockquote {
    line-height:1.3em;
    background-color: #cccccc;
    border: 1px solid #cc6600;
    }

    or if using variables

    .post-body blockquote {
    line-height:1.3em;
    background-color: $bordercolor;
    border: 1px solid $titlecolor;
    }

    Blockquotes With a Background and Background Border
  3. CSS Styling to Add Padding Around Blockquotes
    Now if we were to leave the styling at this point one of the problems would be that the text would butt up against the background which is not a good look. To create some space between the text and the background edge all the way around we use CSS styling to add some padding like this:

    .post-body blockquote {
    line-height:1.3em;
    background-color: #cccccc;
    border: 1px solid #cc6600;
    padding: 20 px;
    }

    or if using variables

    .post-body blockquote {
    line-height:1.3em;
    background-color: $bordercolor;
    border: 1px solid $titlecolor;
    padding: 20 px;
    }

    Blockquotes With a Background, Background Border and Padding
  4. CSS Styling to Add or Change the Text Color of Blockquotes
    If you want to accent your blockquote area in your posts one effective way to do this is to make the blockquote text color a different color from the text color of your pages. We do this by picking a color and adding the following line to the code:

    .post-body blockquote {
    line-height:1.3em;
    background-color: #cccccc;
    border: 1px solid #cc6600;
    padding: 20 px;
    color: #cc6600
    }

    or if using variables

    .post-body blockquote {
    line-height:1.3em;
    background-color: $bordercolor;
    border: 1px solid $titlecolor;
    padding: 20 px;
    color: $titlecolor;
    }

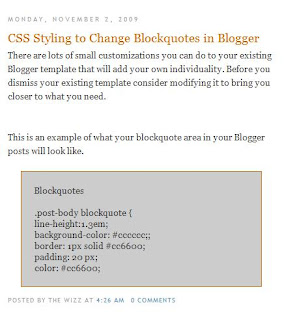
    Blockquotes With a Background, Background Border, Padding and Change of Text Color

Tips and Troubleshooting
If you want to add further modifications to the blockquotes area of your Blogger template here are several other possibilities.

  1. CSS Styling To Change the Margin of Blockquotes
    You can increase the margin from 1em to 1.5em by changing the margin line to
    margin: 1.5em 20px;

  2. CSS Styling to Add a Background Image to Blockquotes
    You can have your own image as a background in your blockquotes area of your posts by adding this line:

    background: url(http://URL of your image.jpg);

In today's Blogger tutorial (Blogspot tutorial) you have learned how to add CSS styling to the blockquotes area of your Blogger posts. I have shown you how to add a background, a background border, change the text color, add padding, change the margin and add a background image to the blockquotes code block. If you have a moment please let me know how you got on customizing your own Blogger template. Any questions please ask.


Related Articles
List of Blog Know How Tutorials for Blogger Blogs
How to Add, Delete or Remove Blogger Image Borders
How to Align and Justify Posts in Blogger
How to Add a Divider Between Blogger Posts
How to Add or Change a Background Image in a Blogger Template

Add or Change Background Image of a Blogger Template

In today's Blogger tutorial (Blogspot tutorial) I will show you how to both add a background image to a Blogger template if you don't have one already or change the existing background of your Blogger template.

I have chosen to write this article not because there aren't any how to articles already on the net but because they assume quite a bit of knowledge. I have taken a different tack with this post in that I assume you are an absolute beginner with no knowledge of Blogger templates.

For this reason I have provided some sample backgrounds for you to play around with. By just cutting and pasting these images you can see first hand how dramatically adding a different background to your Blogger template can change it. You will see that replacing your background image with these images isn't that difficult and hopefully it will give the confidence to branch out further and change the background of your Blogger template to suit your own needs. All that is needed is to insert a small snippet of code into the CSS styling section of your Blogger template and hey presto your Blogger template will take on a whole new look.

How to Change the Color of a Blogger Background (Default Templates)
If you are using a default Blogger template then you already have the option to change the background color to your own taste by going to Layout > Fonts and Colors. Some third party custom Blogger templates have this option too but by no means all. For instructions on changing the background color of custom templates see tips and troubleshooting below.

How to Add a Background Image to a Blogger Template
  1. Log in to Blogger if not already logged in

  2. Go to Layout > Edit HTML

  3. Back up your Blogger template as a precaution by downloading the full template to your computer

  4. Find the following line in your Blogger template

    body {

  5. Add the following line directly after this line
    background-image: url(URL address of your image);

    Your block of code will now look like this:

    body {
    background-image: url(URL address of your image);
    (existing code in this block)
    }

  6. Now replace the code in red for the URL address of your image. Choose an image from the selection below to practise with or use your own image. Note if using your own image make sure you read the tips and troubleshooting section below.


    https://blogger.googleusercontent.com/img/b/R29vZ2xl/AVvXsEiw4FZCxvYCUJ-jfnZJeKJ4B9d0wVHmTJKj2xjlr604UeWd8JLmhXtf1Q4NqNPVchlyCOwSSp4jmRibScIT_dt26wsHTIUWmfFRbT-rvTScPcax3x6t0NT5iR0tZ2oO_sNyumYhUxhKauc/s320/background_047.gif


    https://blogger.googleusercontent.com/img/b/R29vZ2xl/AVvXsEh87IRKbcfbpJrhlmdTF23vzkH8a8jXI-EEDXWvTeHHDlp4-dSNEp0hZKq19x81PmXWOXsdqEgEtga8WGyOyZ3WubZUvksAKXln7iu1bvPasBSWGqLEua8nym1GhM4sbAjIFiXsMFPZjyU/s320/background_104.gif


    https://blogger.googleusercontent.com/img/b/R29vZ2xl/AVvXsEg3yRNdsDmHZSmnSv9shzs9yAupruKwlTUByY5J026eirQn_Q8dcjuBmMSZrLzUqE2teUaYbNYA_3yKZsGreA-aqb5Keaa4KGxqsmNaqffbKU5l9vfF9y8F8nEqf28fgX-S0opsYtQOnGA/s320/background_126.gif


    https://blogger.googleusercontent.com/img/b/R29vZ2xl/AVvXsEiGhQD-3Nf2TjwwGDKyqPCGtmkHEh1GnaGOa-VCkEYieQiFk1szo9z6wK-zlUtOTjoZcjxxuQGZb5j3Kjfwo6yrRR08cEkvugYoxsW9uAJWDwVxkqzgKUU_Td7XjaEWGxTHu1dlppeEas4/s320/background_073.gif


    https://blogger.googleusercontent.com/img/b/R29vZ2xl/AVvXsEiZFteldW5bIoEsbkUfeb2fH2VShc3Id-5rjX3-3VaBx-74Qt6_dgGr1S3Gkc5sb6kYDobLqoVBxbPS4bWHRonXQfa3-LX3P90HW550ZvhhSkEm4R8bW6X0BJTId29vMu2c28cQFDTI4jU/s320/background_083.gif

    Green Paws Background

    https://blogger.googleusercontent.com/img/b/R29vZ2xl/AVvXsEh5feEvCMnia8gnP2_OIqB1_eFpWFk97rHJnTJtOiBX0QarPfWd5q3uHjvvn36qyYed0WO-icv0ATE6JR4m1uBFzZdKzd4PrI8O7VoXXGPXGknx2bxHCXRaRw3eDbR6p8i5srOL-KoHa9s/s320/green-paws.gif

    Musical Notes Background

    https://blogger.googleusercontent.com/img/b/R29vZ2xl/AVvXsEijesj1KkbiXnAGABbm-6DhWn09odf8hWldW8LAgLAZ1QgPtRmPy-kHmQ_d7un4UXHNnrxrWoNlFVSE95ZAg0L0uVAyfGKLBWcEQ4b0LyCUEk-O-lwVCxa0oCn4Fs_5RgGmBR1qPyd5u9s/s320/melody.gif

  7. Use the Preview button to see the effect of these different backgrounds on your template. It will help you get an idea of the kind of possibilities out there.

  8. You are welcome to use one of the above Blogger backgrounds as they are all free to use without any restriction. If you decide to use one of these simply click on Save Template and you are in business. Alternatively go ahead and find your own background image on the net and follow the instructions below to insert it into your Blogger template.

Tips and Troubleshooting

  • To Add Your Own Image to a Blogger Template
    There are huge number of backgrounds on the net that are suitable for Blogger. Search under free website backgrounds in your favorite search engine to find these.

    Simply download your preferred background and save to an image service like Photobucket, Flickr.

    Make sure the file format is either a .jpg, .gif or .png and that its size does not exceed 100kbs. As a rule of thumb an image size of around 30kb or less is about right if loading time speed is not to be compromised. Larger images can be resized quickly by using an online resizing service such as Shrink Pictures.

    Follow the instructions above to change the URL to that of your image.

  • To Change the Background Color of Your Custom Blogger Template
    If there is no option to change the background color of your Blogger template in Layout > Fonts and Colors you can still change the color manually.

    1. Follow steps 1 to 4 as above

    2. Find the line beginning with :

      background-color: #

    3. The hex color will be different for each template. We will change the color only

      background-color: #change hex color code to your chosen color;

    4. Replace the existing hex color code with the value of your chosen hex color. List of web safe hex colors. For example insert the following code to change the background color to:

      Denim Blue
      background-color: #336699;

      Black
      background-color: #000000;

      White
      background-color: #ffffff;

    5. Use the Preview button to see the effect of each color before you save it.

    6. Once you are satisfied go ahead and click on Save Template

Today's Blogger tutorial (Blogspot tutorial) aimed at Blogger beginners continues the series on CSS styling for Blogger. You have learned how to add the background image to your Blogger template or change the existing background image. To help you gain confidence in changing the background image I have provided some sample images for you to practise with. Also in this Blogger tutorial you have learned how to change the color of your Blogger background if you prefer a plain solid background color rather than a background image. As always if you strike any problems implementing the tips in this tutorial please let me know.

Related Articles
List of Blog Know How Tutorials for Blogger Blogs
How to Add, Delete or Remove Blogger Image Borders
How to Align and Justify Posts in Blogger
How to Add a Divider Between Blogger Posts

Add a Post Divider Between Blogger Posts

In today's Blogger tutorial I show you how to enhance your Blogger blog (Blogspot blog) by adding a post divider to your Blogger template. Used effectively post dividers can really jazz up your blog and will lend it that individual feel which most of us are hoping to create.

This tweak is very easy and well within the capabilities of any Blogspot blogger. Only a few simple changes to your Blogger template are required and these are in the CSS styling section.

How to add a post divider between posts in Blogger
By way of example I will use a divider that I downloaded from the internet free by searching for free divider graphics. Here are some sample dividers you can use to get started:


URL address:
https://blogger.googleusercontent.com/img/b/R29vZ2xl/AVvXsEjj0dHGQ0vPLtlzVNV2SDxjFkZALQ654dxhGBAWzrqkpQQRWljQaeIk5vJyq4nGtAXnY7P-kJiA8JGXf2oNCx6Edw6Lyy3OAcUq-XZtbs5YR_LantYbVno6UQHK1lP-n-GM8g6nR0-da1U/s400/ribbon.gif


URL address:
https://blogger.googleusercontent.com/img/b/R29vZ2xl/AVvXsEhTwTf5p5078YVvSqBCJLD79brRk3MCEhnOvTaRBZedeqTvrHdaJMgDJCe7lTWZIO0ijT-ZHJaC67j4KmjAelgdWKtUbGSQBro8TauUMDczjmm0CauzrCRTwsBKvI9i4HQoG1z-ulzV00o/s400/bar1.gif


URL address:
https://blogger.googleusercontent.com/img/b/R29vZ2xl/AVvXsEgtCn1pgya_f4bmwghwQt71f3hfjdIJEFegT9QSHSmU5BEHKGpXKkbtMNACNkZIfc9WgJAJUTsAMnbJ_RKuIoytV2EvJ1O0-kmajJSUqLIo1Ni0Hl-KKlXhUf9G6ymdat8Z4e8UGFl86L0/s400/barbsmpl.jpg


URL address:
https://blogger.googleusercontent.com/img/b/R29vZ2xl/AVvXsEjH9uKLaHAVPAUe1h6hodbHmRa5RTCMcDmcHp3JHYn1mObLUrz2c_CBb5P_2L1BBnLVBMnkkS5U8PeyCcy4-oSfoe4vSo1xXHlZtdshFNBqQXV7JrQjO8ia72RzMi0yJh8h8CchbM5pcEE/s400/bar47.gif


How to Add a Divider Between Posts in Blogger

  1. Login to Blogger if not already logged in

  2. From the Dashboard navigate to Layout > Edit HTML

  3. Back up your Blogger template as a precaution by downloading it to your computer

  4. Find the following line of code in your template:

    .post {

    You are likely to have something like this in your template already:

    .post {
    margin:.5em 0 1.5em;
    border-bottom:1px dotted $bordercolor;
    padding-bottom:1.5em;
    }

  5. Paste the following lines of code to this block making sure you paste them before the closing curly bracket:

    background: url(https://blogger.googleusercontent.com/img/b/R29vZ2xl/AVvXsEjj0dHGQ0vPLtlzVNV2SDxjFkZALQ654dxhGBAWzrqkpQQRWljQaeIk5vJyq4nGtAXnY7P-kJiA8JGXf2oNCx6Edw6Lyy3OAcUq-XZtbs5YR_LantYbVno6UQHK1lP-n-GM8g6nR0-da1U/s400/ribbon.gif);
    background-repeat: no-repeat;
    background-position: bottom center;
    margin:.5em 0 1.5em;
    padding-bottom:1.5em;

  6. If any lines are duplicated remove them.

  7. Remove any line beginning with: border-bottom: eg

    border-bottom:1px dotted $bordercolor;

  8. You will now have a block of code which looks like this plus any extra lines from the existing code in this block:

    .post {
    background: url(https://blogger.googleusercontent.com/img/b/R29vZ2xl/AVvXsEjj0dHGQ0vPLtlzVNV2SDxjFkZALQ654dxhGBAWzrqkpQQRWljQaeIk5vJyq4nGtAXnY7P-kJiA8JGXf2oNCx6Edw6Lyy3OAcUq-XZtbs5YR_LantYbVno6UQHK1lP-n-GM8g6nR0-da1U/s400/ribbon.gif);
    background-repeat: no-repeat;
    background-position: bottom center;
    margin:.5em 0 1.5em;
    padding-bottom:1.5em;
    }

  9. Click on Save Template to save your changes

  10. Click on View Blog to see your new post divider between posts

Tips and Troubleshooting
  • To change the divider to one of the above replace the URL address of the image (in red) with the URL address of the new image you want to use.

  • To use your own divider image download to your computer from the internet and then save the image to a photo image service like Photobucket. Replace the divider image URL address (in red) with the URL address of your new image

  • To increase the padding around the divider change the following line of code:

    padding-bottom:1.5em;

    to

    padding-bottom:2.5em;

In today's Blogger tutorial you have learned how to insert a divider between your Blogger posts to enhance the look of your Blogger template (Blogspot template). You can either make your own post divider or download one from the myriad of free website dividers available on the net.

Related Articles
List of Blog Know How Tutorials for Blogger Blogs
How to Add, Delete or Remove Blogger Image Borders
How to Align and Justify Posts in Blogger

How to Align and Justify Blogger Posts

This is the second article in a series about CSS styling tricks and tips for Blogger written with Blogger beginners and novices in mind but suitable for all bloggers who want to customize their existing Blogger template. While the first article dealt with how to add or remove image borders in Blogger today I show you how to align and justify Blogger posts.
Skill Level: Beginner Rating: Easy Time: 1 Minute

Many of the questions that my readers ask me are about how to customize various features of their Blogger template (Blogspot template). Over the coming weeks I will be focusing on some simple CSS styling tricks and tips to help you get more out of your Blogger template. Much can be achieved by learning a little about CSS. So before you rush off to download a custom Blogger template consider customizing your existing Blogger template.

This tutorial is part of a series of articles that I will publishing over the coming weeks about customizing your Blogger template using CSS styling. I will be targeting beginner bloggers and newbies to Blogger as well as more seasoned bloggers so if you want to spice up your Blogger template please read along.

How to Justify Blogger Posts (Blogspot Posts) Using CSS
It is easy to change the text alignment of your Blogger posts with the addition of one extra line in the CSS styling section of your Blogger template (Blogspot template). By default the alignment is set to left align so that the text aligns to the left while the right edge is ragged. You can also have right alignment where the text aligns to the right and the left edge is ragged.

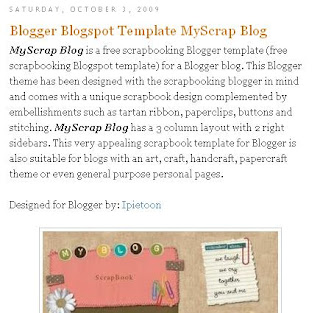
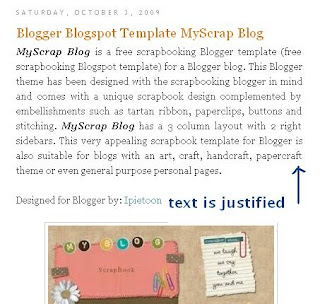
Another not so common option is to justify the text so that both left and right edges are straight. Users of MS Word and other word processing programs will be familiar with justify as an alignment choice. Justify stretches out the text so that each line has an equal width similar to what you will find in newspapers and magazines. I have found justifying my Blogger posts to be a useful feature on several of my blogs and thought some of you might to. Below are instructions on how to justify your Blogger posts so that all your blog's articles are justified but first take a look at the difference in presentation of these 2 blog posts just by justifying the alignment of the text. Makes a big difference don't you think?

Blogger post text is left aligned
Blogger post text is justified

  1. Before you start check how text is currently aligned on your Blogger posts. If it is left aligned you will be able to follow this trick to justify it. If it is already justified no need to go any further.

  2. Login to Blogger if not already logged in

  3. From the Dashboard click the Layout link for your blog and then click on Edit HTML

  4. Back up your template by downloading it in full as a precaution

  5. Use CTRL + F to find the code block beginning with .post in the CSS styling section of your Blogger template. As templates will differ greatly there are no hard and fast rules about what styling will be in this block. Here is a typical code block taken from the default Minima Blogger template

    .post {
    margin:.5em 0 1.5em;
    border-bottom:1px dotted $bordercolor;
    padding-bottom:1.5em;
    }

  6. Add the following line to the code block before the end brace (the end curly bracket)

    text-align:justify;

    so that your code now looks like:

    .post {
    margin:.5em 0 1.5em;
    border-bottom:1px dotted $bordercolor;
    padding-bottom:1.5em;
    text-align:justify;
    }

  7. Click on Save Template

  8. Click View Blog to see the alignment of all your posts has now changed to justified

Tips and Troubleshooting
  1. If your Blogger template justifies posts and you would like to left align them find the code beginning with .post in your Blogger template and add the following line to the block:

    text-align:left;

    so that your code now looks like:

    .post {
    margin:.5em 0 1.5em;
    border-bottom:1px dotted $bordercolor;
    padding-bottom:1.5em;
    text-align:left;
    }

  2. If you want the posts right aligned you would substitute the word right for left.

In this tutorial you have learned how to justify your Blogger posts to create a straight rather than ragged margin edge. By using this tip to add one line of code to your Blogger template you can enhance the look of your Blogger posts. This tweak only takes a minute but can markedly improve the presentation of your Blogger posts. Please keep reading along for more CSS tips and tweaks in the coming weeks.

Related Articles
List of Blog Know How Tutorials for Blogger Blogs
How to Add, Delete or Remove Blogger Image Borders