Popular Posts

Showing posts with label Customize Blogger Tips. Show all posts

How to Fix Missing Quick Edit Pencil in Blogger Blogspot

Is your custom Blogger template missing its quick edit pencil at the bottom of your Blogger posts (Blogspot posts)? Don't worry. In this Blogger tutorial I discuss how to show a quick edit pencil icon beneath Blogger posts if it is missing. This is a common Blogger problem among custom Blogger templates but fortunately it only takes a couple of minutes to fix.

This Blogger tutorial follows on from my previous Blogspot tutorial about fixing missing Blogger icons. Check out how to show quick edit gadget wrench in Blogger (Blogspot) for help with this issue.

In my previous Blogger tutorials I have also discussed how to fix many other common Blogger problems eg how to fix a missing embedded comment form in Blogger. Take a look at all my Blogger tutorials on how to fix common Blogger problems (Blogspot problems) here

Fix Missing Quick Edit Pencil Blogger Blogspot
The quick edit pencil is a nice Blogger feature that you would not want to be without. A click on this time saving Blogger icon gives you direct access to your Blogger posts without having to go through "Edit Posts"

So if the free custom Blogger template you downloaded from the internet has no quick edit pencil displaying under your Blogger posts when viewing the actual published post then it can be fixed by taking the following the steps below:

  1. Login to Blogger

  2. Go to your Design > Page Elements

  3. Click on the Blog Posts edit button located in the bottom right hand corner of the widget


  4. A Configure Blog Posts window will pop up displaying a number of different features that can be turned on and off on your blog posts.

  5. Make sure that Show Quick Edit is checked. Tick the box and save if Show Quick Edit is not already checked


  6. Now navigate to an actual published post and check whether the quick edit pencil is now displaying in or around the footer of your blog post. Remember that you must be logged into Blogger to see the quick edit pencil - it is not displayed to your visitors

    If the pencil is there then that is the end of this Blogger tutorial. The pencil just needed to be enabled. So thank you for joining me today and if you have any other issues with Blogger be sure to check out my how to fix common problems in Blogger tutorials or take a look at the list of all the Blog Know How Blogger tutorials

    If the Blogger quick edit pencil is still missing it means that some important code has been omitted from your Blogger template and it will need to be added to get the quick edit pencil to show up

  7. Go to Design > Edit HTML

  8. Back up your template

  9. Check the Expand Widget Templates box by placing a tick in it

  10. Find the following line of code by holding down the CTRL key and F at the same time:

    <b:includable id='postQuickEdit' var='post'>


  11. Check whether the following code is under it:

    <span class='post-icons'>
    <!-- email post links -->
    <b:if cond='data:post.emailPostUrl'>
    <span class='item-action'>
    <a expr:href='data:post.emailPostUrl' expr:title='data:top.emailPostMsg'>
    <img alt='' class='icon-action' height='13' src='http://img1.blogblog.com/img/icon18_email.gif' width='18'/>
    </a>
    </span>
    </b:if>

    <!-- quickedit pencil -->
    <b:include data='post' name='postQuickEdit'/>
    </span> </div>


  12. If part or all of the code is missing copy and paste it above :

    <!-- quickedit pencil -->
    <b:include data='post' name='postQuickEdit'/>


  13. Save changes to your Blogger template

  14. Go to an individual published post page and see your new quick edit pencil displayed under your Blogger post


Tips and Troubleshooting
If you want to change the Blogger quick pencil icon you can by changing the image. Simply replace the image as depicted in red with the URL address of your own image. If your image is a different size you may have to change the width and height as shown in blue for the image to display correctly

<span class='post-icons'>
<!-- email post links -->
<b:if cond='data:post.emailPostUrl'>
<span class='item-action'>
<a expr:href='data:post.emailPostUrl' expr:title='data:top.emailPostMsg'>
<img alt='' class='icon-action' height='13' src='http://img1.blogblog.com/img/icon18_email.gif' width='18'/>
</a>
</span>
</b:if>

<!-- quickedit pencil -->
<b:include data='post' name='postQuickEdit'/>
</span> </div>


In this Blogger tutorial (Blogspot tutorial) I have shown you how to fix a missing Blogger quick edit pencil that is not showing. I have demonstrated how to enable the quick edit pencil in Blogger via Page Elements and I have provided you with the missing code in the event that the quick edit pencil code is missing from your custom Blogger template.

Please let me know if this tutorial has been useful for you by leaving your comments and opinions below.

Related Articles
List of Blog Know How Tutorials for Blogger Blogs
How to Show a Quick Edit Gadget Wrench in Blogger (Blogspot)
How to Fix a Missing Embedded Comment Form in Blogger
How to Fix Common Problems in Blogger

Add a Comments Counter Button to Blogger Blogspot

In this Blogger tutorial (Blogspot tutorial) you will learn how to add a comments counter button to Blogger (Blogspot) to show off the number of comments each of your posts has received.

A comment counter button (bubble) will have the effect of encouraging visitors to comment on your Blogger blog and also help to highlight the credibility of your articles.


Installing this Blogger hack to add a comment counter button only takes a few minutes. The changes needed to add the comment bubble to Blogger while not difficult do involve adding a small snippet of code to your Blogger template in two places. For this reason I strongly urge you to back up your Blogger template before attempting this blogger hack.

Blogger Tutorial Difficulty - easy to medium


How to Add a Comments Counter Bubble to Blogger
A Step-by-Step Walkthrough
The following steps will insert a fully clickable comments counter button on the same line as the post title in Blogger. The comments counter is right aligned by default.

  1. Log in to Blogger and the blog you wish to apply these changes to

  2. Select Design > Edit HTML

  3. Click on Download Full Template to back up your template before you make any changes

  4. Check the Expand Widget Templates box

  5. In the CSS Styling section of your Blogger template and just before the ]]></b:skin>

    .comments-button {
    width : 48px;
    height : 48px;
    background : url(https://blogger.googleusercontent.com/img/b/R29vZ2xl/AVvXsEjs2d6Zxmb8zLB2Tb4vrkKIOtwuGcgt87e2sVJ8W6VqpjeAGPRp03ulohrpZuJ9FS6xWEs_m96zPfZE4H6K2IuPsxwNYkmb_cDPA4IscdQkBYrTU91SZCNLqaLMiPYvK6P3BU2S0Aap0oD_/s200/comment-counter-bubble.png) no-repeat;
    float : right;
    font-size : 18px;
    margin-top : -15px;
    margin-right : 2px;
    text-align : center;
    padding-top:10px;
    }

  6. Now find the following block of code using CTRL key + F

    <b:includable id='post' var='post'>
    <div class='post hentry uncustomized-post-template'>
    <a expr:name='data:post.id'/>
    <b:if cond='data:post.title'>
    <h3 class='post-title entry-title'>
    <b:if cond='data:post.link'>
    <a expr:href='data:post.link'><data:post.title/></a>

  7. Copy this code block:

    <b:if cond='data:post.allowComments'>
    <a class='comments-button' expr:href='data:post.addCommentUrl' expr:onclick='data:post.addCommentOnclick'><data:post.numComments/></a>
    </b:if>

  8. Insert as follows:

    <b:includable id='post' var='post'>
    <div class='post hentry uncustomized-post-template'>
    <a expr:name='data:post.id'/>
    <b:if cond='data:post.title'>
    <h3 class='post-title entry-title'>
    <b:if cond='data:post.allowComments'>
    <a class='comments-button' expr:href='data:post.addCommentUrl' expr:onclick='data:post.addCommentOnclick'><data:post.numComments/></a>
    </b:if>

    <b:if cond='data:post.link'>
    <a expr:href='data:post.link'><data:post.title/></a>

  9. Save template and then view blog to admire your new comment counter badge.


Tips and Troubleshooting
  1. If you prefer you can replace the button image I have provided with your own image. You can find other buttons easily enough by doing a Google search with a term like "speech button icons".

    Upload your button to a hosting service such as Photobucket and change the URL address of the image in the CSS styling section. The following example will render a smaller blue button. Note I have reduced the font size to accommodate the change. You may need to play around with the settings to get the font sizing right for your image.
    .comments-button {
    width : 48px;
    height : 48px;
    background : url(https://blogger.googleusercontent.com/img/b/R29vZ2xl/AVvXsEjPVOclvOE_V92N1LKKzQX0uf7Z9niQxAYEReNn5RuOY8wSqq7DzxD97lc4Cc4-BVUpjn0n-4Z2uT2Cb44RQvqzqsLqkBxe7wFgC0phcUUBM4hBv7ZqosyzEypQu6eUXmmVbfI4ftJNR1cK/s200/comment-counter-bubble-2.png) no-repeat;
    float : right;
    font-size : 14px;
    margin-top : -15px;
    margin-right : 2px;
    text-align : center;
    padding-top:10px;
    }


  2. If you want your comment counter to be left aligned instead of right you will need to change the CSS styling from float:right; to float:left;

In today's Blogger tutorial I have covered how to add a comments counter to a Blogger blog (blogspot blog) that will appear to the right of your blog post title. A comments counter is a way to encourage visitors to comment and is a way of showing off the credibility of your blog posts. Good luck! Any comments about installing this blogger hack are most welcome.


Related Articles
List of Blog Know How Tutorials for Blogger Blogs
Tips to Add Digg Button to Blogger Blogspot
Add Twitter Followers Counter to Blogger
Add Twitter Badge or Button to Blogger
Add a Social Bookmarking Button to Blogger
Add Social Bookmark Buttons to Blogger

Add Your Blogger Blog to Facebook

In today's Blogger tutorial I will show how to add your Blogger blog (Blogspot blog) to Facebook so that your updated content can be read right from your Facebook profile. Importing your Blogger blog into Facebook will only take you a few minutes to set up but will likely produce quite a few extra readers.

By importing your blog into Facebook your Blogger posts become available to all your Facebook friends and family. Everytime you post new articles to your Blogger blog they will automatically appear on your Wall in Facebook and in your friends News Feeds. It is also possible to remove any content that you do not wish to be displayed which may be handy for some.

Advantages of Importing Your Blog into Facebook
  • Increase your web presence
  • Enjoy added interest in your blog articles and new readers
  • No need to replicate your blog articles or content on Facebook

Disadvantages of Importing Your Blog into Facebook
  • If you blog for profit think carefully about importing your Blogger blog into Facebook as you are likely to experience a drop off in traffic and a reduction in revenue earnings as fewer people will visit your actual blog. One possible way around this is to set your blog's RSS feed to show summaries only that way ensuring that anyone interested will need to visit your blog to read the whole article.

How to Import or Add Your Blogger Blog to Facebook
  1. Login to Facebook or Sign up to Facebook if you are not already a member

  2. From your Facebook profile page go to Settings > Application Settings which you will find in the top right hand corner


  3. Select Notes from the list of applications displayed on the page

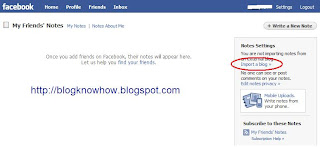
  4. Click on Import a Blog in the right sidebar

    Facebook - Add Notes Screen (Settings, Applications Settings, Notes)
  5. Enter the URL address of your blog

    either website URL:
    http://blogknowhow.blogspot.com

    or your Blogger feed: http://blogknowhow.blogspot.com/feeds/posts/default?alt=rss
    Please note it is not necessary to add the feed of your blog as Facebook will autodetect this


    Facebook - Import a Blog Screen
  6. You will need to tick the box below this to confirm that the content is not illegal or obscene and that you have the right to permit Facebook to reproduce the content of your blog. Any problems click Cancel and reenter your blog URL address

  7. Click Start Importing

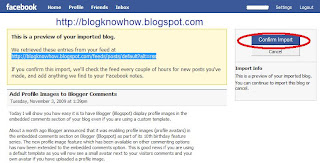
  8. Facebook will now import your feed and you will be taken to a preview screen to make sure the content matches your blog. If it does go ahead and confirm the import by clicking on the Confirm Import button

    Facebook - Preview Screen for import a blog showing latest content

  9. Go to your Wall in Facebook to check that your Blogger posts are now available to all your Facebook friends and family.


Tips and Troubleshooting
  • If your Blogger blog is members only the blog import will fail as Facebook will be unable to detect your blog's feed

  • To remove a blog post from your Wall in Facebook click on the Remove button on the righthand side

  • If your images are not displaying (there seems to be a bit of a glitch with this) then you may need to try importing your blog using Networked Blogs


In this Blogger tutorial I have discussed how to import your Blogger blog into your Facebook profile. I have also pointed out some advantages and disadvantages of adding your Blogger blog to your Facebook profile. I will be talking some more about importing blogs into Facebook in the future which is likely to be of interest to those with multiple Blogger blogs.


Related Articles
List of Blog Know How Tutorials for Blogger Blogs

Add CSS Styling to Blockquotes in a Blogger Template

Today I continue the series of Blogger tutorials (Blogspot tutorials) by showing you how to apply CSS styling to blockquotes in a Blogger template. Other articles I have already published on the subject of CSS styling include:

How to Add, Delete or Remove Blogger Image Borders
How to Align and Justify Posts in Blogger
How to Add a Divider Between Blogger Posts
How to Add or Change a Background Image in a Blogger Template.

Today's tutorial on Blogger blockquotes will be useful if you are using a default Blogger template or a third party custom template. It will show you how to change your blockquote area in the following ways:

  • Add a background color to the blockquote
  • Add a border around the background of the blockquote
  • Add or change the color of the blockquote text
  • Add or change padding around the text
  • Add or change the margin
  • Add a background image

Blogger beginners you can relax as I have written this Blogger tutorial with you in mind. I will walk you through the steps of styling the blockquote section and you will see that it is not as daunting as it first appears. This Blogger tutorial assumes no knowledge of CSS styling. I have rated the difficulty level as easy to medium because it does involve making adjustments to your Blogger template.

How to Change the Blockquote Section of a Blogger Template

First of all let's take a look at the CSS Styling for the blockquote section of a default Minima Blogger template.

.post-body blockquote {
line-height:1.3em;
}

.post blockquote {
margin:1em 20px;
}

.post blockquote p {
margin:.75em 0;
}

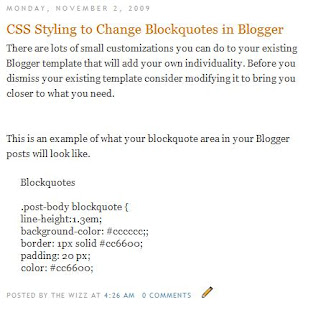
As you can see the blockquotes area of this Minima template has minimal styling. Apart from line height and margin indentation there has been no additional code added to improve the look of the template.

Minima Blockquotes No Extra CSS Styling
Let's go ahead and give the blockquotes in your Blogger posts some styling. I will use the Minima template to show you but you can do the same for another default template or custom template. As always back up your Blogger template by downloading it to your computer before you begin to make any changes.

  1. CSS Styling to Add a Background Color to Blockquotes
    Adding a background color to the blockquote area can be achieved in 1 of 2 ways.

    1. One way is to enter the hex color directly into the styling as I have done below. This code will add a light grey background to the blockquote area.

      .post-body blockquote {
      line-height:1.3em;
      background-color: #cccccc;
      }

    2. Another way to add a background color using CSS styling for the blockquote area is to make use of the variable names already set up. The border color is light grey #cccccc by default in a Minima template. The advantage of this option is that if you decide to change the border color under Layout > Fonts and Colors the blockquote color will automatically change to the new color too.

      .post-body blockquote {
      line-height:1.3em;
      background-color: $bordercolor;
      }

      If you wanted the background color to be the same as the blog title color rather than the border color you would write this instead

      .post-body blockquote {
      line-height:1.3em;
      background-color: $titlecolor;
      }

  2. CSS Styling to Add a Border Around Blockquotes
    You have your background in place now let's add a narrow border around the background to add some more definition. The following will add a 1px solid border around the outside of your blockquote area in your Blogger posts.

    .post-body blockquote {
    line-height:1.3em;
    background-color: #cccccc;
    border: 1px solid #cc6600;
    }

    or if using variables

    .post-body blockquote {
    line-height:1.3em;
    background-color: $bordercolor;
    border: 1px solid $titlecolor;
    }

    Blockquotes With a Background and Background Border
  3. CSS Styling to Add Padding Around Blockquotes
    Now if we were to leave the styling at this point one of the problems would be that the text would butt up against the background which is not a good look. To create some space between the text and the background edge all the way around we use CSS styling to add some padding like this:

    .post-body blockquote {
    line-height:1.3em;
    background-color: #cccccc;
    border: 1px solid #cc6600;
    padding: 20 px;
    }

    or if using variables

    .post-body blockquote {
    line-height:1.3em;
    background-color: $bordercolor;
    border: 1px solid $titlecolor;
    padding: 20 px;
    }

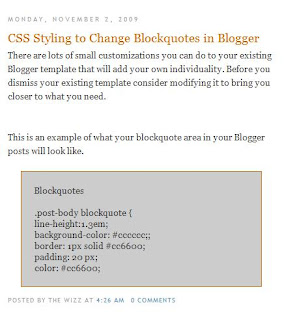
    Blockquotes With a Background, Background Border and Padding
  4. CSS Styling to Add or Change the Text Color of Blockquotes
    If you want to accent your blockquote area in your posts one effective way to do this is to make the blockquote text color a different color from the text color of your pages. We do this by picking a color and adding the following line to the code:

    .post-body blockquote {
    line-height:1.3em;
    background-color: #cccccc;
    border: 1px solid #cc6600;
    padding: 20 px;
    color: #cc6600
    }

    or if using variables

    .post-body blockquote {
    line-height:1.3em;
    background-color: $bordercolor;
    border: 1px solid $titlecolor;
    padding: 20 px;
    color: $titlecolor;
    }

    Blockquotes With a Background, Background Border, Padding and Change of Text Color

Tips and Troubleshooting
If you want to add further modifications to the blockquotes area of your Blogger template here are several other possibilities.

  1. CSS Styling To Change the Margin of Blockquotes
    You can increase the margin from 1em to 1.5em by changing the margin line to
    margin: 1.5em 20px;

  2. CSS Styling to Add a Background Image to Blockquotes
    You can have your own image as a background in your blockquotes area of your posts by adding this line:

    background: url(http://URL of your image.jpg);

In today's Blogger tutorial (Blogspot tutorial) you have learned how to add CSS styling to the blockquotes area of your Blogger posts. I have shown you how to add a background, a background border, change the text color, add padding, change the margin and add a background image to the blockquotes code block. If you have a moment please let me know how you got on customizing your own Blogger template. Any questions please ask.


Related Articles
List of Blog Know How Tutorials for Blogger Blogs
How to Add, Delete or Remove Blogger Image Borders
How to Align and Justify Posts in Blogger
How to Add a Divider Between Blogger Posts
How to Add or Change a Background Image in a Blogger Template

Add a Post Divider Between Blogger Posts

In today's Blogger tutorial I show you how to enhance your Blogger blog (Blogspot blog) by adding a post divider to your Blogger template. Used effectively post dividers can really jazz up your blog and will lend it that individual feel which most of us are hoping to create.

This tweak is very easy and well within the capabilities of any Blogspot blogger. Only a few simple changes to your Blogger template are required and these are in the CSS styling section.

How to add a post divider between posts in Blogger
By way of example I will use a divider that I downloaded from the internet free by searching for free divider graphics. Here are some sample dividers you can use to get started:


URL address:
https://blogger.googleusercontent.com/img/b/R29vZ2xl/AVvXsEjj0dHGQ0vPLtlzVNV2SDxjFkZALQ654dxhGBAWzrqkpQQRWljQaeIk5vJyq4nGtAXnY7P-kJiA8JGXf2oNCx6Edw6Lyy3OAcUq-XZtbs5YR_LantYbVno6UQHK1lP-n-GM8g6nR0-da1U/s400/ribbon.gif


URL address:
https://blogger.googleusercontent.com/img/b/R29vZ2xl/AVvXsEhTwTf5p5078YVvSqBCJLD79brRk3MCEhnOvTaRBZedeqTvrHdaJMgDJCe7lTWZIO0ijT-ZHJaC67j4KmjAelgdWKtUbGSQBro8TauUMDczjmm0CauzrCRTwsBKvI9i4HQoG1z-ulzV00o/s400/bar1.gif


URL address:
https://blogger.googleusercontent.com/img/b/R29vZ2xl/AVvXsEgtCn1pgya_f4bmwghwQt71f3hfjdIJEFegT9QSHSmU5BEHKGpXKkbtMNACNkZIfc9WgJAJUTsAMnbJ_RKuIoytV2EvJ1O0-kmajJSUqLIo1Ni0Hl-KKlXhUf9G6ymdat8Z4e8UGFl86L0/s400/barbsmpl.jpg


URL address:
https://blogger.googleusercontent.com/img/b/R29vZ2xl/AVvXsEjH9uKLaHAVPAUe1h6hodbHmRa5RTCMcDmcHp3JHYn1mObLUrz2c_CBb5P_2L1BBnLVBMnkkS5U8PeyCcy4-oSfoe4vSo1xXHlZtdshFNBqQXV7JrQjO8ia72RzMi0yJh8h8CchbM5pcEE/s400/bar47.gif


How to Add a Divider Between Posts in Blogger

  1. Login to Blogger if not already logged in

  2. From the Dashboard navigate to Layout > Edit HTML

  3. Back up your Blogger template as a precaution by downloading it to your computer

  4. Find the following line of code in your template:

    .post {

    You are likely to have something like this in your template already:

    .post {
    margin:.5em 0 1.5em;
    border-bottom:1px dotted $bordercolor;
    padding-bottom:1.5em;
    }

  5. Paste the following lines of code to this block making sure you paste them before the closing curly bracket:

    background: url(https://blogger.googleusercontent.com/img/b/R29vZ2xl/AVvXsEjj0dHGQ0vPLtlzVNV2SDxjFkZALQ654dxhGBAWzrqkpQQRWljQaeIk5vJyq4nGtAXnY7P-kJiA8JGXf2oNCx6Edw6Lyy3OAcUq-XZtbs5YR_LantYbVno6UQHK1lP-n-GM8g6nR0-da1U/s400/ribbon.gif);
    background-repeat: no-repeat;
    background-position: bottom center;
    margin:.5em 0 1.5em;
    padding-bottom:1.5em;

  6. If any lines are duplicated remove them.

  7. Remove any line beginning with: border-bottom: eg

    border-bottom:1px dotted $bordercolor;

  8. You will now have a block of code which looks like this plus any extra lines from the existing code in this block:

    .post {
    background: url(https://blogger.googleusercontent.com/img/b/R29vZ2xl/AVvXsEjj0dHGQ0vPLtlzVNV2SDxjFkZALQ654dxhGBAWzrqkpQQRWljQaeIk5vJyq4nGtAXnY7P-kJiA8JGXf2oNCx6Edw6Lyy3OAcUq-XZtbs5YR_LantYbVno6UQHK1lP-n-GM8g6nR0-da1U/s400/ribbon.gif);
    background-repeat: no-repeat;
    background-position: bottom center;
    margin:.5em 0 1.5em;
    padding-bottom:1.5em;
    }

  9. Click on Save Template to save your changes

  10. Click on View Blog to see your new post divider between posts

Tips and Troubleshooting
  • To change the divider to one of the above replace the URL address of the image (in red) with the URL address of the new image you want to use.

  • To use your own divider image download to your computer from the internet and then save the image to a photo image service like Photobucket. Replace the divider image URL address (in red) with the URL address of your new image

  • To increase the padding around the divider change the following line of code:

    padding-bottom:1.5em;

    to

    padding-bottom:2.5em;

In today's Blogger tutorial you have learned how to insert a divider between your Blogger posts to enhance the look of your Blogger template (Blogspot template). You can either make your own post divider or download one from the myriad of free website dividers available on the net.

Related Articles
List of Blog Know How Tutorials for Blogger Blogs
How to Add, Delete or Remove Blogger Image Borders
How to Align and Justify Posts in Blogger

Add a Twitter Profile Widget to Blogger

If you use Twitter then you are going to want to let your Blogger readers know about it. One effective way to show your Twitter updates on Blogger is to add a Twitter profile widget to the sidebar of your blog. This widget is quite a bit more fancy than the current Twitter Updates Widget available through Blogger which I showed you how to insert into your blog in my recent article Add a Twitter Updates Widget to Blogger. On the minus side the widget may slow your blog down so test it out first if fast loading time is crucial to you.

Twitter Profile Widget - how to insert into Blogger
How to Insert a Twitter Profile Widget into Blogger
  1. Go to Twitter Widgets and sign in


  2. Choose Profile Widget and you will be taken to a default profile widget page where you can customize your Twitter widget according to your needs.

  3. Choose Settings and make sure that your username is correct

  4. Choose Appearance and make any custom color changes you need to so that the widget will blend into your blog. At the very least you will need to change the shell background and the links colors to suit your blog

  5. Choose Dimensions and change the sizing of the widget if it is too large to fit into your Blogger sidebar. The default setting is 250x300

  6. Click on Test Your Settings to ensure your new widget looks the way you want it to

  7. Click the Finish and Grab Code button

  8. Copy the code by right click the mouse in the code box and choosing Select All. Right click again and choose Copy

  9. Sign in to Blogger. From the Dashboard go to Layout | Page Elements

  10. In the sidebar choose Add a Gadget and then a HTML/Javascript widget

  11. Paste the Twitter code into the gadget content box and click Save

  12. Your Twitter Profile Widget will now be showing in your Blogger sidebar so click on View Blog to admire it

In this Blogger tutorial I have showed you how to add a Twitter Profile Widget to the sidebar of your Blogger blog (Blogspot blog). This Twitter widget will encourage your blog readers to visit your Twitter Profile and with luck you may get some new Twitter followers out of it.

Related Articles
List of Blog Know How Tutorials for Blogger Blogs
Add a Twitter Updates Widget to Blogger
Add Twitter Button or Twitter Badge to Blogger
Add Twitter Followers Counter to Blogger
Add a Social Bookmarking Button to Blogger
Add Social Bookmark Buttons to Blogger
Best Free Social Bookmark Icon Sets for Blogger

Add a Simple Drop Down Menu to Blogger

In today's Blogger tutorial I show you how to add a simple drop down menu widget sometimes called a select box to the sidebar of your Blogger blog (Blogspot blog). If you want to add lots of links to your Blogger blog but are worried about the amount of space this will take up on your blog this tutorial is for you. A drop down widget is a neat solution to the cluttered sidebar problem as it is both space saving and easy to install. The convenience of a drop down menu widget can be seen on many blogs where it is used for lists like a long Blogroll, Categories list, Labels list or a Recommended Posts list.

How to Add a Drop Down Menu Widget to Blogger
Adding a drop down menu to Blogger is well within the capabilities of even beginner bloggers. Most of the work is in cutting and pasting the links which is not difficult for anyone with basic computer skills. So let's get started but first here is a working drop down menu list with links to various posts in my blog:


  1. Log in to Blogger if not already logged in

  2. Navigate from the Dashboard to Layout > Page Elements.

  3. Click on Add a Gadget in the sidebar or other location if you wish

  4. Select a HTML/JavaScript gadget from the list of gadgets

  5. Paste the following code into the content box of the widget:

    <form><select name="menu" onchange="window.open(this.options[this.selectedIndex].value,'_blank')"
    size=1 name=menu>
    <option>- Your Menu Title -</option>

    <!-- Change the following links to your own -->

    <option value="http://URL of link1">Link 1</option>
    <option value="http://URL of link2">Link 2</option>
    <option value="http://URL of link3">Link 3</option>
    <option value="http://URL of link4">Link 4</option>
    <option value="http://URL of link5">Link 5</option>

    <option value="http://blogknowhow.blogspot.com">Blog Know How</option>
    </select></form>

  6. Replace _blank as follows:

    • To have a new window open leave the same

    • To have the new page appear in the same window replace _self


  7. Replace - Your Menu Title - with a title of your own

  8. For each instance of the option values highlighted in red substitute your own links and link names. For example:

    <option value="http://blogknowhow.blogspot.com">Blog Know How</option>

  9. Click Save

  10. Use drag and drop to position the drop down menu widget in the location you want it within your sidebar and save any changes

  11. Click View Blog to admire the new drop down menu in the sidebar of your blog

In today's Blogger tutorial I have provided you with instructions to create and insert a simple drop down menu widget in the sidebar of your Blogger blog (Blogspot blog). This widget is ideal for reducing clutter on your Blogger sidebar and excellent for displaying long lists of links such as labels in a convenient, neat and space saving way. A drop down menu gadget is easily installed from the Layout > Page Elements page and can be customized to your own specifications. Any problems with this Blogger tweak please let me know. Enjoy!


Related Articles
List of Blog Know How Tutorials for Blogger Blogs
Add Breadcrumb Navigation to Blogger
Add Horizontal Links Menu Navigation to Blogger

Add a Twitter Updates Widget to Blogger

If you are a regular Twitter user and have a bunch of followers you might want to add a Twitter Updates widget to Blogger (Blogspot). In today's tutorial I will show you the easy way to add a Twitter Updates widget to Blogger (Blogspot). It is fairly straightforward to add this Twitter Updates widget to Blogger so please don't be put off if you are a Blogger beginner as you can have this widget up and running in no time.

If you are new to Twitter and don't have an account yet you can sign up to Twitter for free


Twitter Updates widget for BloggerHow to Add a Twitter Updates Gadget to Blogger
There are several methods of adding a Twitter Updates widget to Blogger which I will be discussing over the next few posts. Today I will start with the easiest method by far. This Twitter widget won't slow down your blog loading time particularly but I suggest as with all HTML widgets that you place it near the bottom of your column of gadgets and limit the number of updates shown.

This Twitter Updates widget will provide a basic widget only and is fine if you aren't too bothered about styling. The widget uses the styling from your blog based on the Blogger template you are using but unfortunately there is no way to modify its appearance at the moment. If you want something a little more fancy keep an eye out for my future posts about Twitter Updates widgets.

  1. Log in to Blogger if you are not already logged in

  2. Go to Layout > Page Elements

  3. Click Add a Gadget in the Blogger sidebar

  4. Click on More Gadgets to the left and choose the Twitter Updates widget. Blogger may change this so if you don't find it there try looking in Featured or Popular.

  5. Enter your Twitter name (usually your blog name)

  6. Choose the number of updates to display. By default this is set to 5

  7. Uncheck display link to your Twitter page if you do not want visitors to go to your Twitter page for some reason otherwise leave it as is.

  8. Click Update to Preview any changes and then Save

  9. Use Blogger's drag and drop feature to reposition your Twitter gadget in the desired location in sidebar or footer of your Blogger blog. Save any changes

  10. Click View Blog to admire your new Twitter Updates widget

In today's tutorial I have shown you how easy it is to add a Twitter Updates widget to your Blogger blog (Blogspot blog). The Twitter Updates widget will display your latest Twitter tweets on your blog. The disadvantage of this third party Twitter Updates widget is that it has basic styling only and no way to modify it. On the plus side it loads fast and is likely to be trouble free. I will be writing more about Twitter updates widgets in the next couple of posts so keep an eye out. Enjoy!


Related Articles
List of Blog Know How Tutorials for Blogger Blogs
Add Twitter Button or Twitter Badge to Blogger
Add Twitter Followers Counter to Blogger

Blogger Post Image Borders Change or Remove

Sometimes you may want to remove, delete or change the image border of a custom Blogger template or default Blogger template (Blogspot template). In this Blogger tutorial you will learn how easy it is to make changes to your template so that you can get rid of unwanted image borders around all the images that appear in your blog posts or around a single image in a blog post.

You will also learn how to enhance your Blogger template (Blogspot template) by changing the line color and line style of the existing image borders.

Note this Blogger tutorial applies to custom templates and the previous generation of Blogger templates. If you are using the new default Blogger Template Simple please refer to my Blogger tutorial How to Remove the Image Border in Blogger template Simple for instructions

This Blogspot tutorial is rated easy. It involves making minor alterations to your Blogger template (Blogspot template) but this is well within the capabilities of beginner bloggers and newbies. The changes will take less than 5 minutes to complete and can make the world of difference to your Blogger template.

Blogger image with border Blogger image without border

How to Delete, Remove, Get Rid of the Image Border in Blogger Posts
The following instructions will remove the little border around the images in your Blogger posts.

  1. Login into Blogger if not already logged in

  2. From the Dashboard navigate to your blog. Go to Design > Edit HTML by clicking on the Design tab and then choosing the Edit HTML link

  3. Back up your existing Blogger template by clicking on the Download Full Template button

  4. Find the following code in your Blogger template (no need to check the Expand Widgets Template box as we are only working with the CSS Style Sheet). Note: the code in Blogger templates varies but this is the code you will find on a Blogger Minima template and most other default Blogger templates.


    .post img {
    padding:4px;
    border:1px solid $bordercolor;
    }

    If you do not have this code look for the following:

    img{
    padding: 4px;
    border:1px solid $bordercolor;
    }

  5. There are two ways to get rid of the unwanted border image code. You can either:

    • Remove the following line:

      border:1px solid $bordercolor;
      or

    • Change it to the following
      border:0px;

  6. Click on the Save Template button

  7. Click View Blog to admire your post images minus any image border.

How to Change the Color of the Image Border Around Posts in a Blogger Template
The following instructions will show you how to change the color of the border which appears around images in your Blogger posts

  1. Follow Steps 1 to 4 as per removing the image border from Blogger posts.

  2. There are several methods to change the color of the image border but the easiest is to

    • Change the following line:
      border:1px solid $bordercolor;

      to
      border:1px solid #6698FF;

      The above change will make the border line color sky blue. To change the color (in red) to your own color choice replace with the hex color code for your chosen color

  3. Click the Save Template button to save your changes

  4. Click on View Blog to admire the new color around the images in your Blogger posts

Tips and Troubleshooting

  • To change the image border line style from a solid line to a dotted line change the word solid to dotted eg

    border:1px dotted $bordercolor;

  • To change the image border line style from a solid line to a dashed line change the word solid to dashed eg

    border:1px dashed $bordercolor;

  • To increase the width of the image border change the size from 1px to 2px or 3px eg

    border:3px solid $bordercolor;

  • To Remove The Image Border Around Only One Image paste the following into your image code in your Blogger post:

    style="border:none"
    eg
    <img style="cursor:pointer; cursor:hand;width: 126px; height: 22px;" src="http://3.bp.blogspot.com/_vLeiVavkV_M/SrRp2wb1I_I/AAAAAAAAAAA/XXXXXXXXX/s200/download-now.png" border="0" style="border:none" alt=""id="BLOGGER_PHOTO_ID_XXXXXXXXXXXX" />

In this Blogger tutorial you have learned how to remove, delete and get rid of the line border which appears around images in your Blogger posts (Blogspot posts). You have also learned how to change the line color of the border image to your own chosen hex color. In addition I have shown you how to change the line style from solid to dotted or dashed and to remove the border around a single image. As always any problems with making these changes please let me know. Good luck!


Related Articles
List of Blog Know How Tutorials for Blogger Blogs
How to Remove the Image Border in Blogger Simple Template

Add 3 Column or 4 Column Footer to Blogger

In this Blogspot tutorial you will learn how to convert your existing Blogger footer (Blogspot footer) into a 3 column footer or a 4 column footer. With more columns in your Blogger footer you will be have the extra room to accommodate more widgets such as Flickr photos and Twitter updates. Also you will be able to put less frequently used widgets such as recents comments, archives, followers, About Me etc at the bottom of your template so that only the most important widgets are loaded first.

This tweak involves adding code to the footer section of your existing Blogger template to change it to 3 columns or 4 columns. The tutorial is not beyond the capabilities of Blogger newbies and webmasters with intermediate skills but care needs to be taken when modifying your Blogger template so back up before you start. For best results a Blogger template with a width of around 900px is best.

Convert your Blogger footer to a 3 column footer

How to Add a 3 Column Footer to Blogger

  1. Log in to Blogger if not already logged in

  2. Navigate to Layout > Page Elements

  3. Move any existing widgets out of the footer section and place them in the sidebar temporarily and save changes

  4. Navigate to Layout > Edit HTML

  5. Back up your template as a precaution by downloading it to your computer

  6. Find the following section in your Blogger template

    <div id='footer-wrapper'>
    <b:section class='footer' id='footer'/>
    </div>

    If you are having difficulty finding this section trying searching for footer-wrap or something similar as sometimes this section is called something else in some templates.

  7. To Add a 3 Column Footer to Blogger
    Replace all the code located in Step 6 with the following

    <div id='footer-columns'>
    <div id='footer1' style='width: 30%; float: left; margin:0; text-align: left;'>
    <b:section class='footer-column' id='col1' preferred='yes' style='float:left;'/>
    </div>
    <div id='footer2' style='width: 40%; float: left; margin:0; text-align: left;'>
    <b:section class='footer-column' id='col2' preferred='yes' style='float:left;'/>
    </div>
    <div id='footer3' style='width: 30%; float: right; margin:0; text-align: left;'>
    <b:section class='footer-column' id='col3' preferred='yes' style='float:right;'/>
    </div>
    <div style='clear:both;'/>
    </div>

    To Add a 3 Column Footer to Blogger with a Lower Footer Section
    Replace all the code located in Step 6 with the following

    <div id='footer-columns'>
    <div id='footer1' style='width: 30%; float: left; margin:0; text-align: left;'>
    <b:section class='footer-column' id='col1' preferred='yes' style='float:left;'/>
    </div>
    <div id='footer2' style='width: 40%; float: left; margin:0; text-align: left;'>
    <b:section class='footer-column' id='col2' preferred='yes' style='float:left;'/>
    </div>
    <div id='footer3' style='width: 30%; float: right; margin:0; text-align: left;'>
    <b:section class='footer-column' id='col3' preferred='yes' style='float:right;'/>
    </div>
    <div style='clear:both;'/>
    <p/>
    <div id='footer-bottom' style='text-align: center; padding: 10px;'>
    <b:section class='footer' id='col-bottom' preferred='yes'>
    </b:section>
    </div>
    <div style='clear:both;'/>
    </div>

    Add 3 column footer to Blogger with a lower section
    To Add a 4 Column Footer to Blogger
    Replace all the code located in Step 6 with the following

    <div id='footer-columns'>
    <div id='footer1' style='width: 25%; float: left; margin:0; text-align: left;'>
    <b:section class='footer-column' id='col1' preferred='yes' style='float:left;'/>
    </div>
    <div id='footer2' style='width: 25%; float: left; margin:0; text-align: left;'>
    <b:section class='footer-column' id='col2' preferred='yes' style='float:left;'/>
    </div>
    <div id='footer3' style='width: 25%; float: left; margin:0; text-align: left;'>
    <b:section class='footer-column' id='col3' preferred='yes' style='float:left;'/>
    </div>
    <div id='footer4' style='width: 25%; float: right; margin:0; text-align: left;'>
    <b:section class='footer-column' id='col4' preferred='yes' style='float:right;'/>
    </div>
    <div style='clear:both;'/>
    </div>

    Convert Blogger Footer to a 4 Column Footer

  8. Save changes to your Blogger template.

  9. Navigate to Layout > Page Elements. You will now see a 3 column footer, 3 column footer with a lower section or a 4 column footer depending on what option you chose.

  10. Move the desired gadgets to the new Blogger footer columns. Create new widgets to fill up the footer columns if necessary. Save your changes.

  11. Click View Blog to admire your new footer section

Tips and Troubleshooting

  1. To Add Padding Between Footer Columns in Blogger
    To create some padding between the columns add the following code to the style section of your Blogger template - before </b:skin> tag.

    #footer-columns {
    clear:both;
    }

    .footer-column {
    padding: 10px;
    }

  2. To Add a Border to the 3 or 4 Column Blogger Footer

    • For Top Border Only of the 3 or 4 Column Footer
      Paste the following code before the </b:skin> tag

      #footer-columns{
      border-top:1px dotted $bordercolor;
      clear:both;
      margin:0 auto;
      }

      Replace $bordercolor with a hex color if default color is not displayed. Change this color to suit your template. For example


      #footer-columns{
      border-top:1px dotted #113355;
      clear:both;
      margin:0 auto;
      }

    • For a Box Border Around the 3 or 4 Column Footer

      #footer-columns{
      border:1px dotted $bordercolor;
      clear:both;
      margin:0 auto;
      }

      Replace $bordercolor with a hex color if default color is not displayed. Change this color to suit your template. For example

      #footer-columns{
      border-top:1px dotted #113355;
      clear:both;
      margin:0 auto;
      }


In today's Blogger tutorial you have learned how to add a 3 column footer or a 4 column footer to your Blogger template (Blogspot template). You have also learned how to add some styling such as a border above the footer and around the footer. As always I am available to answer questions if you need assistance. Good luck!

Related Articles
List of Blog Know How Tutorials for Blogger Blogs
Customize Blogger Tips

Add Social Bookmark Buttons to Blogger

In today's Blogger tutorial (Blogspot tutorial) you will learn how to place social bookmark buttons in the sidebar, footer and below each post in a Blogger Blogspot blog. This is a social bookmarking script for individual buttons or icons rather than the Add This all-in-one solution that I have previously written about. These free social bookmark buttons will encourage social bookmarking SEO by having your visitors save their favorite content and hopefully share it on social media sites such as Digg, Technorati and Stumble Upon thereby helping to grow your blog traffic.

I personally prefer to use an Add This social bookmark button because individual buttons can create a cluttered busy look. However, I also realize that the Add This social bookmarking button is not necessarily that recognizable to visitors who may have otherwise bookmarked your pages had the button been more recognizable to them.

YahooTwitterTechnoratiStumble UponRedditGoogleFacebookDiggDel.icio.us

Diggdel.icio.usMySpaceYahooTwitterTechnoratiStumble UponReddit


How to Add Social Bookmark Buttons to Blogger Sidebar or Footer

1. Login to Blogger if not already logged in

2. Navigate to Page Layout > Page Elements

3. Click on Add Gadget in Sidebar or Footer

4. Select HTML/Javascript gadget from the list of available gadgets

5. Copy and paste the social bookmarking button code into the content box that is available for free download below. Note you will only be able to add the small social bookmarking buttons to the sidebar unless you only want a few of them.

Download Code for Large Buttons (48x48)
Download Code for Small Buttons (24x24)

6. Add a title such as Bookmark and Share if you wish

7. Click on the Save button

8. Use the drag and drop feature in the sidebar to reposition the new widget if necessary and save again

9. Click on View Blog to admire new social bookmarking buttons


How to Add Social Bookmark Buttons Below Every Post in Blogger

1. Login to Blogger if not already logged in

2. Navigate to Page Layout > Edit HTML

3. Back up your template as a precaution by downloading it to your computer

4. Check the Expand Widget Templates box

5. Find the following line of code using CTRL + F

<p><data:post.body/></p>

or

<data:post.body/>

6. Paste the button code below directly below this line

Download Code for Large Buttons (48x48)
Download Code for Small Buttons (24x24)

7. Click on the Save Template button to save

8. Click on View Blog to admire your new social bookmarking button set at the bottom of your blog


Tips and Troubleshooting
  • To center the social bookmarking buttons
    <p><data:post.body/></p>
    <div align='center'>
    Your social bookmarking button code goes here
    <br/>
    </div>

  • To have your social bookmarking buttons only appear on post pages you will need to enclose the code in an if statement

    <p><data:post.body/></p>
    <b:if cond='data:blog.pageType == "item"'>
    Your social bookmarking button code goes here
    <br/>
    </b:if>

  • To center the social bookmarking buttons and have them appear only on post pages
    <p><data:post.body/></p>
    <b:if cond='data:blog.pageType == "item"'>
    <div align='center'>
    Your social bookmarking button code goes here
    <br/>
    </div></b:if>

  • To center the social bookmarking buttons and have them appear only on post pages
    <p><data:post.body/></p>
    <b:if cond='data:blog.pageType == "item"'>
    <div align='center'>
    Your social bookmarking button code goes here
    <br/>
    </div></b:if>

  • To add extra social bookmarking buttons to this set download the Aqauticus Icon Set

  • To change the social bookmarking buttons for another set simply do the following:

    1. To find other social bookmarking buttons please do check out my article Best Free Social Bookmark Button Sets for Blogger first as very likely you will find something suitable in that collection. Download your preferred icon set. These will be in a zip file so you will need to unzip them and take a look at what sizes are on offer. Most icon sets come in at least several sizes.

    2. Upload your button images to Blogger or to an image storage site like Photobucket or Flickr. One easy way to upload to Blogger is to create a post called images that you never publish. Then upload the images you want individually (that's the drawback). Copy the URL address of the button image and paste it into the social bookmarking button code replacing existing URLs

    3. Change the URL address of each button in the button code I have supplied. That's the code beginning with scr='


In today's tutorial you have learned how to add social bookmark buttons using a social bookmarking script to the sidebar, footer and below each post in a Blogger blog (Blogspot blog). I have supplied you with the code for a small and large social bookmarking button set to get you started. I suggest you download the codes first and install them on your blog. Then it is just a simple matter of changing the URL address of the social bookmarking buttons if you wish to substitute these for a new set of social bookmarking buttons. Also in this tutorial I offered you some tips and troubleshooting suggestions for adding your social bookmarking buttons to Blogger. If there are other issues that crop up for you as always please ask. I am interested in hearing from anyone about how they got on installing these social bookmark buttons.


Related Articles
List of Blog Know How Tutorials for Blogger Blogs
Add a Social Bookmarking Button to Blogger
Best Free Social Bookmark Icon Sets for Blogger

Free Social Bookmark Buttons for Blogger

One way to get your blog to grow is add social bookmarking buttons to your Blogger Blogspot blog. In an earlier article I wrote about the simplest way to place social media on a Blogger blog - that is to add an all-in-one Add This social bookmarking button.

However, as one size doesn't fit all situations there may be lots of times when you would prefer to add individual social bookmark buttons to your Blogger blog. That's why I have put together this list of useful free social bookmarking button sets. All are free to use on a personal blog and most have no restrictions for commercial use either but please do double check the license when you download them if you want to use the buttons commercially.

Best Sources of Social Bookmarking Buttons for Blogger Blogspot

128 Completely Free Icons Set
128 Icons available in 48×48px. Includes Social Media Icons such as: Design Float, Digg, Delicious, Furl, Technorati, Flickr, Stumble Upon, Twitter & more…

Web 2.0 Icons (23 icons)
23 freeware “iPhone-like” icons sized from 512X512 to 16X16 pixels. Includes Blinklist, BlogMarks, Delicious, Digg, FaceBook, Favorite, Feeds, FeedBurner, Flickr, Furl, Google Magnolia, Misterwong, Myspace, Newsvine, Netvibes, Reddit, Simpy, Stumbleupon, Technorati, Twitter, Youtube.

Socialize (12 icons)
12 high quality, free icons in these sizes: 16x16px, 32x32px, 48x48px, 64x64px and 128x128px and 32-bit transparency PNG file format.

Free Social Bookmark Icons for Blogger - Socialize Icon Set

Handycons (12 icons)
Handycons is a free, hand drawn social media icon set containing 12 icons. Package contains icons for del.icio.us, Digg, Mixx, DesignBump, StumbleUpon, Reddit, Developer Zone, DesignFloat, Technorati, Twitter and RSS feed & Email icon, of course. All icons are available in four sizes: 16x16, 24x24, 32x32 and 48x48 pixels.

Free Social Bookmark Icons for Blogger - Handycons


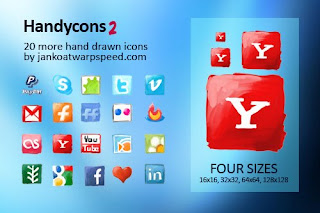
Handycons 2 (20 icons)
20 more hand drawn icons following on from the first Handycons set. Package contains Facebook, Blinklist, Feedburner, Flickr, FriendFeed, Furl, Gmail, Google, Heart icon, Last FM, Linked IN, Magnolia, Newsvine, PayPal, Skype, Sphinn, Twitter, Vimeo, Yahoo and You Tube icons. All icons come in four sizes: 16x16, 32x32, 64x64 and 12x128px.

Free Social Bookmark Icons for Blogger - Handycons2


Social Media Icons (26 icons)
26 clean looking free social media icons available for personal or commercial use.

Aquaticus Social (30 icons)
30 Web 2.0 social media icons in 4 sizes. Free to use on blogs. List includes popular icons like: Blogger, Delicious, Digg, Facebook, flickr, furl, Google, Ma.gnolia, Mixx, MySpace, NetVibes, NewsVine, Reddit, StumbleUpon, Technorati, Twitter, Yahoo!


Aquaticus.Social by ~jwloh on deviantART


Social Me Icons (30 Icons)
30 free iPhone-inspired icons that can be used on blogs and websites without restriction. 4 sizes up to 60x60px, 48x48px, 24x24px, 16x16px. List includes popular icons like: Blogger, Delicious, Digg, Facebook, flickr, furl, Google, Ma.gnolia, Mixx, MySpace, NetVibes, NewsVine, Reddit, StumbleUpon, Technorati, Twitter, Yahoo!


Social.me by ~jwloh on deviantART


Social Bookmark Iconset Pt I
Free Social Bookmark Icons for Blogger - Social Bookmark Iconset

Social Bookmark Iconset Pt II

Free Social Bookmark Icons for Blogger - Social Bookmark Iconset Part II

Ok so that's my current list of some of the best free social bookmark icons available on the net suitable for a Blogger Blogspot blog. This is a pretty extensive list to get you started but I will add more as time goes on and I come across other great sets. If you find what you are looking for here please let me know and if not I would be interested in that too.


Related Articles
List of Blog Know How Tutorials for Blogger Blogs
Add a Social Bookmarking Button to Blogger

Add Affiliate Banner Below Post in Blogger

In today's Blogger tutorial you will learn just how easy it is to place an affiliate banner at the end of each post of a Blogger blog (Blogspot blog). This is a relatively easy task but does require adding a short snippet of code to your Blogger template. For those new to Blogger or without much technical knowledge don't worry as I have broken down the steps so that anyone can follow them even virtual beginners.

For instructions on how to add affiliate banners to other areas of a Blogger blog (Blogspot blog) please consult these tutorials:

Add an Affiliate Banner or Adsense Above Blogger Header
Add an Affiliate Banner to Blogger Header
Add an Affiliate Banner to Blogger Sidebar

How to Add an Affiliate Banner Below a Blogger Post
The instructions below will place an affiliate banner below each post in your blog. The banner will appear on all pages including the home page. If you want faster loading times and the banner to appear only on individual post pages see tips and troubleshooting below for instructions on how to restrict the banner display to post pages only.

1. Login to Blogger if not already logged in

2. Navigate to Design > Edit HTML

3. Back up your Blogger template as a precaution by downloading to your computer

4. Check the Expand Widgets Template box

5. Find the following lines in your Blogger template with CTRL + F to bring up the search box

<div class='post-footer-line post-footer-line-3'/>
</div>

6. Paste your affiliate banner code between these two lines

<div class='post-footer-line post-footer-line-3'/>
Place the affiliate banner code here
</div>

Once you have finished your code should like something like the following which places a horizontal banner (468x60) in the post footer but any size banner can be inserted below each post provided your template is wide enough to accommodate it:

<div class='post-footer-line post-footer-line-3'/>
<a href='https://chitika.com/publishers.php?refid=XXXXXX' style='text-decoration: none;' title='Get Chitika | Premium'><img alt='Get Chitika | Premium' border='0' src='http://scripts.chitika.net/eminimalls/logos/468x60.png' title='Get Chitika | Premium'/></a>
</div>


7. Save Template

8. Click on View Blog to see your new affiliate banner in action

Get Chitika Premium

Tips and Troubleshooting
  • If your template does not have these lines it may only have two post footer lines in which case you can do one of two things

    1. Add these lines to your template:

      <div class='post-footer-line post-footer-line-3'/>
      Place the affiliate banner code here
      </div>

    2. Or place the affiliate banner code between the following lines:

      <div class='post-footer-line post-footer-line-2'/>
      Place the affiliate banner code here
      </div>

  • If you would like the banner to appear below your post only on the post page and not the home page then you will need to add an if statement to the code as follows:

    <div class='post-footer-line post-footer-line-3'/>
    <b:if cond='data:blog.pageType == "item"'>
    Paste affiliate banner code here
    </b:if>
    </div>

  • If you are having problems adding the affiliate banner code to the template make sure that only single quotes are used. The Blogger template code is sensitive to this and usually doesn't accept double quotes

In today's Blogger tutorial you have learned how to place an affiliate banner at the bottom of a post in a Blogger blog (Blogspot blog). This banner will be the same for each post and only displays on the individual post page. If you would like to know more about adding banners to Blogger please consult the list of tutorials below.
Related Articles
List of Blog Know How Tutorials for Blogger Blogs
Add Chititka Ads to Blogger Blogspot Blog
Add an Affiliate Banner or Adsense Above Blogger Header
Add an Affiliate Banner to Blogger Header
Add an Affiliate Banner to Blogger Sidebar
5 Ways to Make Money from Blogger
Blogger Guide to Google Adsense Placement