Popular Posts

How to Highlight Author Comments in Blogger Posts

In this Blogger tutorial I will show you how to highlight the author comments section of your Blogger template (Blogspot template) using CSS styling.

Benefits of Adding CSS Styling to Author Comments
If you are using a default Blogger template chances are it is difficult to differentiate between comments made by visitors and comments made by you, the blog author. If you only have a few comments per post that may not be enough of an issue for you. If however, you have some posts with lots of comments you may need to make your remarks stand out from those of your visitors. We can do that by adding CSS styling to highlight your author comments.

What Will I Learn in This Tutorial?
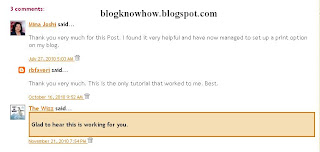
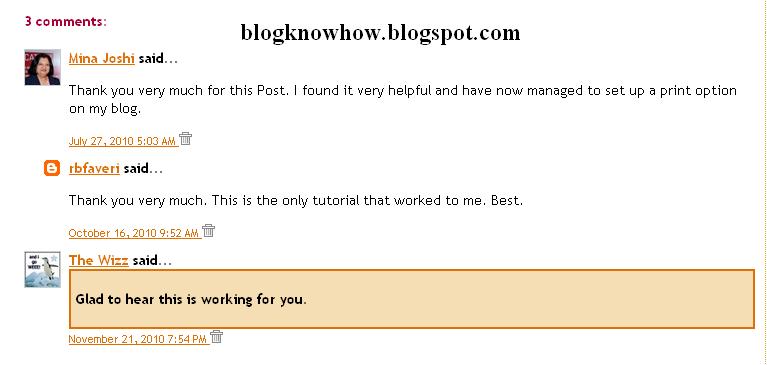
In this Blogger tutorial you will learn how to easily add some highlighting to your comments so that they will never get lost in the crowd again. This requires a small amount of tweaking to your Blogger template which is not difficult to do if care is taken. The image below shows one example of what can be achieved using this Blogger hack and some CSS styling.


Will This Blogger Hack Work on My Template?
I have tested this Blogger hack on both the old generation of Blogger templates (Minima and Sand Dollar) and the latest generation of default Blogger templates eg Simple. It will also work on custom templates as the comments code is likely to be very similar.

If you are using a custom Blogger template and run into difficulty you can also try this alternative method to highlight author comments in Blogger posts

How to Add CSS Styling to Author Comments in a Blogger Post
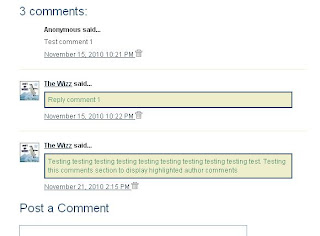
The following instructions will highlight author comments in the comments section of a Blogger post. The code creates a shaded box around the comments made by the blog author. These changes will not affect the CSS the styling of any of the other comments made.

Instructions to Add CSS Highlighting to Author Comments in Blogger

  1. Login to Blogger

  2. From the Dashboard go to Design > Edit HTML

  3. Back up your template by downloading it to your computer

  4. Check the Expand Widget Templates checkbox on the top righthand side

  5. Use CTRL + F by entering the following into the search box

    <dd class='comment-body'>

  6. Immediately above this line paste the following code:

    <b:if cond='data:comment.author == data:post.author'>
    <dd class='comment-body-author'>
    <p><data:comment.body/></p>
    </dd>
    <b:else/>

  7. Now look for this code block

    <dd class='comment-body'>
    <b:if cond='data:comment.isDeleted'>
    <span class='deleted-comment'><data:comment.body/></span>
    <b:else/>
    <p><data:comment.body/></p>
    </b:if>
    </dd>

    and paste </b:if> immediately after it.

  8. Your code will now look like this:

    <div expr:id='data:widget.instanceId + &quot;_comments-block-wrapper&quot;'>
    <dl expr:class='data:post.avatarIndentClass' id='comments-block'>
    <b:loop values='data:post.comments' var='comment'>
    <dt expr:class='&quot;comment-author &quot; + data:comment.authorClass' expr:id='data:comment.anchorName'>
    <b:if cond='data:comment.favicon'>
    <img expr:src='data:comment.favicon' height='16px' style='margin-bottom:-2px;' width='16px'/>
    </b:if>
    <a expr:name='data:comment.anchorName'/>
    <b:if cond='data:blog.enabledCommentProfileImages'>
    <data:comment.authorAvatarImage/>
    </b:if>
    <b:if cond='data:comment.authorUrl'>
    <a expr:href='data:comment.authorUrl' rel='nofollow'><data:comment.author/></a>
    <b:else/>
    <data:comment.author/>
    </b:if>
    <data:commentPostedByMsg/>
    </dt>


    <b:if cond='data:comment.author == data:post.author'>
    <dd class='comment-body-author'>
    <p><data:comment.body/></p>
    </dd>
    <b:else/>


    <dd class='comment-body' expr:id='data:widget.instanceId + data:comment.cmtBodyIdPostfix'>
    <b:if cond='data:comment.isDeleted'>
    <span class='deleted-comment'><data:comment.body/></span>
    <b:else/>
    <p>
    <data:comment.body/>
    </p>
    </b:if>
    </dd>

    </b:if>

    </dd>
    <dd class='comment-footer'>
    <span class='comment-timestamp'>
    <a expr:href='data:comment.url' title='comment permalink'>
    <data:comment.timestamp/>
    </a>
    <b:include data='comment' name='commentDeleteIcon'/>
    </span>
    </dd>
    </b:loop>
    </dl>
    </div>

  9. Now using CTRL + F again find this line ]]></b:skin>

  10. Paste the following immediately before ]]></b:skin>

    .comment-body-author {
    background: #f5deb3;
    border: 2px solid #de7008;
    padding: 5px;
    }

  11. Save your template changes

  12. Click on View Blog and go to a post that you have commented on to see the CSS styling has highlighted your comments.


Alternative Method to Add Highlighting to Author Comments in Blogger
The following method will also add highlighting to author comments in Blogger and can be used if you have difficulty with the first method. It does however involve changing some code rather than just adding some so this is not as desirable in terms of future proofing your template for Blogger updates.


  1. Login to Blogger

  2. From the Dashboard go to Design > Edit HTML

  3. Back up your template by downloading it to your computer

  4. Check the Expand Widget Templates checkbox on the top righthand side

  5. Find the following section of code by using CTRL + F and entering <data:comment.body/> into the search box

    <span class='deleted-comment'><data:comment.body/></span>
    <b:else/>
    <p><data:comment.body/></p>
    <b:include data='comment' name='commentDeleteIcon'/>
    </b:if>

  6. Replace with the following code after <span class='deleted-comment'> and before </b:if> as shown in red:

    <span class='deleted-comment'>
    <!--Highlight Author Comments Start-->
    <b:if cond='data:comment.author == data:post.author'>
    <p class='comment-body-author'><data:comment.body/></p>
    <b:else/>
    <p><data:comment.body/></p>
    </b:if>
    <!--Highlight Author Comments End-->

    </b:if>

  7. Use CTRL + F to find ]]></b:skin> that closes the CSS styling section

  8. Paste the following code immediately above ]]></b:skin>

    p.comment-body-author {
    background: #eeeecc;
    border: 2px solid #335577;
    padding: 5px;
    color:#558866;
    }

  9. Save your template

  10. Click on View Blog and navigate to a post that you have commented on to see the that your comments will now be highlighted


In this Blogger tutorial you have learned two different methods to add CSS styling to highlight the author comments in your Blogger posts. Obviously there is still some work to do on your part to adjust the colors in the CSS styling to match the color scheme of your blog. Good luck!


Related Articles
List of Blog Know How Tutorials for Blogger Blogs
Embedding a Comment Form Below Each Post
How to Get More Comments on Your Blogger Blog
Add Missing Embedded Comment Form to Blogger

How to Add Internal Links Within Blogger Posts

In the Blogger tutorial I discuss how to add internal links within your Blogger posts (Blogspot posts) to point to either another section within the same post or to another post.

There are lots of times when you may want to direct a reader to a different part of your Blogger post depending on what their needs and interests are. Or you might want to alert the visitor to something significant in a related post. In this article I will show how to make use of internal links both within posts and in Blogger generally.

Why bother with internal linking you may be wondering? Well the answer is to improve SEO. Blogs with a good internal linking structure will fare better than blogs that don't link posts. Plus you will be creating an aid to navigation for your reader. On longer posts jumps links to different sections within your post or to other posts mean readers can quickly find the information they are looking for.

How to Create Internal Links To Sections Within the Same Blogger Posts

How to Create Internal Links To Sections Within Different Blogger Posts

How to Create Internal Links To Sections Within the Same Blogger Post
Consider the above links. Click on them. Each jump the reader to a different part of this article. This type of internal linking is common practice in website building and can be equally applied to blogs to assist with navigation.

How did I create these links? The answer is that I used simple html that anyone can learn in a few minutes. Here are the steps I used to create these links.

  1. Log in to Blogger

  2. Go to Posting > New Post or Edit Post and either create a new article or edit an existing one.

  3. Within the article find a place where you want to add some jump links. This will be early on in the article as it will help the reader figure out what information is significant to them and how to get there quickly

  4. Switch to the Edit HTML mode rather than compose mode so you can see the code you are inserting into your post

  5. Create a couple of headings that will be your links to material further down in your Blogger article. Note you can also just jump to a word but for the purposes of this demonstration and clarity I am going to use headings. When creating this post I used the following headings:

    How to Create Internal Links To Sections Within the Same Blogger Post
    How to Create Internal Links To Sections Within Different Blogger Posts

  6. Add links to your headings like so:

    <a href="#withinposts">How to Create Internal Links To Sections Within the Same Blogger Post</a>

    <a href="#withinblogger">How to Create Internal Links To Sections Within Different Blogger Posts</a>

    • The href attribute and closing </a> element is the same structure you use for other links in your blog

    • Each identifier is preceded by a hash mark (#). The # tells the visitor's browser to look for a section within your post

    • Each link identifier needs its own unique identifier and needs to be enclosed in inverted commas. Use a name that reflects the link you are creating if possible as it will make it easier to identify on a page with a lot of internal jump links.

  7. Now go to the first point in your post where you want to jump the reader to. This will be the start of some new idea, section or logical split in the information.

  8. At this point create your anchor text by first adding your heading and then enclosing your heading with this anchor structure.

    <a name="identifier">a heading</a>

    • Note the use of the name attribute at the beginning and the </a> element at the end

    • Each link identifier needs to be enclosed in inverted commas. Make sure to match up the correct identifier with the one created in step 6


    Using this anchoring structure our first anchor becomes:

    <a name="withinposts">How to Create Internal Links To Sections Within the Same Blogger Post</a>

    Substitute your own link identifier and headings

  9. Now move on to the next point you want to link to and create the second anchor. In this example we use the same structure but change the identifier

    <a name="withinblogger">How to Create Internal Links To Sections Within Different Blogger Posts</a>

    Again substitute your own link identifier and headings to suit your article

  10. Save and Publish as normal and you will see your links are live and will jump the reader to different parts of the post


How to Create Internal Links To Sections Within Different Blogger Posts
Now you know how to create links to sections within Blogger posts let's look at how to create internal links within different Blogger posts.

Most of you will be able to create a link to another post in Blogger using the posts editor. You just highlight the text you want and click on the figure eight icon and Blogger creates the link for you. Which is great most of the time.

However what if we want to direct the visitor to a particular section of a different post? When you create an internal link it will take the viewer to the top of the page but what if you want them to see something near the end of the article? Well using an internal link similar to what we did to create internal links within the post we can.

Say I want to take my reader to a particular post in this case Blogger SEO Tips and Tricks. How would I go about it?

  1. I create the link as usual by copying the article URL address from the browser address bar and using the post editor to add the link. The Blogger post editor uses this structure:

    <a href="URLaddress">linkname</a>

    So the Blogger editor would create the following link:

    <a href="http://blogknowhow.blogspot.com/2009/05/blogger-blogspot-seo-tips-and-tricks.html">Blogger SEO Tips and Tricks</a>

    The link would appear like this in a browser:

    Blogger SEO Tips and Tricks

  2. Now I want to direct my visitors to the section about creating breadcrumb navigation so I add a section name using the following structure:

    <a href="URLaddress#identifier">linkname</a>

    Thus my link would look like this in the Edit HTML section of my post editor

    <a href="http://blogknowhow.blogspot.com/2009/05/blogger-blogspot-seo-tips-and-tricks.html#breadcrumb">Blogger SEO Tips and Tricks</a>

    Note the link seen in a browser remains the same

  3. If you want your link to open in a new browser window add the following to your link:

    <a href="http://blogknowhow.blogspot.com/2009/05/blogger-blogspot-seo-tips-and-tricks.html#breadcrumb" target="_blank">Blogger SEO Tips and Tricks</a>

  4. Now I need to go to the post I am linking to and add the anchor. So in the post SEO Tips and Tricks I would use the following structure to link to the section about how to add breadcrumbs:

    <a name="identifier">a heading</a>

    So the section about breadcrumbs in the Blogger SEO Tips and Tricks article is now enclosed by the following:

    <a name="breadcrumb">Add Breadcrumb Navigation to your Blogger Blog</a>


    If you now click on the link below you will see that your browser open a new window and take you directly to the section about adding a breadcrumb to your blog.

    Blogger SEO Tips and Tricks

  5. Save your changes and publish your article as normal


In this Blogger tutorial you have learned how to add internal links to a particular section of a post from both within the same Blogger post and within a different post. By adding internal links you will help your visitors to find their away your blog more easily and access information quickly. You will also be adding to your blog's SEO by linking related posts.


Related Articles
List of Blog Know How Tutorials for Blogger Blogs
Blogger SEO Tips and Tricks

How to Add a Flickr Slideshow Gadget to Blogger

In today's Blogger tutorial I am going to show you how to add a Flickr Slideshow (Flickr Photostream) to a Blogger blog (Blogspot blog). This Blogger tutorial is suited to beginners and newbies to Blogger and contains step by step instructions to create your Flickr slideshow.

This Blogger slideshow tutorial covers the steps to insert a slideshow widget (slideshow gadget) in the sidebar or footer of Blogger and display a set of images uploaded to Flickr. Note the maximum number of images displayed in the slideshow is 20.

There are several different methods to add a Flickr slideshow to Blogger. Which method you use is largely dependent on your own individual requirements. I cover two different methods in the tutorial.

Method 1 - Add a Flickr Slideshow Gadget to Blogger - Photos in photostream are not organized into sets

Method 2 - Add a Flickr Slideshow Gadget to Blogger to display images that are organized in a set


Method 1 - Add a Flickr Photostream to Slideshow Gadget in Blogger

If you will only ever add one slideshow to Blogger from Flickr and don't want to bother with sets use this method to quickly and easily add your Flickr slideshow to Blogger:

  1. Go to Flickr and find your Photostream link. On your home page when logged into Flickr you will see Your Photostream at the top left under the Flickr salutation


  2. Click on the Your Photostream link and copy the photostream id from your browser address bar.

    http://www.flickr.com/photos/27647187@N07/
    It will look something like this. Copy the identifier eg 27647187@N07

  3. In Blogger go to Design > Page Elements

  4. Select Add Gadget from the sidebar or footer depending on where you want to place your Flickr slideshow

  5. Choose Slideshow from widgets in the Basics list

  6. Choose a title for your slideshow or leave blank

    How to Add a Slideshow to Blogger
  7. Under Source use the drop down menu to select Flickr

  8. Under Option select User

  9. Under Username enter you Flickr Photostream id eg 27647187@N07.

    Note:If you have entered your Flickr Photostream id correctly you will be able to see a preview of your slideshow.

  10. Click on Save and then View Blog to see your new Flickr slideshow in action on your Blogger blog

    How to Add a Flickr Slideshow Gadget to Blogger


Method 2 - Add a Flickr Photostream Set to a Slideshow Gadget in Blogger

If you use sets in Flickr to organize your photos and images you will need to use a slightly different method to install a Flickr slideshow into Blogger.

  1. Log on to Flickr

  2. Upload your photos and create sets to organize your photos if desired

  3. Go to view your sets in Flickr and select the set you wish to use for your Blogger slideshow

  4. In your browser window you will see a URL address similar to the following:

    http://www.flickr.com/photos/27647187@N07/sets/72157624508265319/

  5. There are two important parts to this address that you need to note because we will be using these to create our slideshow:

    • Your photostream - designated by something similar to 27647187@N07

    • The id of the set - designated by something similar to 72157624508265319


  6. In a different browser window log on to Blogger if not already logged in

  7. Go to Design > Page Elements

  8. Select Add Gadget from the sidebar or footer depending on where you want to place your Flickr slideshow

  9. Choose Slideshow from the list of Basics Widgets

  10. Click on the blue plus sign to the right of the Slideshow gadget to activate and configure your Blogger Flickr Slideshow

  11. Choose a title for your slideshow or leave blank

  12. Under Source use the drop down menu to select Other (Note do not select Flickr if you are using a set as this will not work - see Method 1)

  13. In the Feed URL section enter the following feed:

    http://api.flickr.com/services/feeds/photoset.gne?set=72157624508265319&nsid=27647187@N07&lang=en-us&format=rss_200

  14. Substitute your photostream id (this will unique to your Flickr account)

  15. Substitute the id of the set of images you wish to display


  16. Leave the speed of the slideshow at medium unless you specifically need it to be faster or slower

  17. Click on Save

  18. Click on the View Blog link to admire your new Flickr slideshow


In today's Blogger tutorial you have learned two different methods to add a Flickr slideshow to Blogger. Both methods use the Blogger Slideshow Gadget but the difference between them is that method 2 shows you how to use a selected part of your Flickr photostream to create a Blogger slideshow for your blog instead of your whole Flickr photostream. Hope you have lots of fun with this Blogger slideshow gadget. Enjoy!


Related Articles
List of Blog Know How Tutorials for Blogger Blogs

Add Your Blogger Blog to Facebook

In today's Blogger tutorial I will show how to add your Blogger blog (Blogspot blog) to Facebook so that your updated content can be read right from your Facebook profile. Importing your Blogger blog into Facebook will only take you a few minutes to set up but will likely produce quite a few extra readers.

By importing your blog into Facebook your Blogger posts become available to all your Facebook friends and family. Everytime you post new articles to your Blogger blog they will automatically appear on your Wall in Facebook and in your friends News Feeds. It is also possible to remove any content that you do not wish to be displayed which may be handy for some.

Advantages of Importing Your Blog into Facebook
  • Increase your web presence
  • Enjoy added interest in your blog articles and new readers
  • No need to replicate your blog articles or content on Facebook

Disadvantages of Importing Your Blog into Facebook
  • If you blog for profit think carefully about importing your Blogger blog into Facebook as you are likely to experience a drop off in traffic and a reduction in revenue earnings as fewer people will visit your actual blog. One possible way around this is to set your blog's RSS feed to show summaries only that way ensuring that anyone interested will need to visit your blog to read the whole article.

How to Import or Add Your Blogger Blog to Facebook
  1. Login to Facebook or Sign up to Facebook if you are not already a member

  2. From your Facebook profile page go to Settings > Application Settings which you will find in the top right hand corner


  3. Select Notes from the list of applications displayed on the page

  4. Click on Import a Blog in the right sidebar

    Facebook - Add Notes Screen (Settings, Applications Settings, Notes)
  5. Enter the URL address of your blog

    either website URL:
    http://blogknowhow.blogspot.com

    or your Blogger feed: http://blogknowhow.blogspot.com/feeds/posts/default?alt=rss
    Please note it is not necessary to add the feed of your blog as Facebook will autodetect this


    Facebook - Import a Blog Screen
  6. You will need to tick the box below this to confirm that the content is not illegal or obscene and that you have the right to permit Facebook to reproduce the content of your blog. Any problems click Cancel and reenter your blog URL address

  7. Click Start Importing

  8. Facebook will now import your feed and you will be taken to a preview screen to make sure the content matches your blog. If it does go ahead and confirm the import by clicking on the Confirm Import button

    Facebook - Preview Screen for import a blog showing latest content

  9. Go to your Wall in Facebook to check that your Blogger posts are now available to all your Facebook friends and family.


Tips and Troubleshooting
  • If your Blogger blog is members only the blog import will fail as Facebook will be unable to detect your blog's feed

  • To remove a blog post from your Wall in Facebook click on the Remove button on the righthand side

  • If your images are not displaying (there seems to be a bit of a glitch with this) then you may need to try importing your blog using Networked Blogs


In this Blogger tutorial I have discussed how to import your Blogger blog into your Facebook profile. I have also pointed out some advantages and disadvantages of adding your Blogger blog to your Facebook profile. I will be talking some more about importing blogs into Facebook in the future which is likely to be of interest to those with multiple Blogger blogs.


Related Articles
List of Blog Know How Tutorials for Blogger Blogs

Add Profile Images to Blogger Comments

Today I will show you how easy it is to have Blogger (Blogspot) display profile images in the embedded comments section of your blog even if you are using a custom template.

About a month ago Blogger announced that it was enabling profile images (profile avatars) in the embedded comments section on Blogger (Blogspot) as part of its 10th birthday feature series. The new profile image feature which has been available on other commenting options has now been extended to the embedded comments option. This is good news if you are using a default template as you will now see a small avatar next to your visitors comments and your own avatar if you have uploaded a profile image.


Default Blogger Templates - Enabling Profile Images
Profile images work on default Blogger templates and have been automatically enabled by Blogger. If you are using a default Blogger template with embedded comments enabled and have recent comments on a post you will see a profile image to the left of visitor comments (provided they have uploaded one that is). Your profile avatar will also display when you respond to visitor comments again provided you have uploaded one. (To upload your profile photo click on Add Photo at the Dashboard). If profile images are not displayed enable them by going to Settings > Comments and checking the Yes radio button at the bottom of the page which says Profile Images Enabled.

Custom Blogger Templates - Enabling Profile Images
If you are using a custom template you may still be able to see profile images in your embedded comments section. Check out Settings > Comments to make sure Profile Images are enabled. If you can't see profile images you can still add this feature by tweaking your Blogger template. Follow the instructions below to have Blogger display profile images in the embedded comments section of your custom Blogger template.

Add Profile Images to Comments Section of a Custom Blogger Template
If you are using a custom Blogger template you can use the following method to add profile images to the embedded comments section of your Blogger template.

  1. Login to Blogger if not already logged in

  2. Go to Design > Edit HTML

  3. Back up your Blogger template as a precaution by downloading the full template to your computer

  4. Expand Widget Templates by checking the box on the right hand side

  5. Find the following line in your Blogger template by using CTRL + F:

    <dl id='comments-block'>

  6. Change the above line to the following:

    <dl expr:class='data:post.avatarIndentClass' id='comments-block'>

  7. Scroll down a few lines and find the following line in your Blogger template:

    <a expr:name='data:comment.anchorName'/>

  8. Directly before the above line paste the following code block:

    <b:if cond='data:comment.favicon'>
    <img expr:src='data:comment.favicon' height='35px' style='margin-bottom:-2px;' width='35px'/>
    </b:if>
    <a expr:name='data:comment.anchorName'/>
    <b:if cond='data:blog.enabledCommentProfileImages'>
    <data:comment.authorAvatarImage/>
    </b:if>

  9. Click Save Template

  10. Click View Blog and navigate to a page with commenting to see avatars next to comments in the embedded comments area


Tips and Troubleshooting
  • If you have added the author commenting highlight hack to your Blogger template there will be 2 instances of the code at Step 7 to change

  • If your template does not have the code mentioned in Step 5 and Step 6 check that dl has not be replaced by div. In this case leave the div as is and replace the rest of the code in the line.

  • Blogger has only enabled profile images for Blogger and Google profiles so if your visitors comment using identities such as "Anonymous" or "Name/URL" their image profile will not be displayed. If OpenID, AIM or other identities are used these favicons will be displayed instead.

  • Profile avatars load last so they will not prevent visitors viewing your content if you have a lot of comments on some pages


In today's Blogger tutorial (Blogspot tutorial) you have learned how to enable profile images in the embedded comments section in Blogger. If you are using a default Blogger template this can be achieved by enabling profile avatars in your Blogger template. If you are using a third party custom template I have shown you a Blogger hack that will display profile images next to comments on your blog. As always I am interested in how you get on with this tweak. Good luck!


Related Articles
List of Blog Know How Tutorials for Blogger Blogs
Add Missing Embedded Comments Section to a Blogger Template
Embed Comments Form in a Blogger Template
How to Get More Comments on a Blogger Blog

Add CSS Styling to Blockquotes in a Blogger Template

Today I continue the series of Blogger tutorials (Blogspot tutorials) by showing you how to apply CSS styling to blockquotes in a Blogger template. Other articles I have already published on the subject of CSS styling include:

How to Add, Delete or Remove Blogger Image Borders
How to Align and Justify Posts in Blogger
How to Add a Divider Between Blogger Posts
How to Add or Change a Background Image in a Blogger Template.

Today's tutorial on Blogger blockquotes will be useful if you are using a default Blogger template or a third party custom template. It will show you how to change your blockquote area in the following ways:

  • Add a background color to the blockquote
  • Add a border around the background of the blockquote
  • Add or change the color of the blockquote text
  • Add or change padding around the text
  • Add or change the margin
  • Add a background image

Blogger beginners you can relax as I have written this Blogger tutorial with you in mind. I will walk you through the steps of styling the blockquote section and you will see that it is not as daunting as it first appears. This Blogger tutorial assumes no knowledge of CSS styling. I have rated the difficulty level as easy to medium because it does involve making adjustments to your Blogger template.

How to Change the Blockquote Section of a Blogger Template

First of all let's take a look at the CSS Styling for the blockquote section of a default Minima Blogger template.

.post-body blockquote {
line-height:1.3em;
}

.post blockquote {
margin:1em 20px;
}

.post blockquote p {
margin:.75em 0;
}

As you can see the blockquotes area of this Minima template has minimal styling. Apart from line height and margin indentation there has been no additional code added to improve the look of the template.

Minima Blockquotes No Extra CSS Styling
Let's go ahead and give the blockquotes in your Blogger posts some styling. I will use the Minima template to show you but you can do the same for another default template or custom template. As always back up your Blogger template by downloading it to your computer before you begin to make any changes.

  1. CSS Styling to Add a Background Color to Blockquotes
    Adding a background color to the blockquote area can be achieved in 1 of 2 ways.

    1. One way is to enter the hex color directly into the styling as I have done below. This code will add a light grey background to the blockquote area.

      .post-body blockquote {
      line-height:1.3em;
      background-color: #cccccc;
      }

    2. Another way to add a background color using CSS styling for the blockquote area is to make use of the variable names already set up. The border color is light grey #cccccc by default in a Minima template. The advantage of this option is that if you decide to change the border color under Layout > Fonts and Colors the blockquote color will automatically change to the new color too.

      .post-body blockquote {
      line-height:1.3em;
      background-color: $bordercolor;
      }

      If you wanted the background color to be the same as the blog title color rather than the border color you would write this instead

      .post-body blockquote {
      line-height:1.3em;
      background-color: $titlecolor;
      }

  2. CSS Styling to Add a Border Around Blockquotes
    You have your background in place now let's add a narrow border around the background to add some more definition. The following will add a 1px solid border around the outside of your blockquote area in your Blogger posts.

    .post-body blockquote {
    line-height:1.3em;
    background-color: #cccccc;
    border: 1px solid #cc6600;
    }

    or if using variables

    .post-body blockquote {
    line-height:1.3em;
    background-color: $bordercolor;
    border: 1px solid $titlecolor;
    }

    Blockquotes With a Background and Background Border
  3. CSS Styling to Add Padding Around Blockquotes
    Now if we were to leave the styling at this point one of the problems would be that the text would butt up against the background which is not a good look. To create some space between the text and the background edge all the way around we use CSS styling to add some padding like this:

    .post-body blockquote {
    line-height:1.3em;
    background-color: #cccccc;
    border: 1px solid #cc6600;
    padding: 20 px;
    }

    or if using variables

    .post-body blockquote {
    line-height:1.3em;
    background-color: $bordercolor;
    border: 1px solid $titlecolor;
    padding: 20 px;
    }

    Blockquotes With a Background, Background Border and Padding
  4. CSS Styling to Add or Change the Text Color of Blockquotes
    If you want to accent your blockquote area in your posts one effective way to do this is to make the blockquote text color a different color from the text color of your pages. We do this by picking a color and adding the following line to the code:

    .post-body blockquote {
    line-height:1.3em;
    background-color: #cccccc;
    border: 1px solid #cc6600;
    padding: 20 px;
    color: #cc6600
    }

    or if using variables

    .post-body blockquote {
    line-height:1.3em;
    background-color: $bordercolor;
    border: 1px solid $titlecolor;
    padding: 20 px;
    color: $titlecolor;
    }

    Blockquotes With a Background, Background Border, Padding and Change of Text Color

Tips and Troubleshooting
If you want to add further modifications to the blockquotes area of your Blogger template here are several other possibilities.

  1. CSS Styling To Change the Margin of Blockquotes
    You can increase the margin from 1em to 1.5em by changing the margin line to
    margin: 1.5em 20px;

  2. CSS Styling to Add a Background Image to Blockquotes
    You can have your own image as a background in your blockquotes area of your posts by adding this line:

    background: url(http://URL of your image.jpg);

In today's Blogger tutorial (Blogspot tutorial) you have learned how to add CSS styling to the blockquotes area of your Blogger posts. I have shown you how to add a background, a background border, change the text color, add padding, change the margin and add a background image to the blockquotes code block. If you have a moment please let me know how you got on customizing your own Blogger template. Any questions please ask.


Related Articles
List of Blog Know How Tutorials for Blogger Blogs
How to Add, Delete or Remove Blogger Image Borders
How to Align and Justify Posts in Blogger
How to Add a Divider Between Blogger Posts
How to Add or Change a Background Image in a Blogger Template

Add or Change Background Image of a Blogger Template

In today's Blogger tutorial (Blogspot tutorial) I will show you how to both add a background image to a Blogger template if you don't have one already or change the existing background of your Blogger template.

I have chosen to write this article not because there aren't any how to articles already on the net but because they assume quite a bit of knowledge. I have taken a different tack with this post in that I assume you are an absolute beginner with no knowledge of Blogger templates.

For this reason I have provided some sample backgrounds for you to play around with. By just cutting and pasting these images you can see first hand how dramatically adding a different background to your Blogger template can change it. You will see that replacing your background image with these images isn't that difficult and hopefully it will give the confidence to branch out further and change the background of your Blogger template to suit your own needs. All that is needed is to insert a small snippet of code into the CSS styling section of your Blogger template and hey presto your Blogger template will take on a whole new look.

How to Change the Color of a Blogger Background (Default Templates)
If you are using a default Blogger template then you already have the option to change the background color to your own taste by going to Layout > Fonts and Colors. Some third party custom Blogger templates have this option too but by no means all. For instructions on changing the background color of custom templates see tips and troubleshooting below.

How to Add a Background Image to a Blogger Template
  1. Log in to Blogger if not already logged in

  2. Go to Layout > Edit HTML

  3. Back up your Blogger template as a precaution by downloading the full template to your computer

  4. Find the following line in your Blogger template

    body {

  5. Add the following line directly after this line
    background-image: url(URL address of your image);

    Your block of code will now look like this:

    body {
    background-image: url(URL address of your image);
    (existing code in this block)
    }

  6. Now replace the code in red for the URL address of your image. Choose an image from the selection below to practise with or use your own image. Note if using your own image make sure you read the tips and troubleshooting section below.


    https://blogger.googleusercontent.com/img/b/R29vZ2xl/AVvXsEiw4FZCxvYCUJ-jfnZJeKJ4B9d0wVHmTJKj2xjlr604UeWd8JLmhXtf1Q4NqNPVchlyCOwSSp4jmRibScIT_dt26wsHTIUWmfFRbT-rvTScPcax3x6t0NT5iR0tZ2oO_sNyumYhUxhKauc/s320/background_047.gif


    https://blogger.googleusercontent.com/img/b/R29vZ2xl/AVvXsEh87IRKbcfbpJrhlmdTF23vzkH8a8jXI-EEDXWvTeHHDlp4-dSNEp0hZKq19x81PmXWOXsdqEgEtga8WGyOyZ3WubZUvksAKXln7iu1bvPasBSWGqLEua8nym1GhM4sbAjIFiXsMFPZjyU/s320/background_104.gif


    https://blogger.googleusercontent.com/img/b/R29vZ2xl/AVvXsEg3yRNdsDmHZSmnSv9shzs9yAupruKwlTUByY5J026eirQn_Q8dcjuBmMSZrLzUqE2teUaYbNYA_3yKZsGreA-aqb5Keaa4KGxqsmNaqffbKU5l9vfF9y8F8nEqf28fgX-S0opsYtQOnGA/s320/background_126.gif


    https://blogger.googleusercontent.com/img/b/R29vZ2xl/AVvXsEiGhQD-3Nf2TjwwGDKyqPCGtmkHEh1GnaGOa-VCkEYieQiFk1szo9z6wK-zlUtOTjoZcjxxuQGZb5j3Kjfwo6yrRR08cEkvugYoxsW9uAJWDwVxkqzgKUU_Td7XjaEWGxTHu1dlppeEas4/s320/background_073.gif


    https://blogger.googleusercontent.com/img/b/R29vZ2xl/AVvXsEiZFteldW5bIoEsbkUfeb2fH2VShc3Id-5rjX3-3VaBx-74Qt6_dgGr1S3Gkc5sb6kYDobLqoVBxbPS4bWHRonXQfa3-LX3P90HW550ZvhhSkEm4R8bW6X0BJTId29vMu2c28cQFDTI4jU/s320/background_083.gif

    Green Paws Background

    https://blogger.googleusercontent.com/img/b/R29vZ2xl/AVvXsEh5feEvCMnia8gnP2_OIqB1_eFpWFk97rHJnTJtOiBX0QarPfWd5q3uHjvvn36qyYed0WO-icv0ATE6JR4m1uBFzZdKzd4PrI8O7VoXXGPXGknx2bxHCXRaRw3eDbR6p8i5srOL-KoHa9s/s320/green-paws.gif

    Musical Notes Background

    https://blogger.googleusercontent.com/img/b/R29vZ2xl/AVvXsEijesj1KkbiXnAGABbm-6DhWn09odf8hWldW8LAgLAZ1QgPtRmPy-kHmQ_d7un4UXHNnrxrWoNlFVSE95ZAg0L0uVAyfGKLBWcEQ4b0LyCUEk-O-lwVCxa0oCn4Fs_5RgGmBR1qPyd5u9s/s320/melody.gif

  7. Use the Preview button to see the effect of these different backgrounds on your template. It will help you get an idea of the kind of possibilities out there.

  8. You are welcome to use one of the above Blogger backgrounds as they are all free to use without any restriction. If you decide to use one of these simply click on Save Template and you are in business. Alternatively go ahead and find your own background image on the net and follow the instructions below to insert it into your Blogger template.

Tips and Troubleshooting

  • To Add Your Own Image to a Blogger Template
    There are huge number of backgrounds on the net that are suitable for Blogger. Search under free website backgrounds in your favorite search engine to find these.

    Simply download your preferred background and save to an image service like Photobucket, Flickr.

    Make sure the file format is either a .jpg, .gif or .png and that its size does not exceed 100kbs. As a rule of thumb an image size of around 30kb or less is about right if loading time speed is not to be compromised. Larger images can be resized quickly by using an online resizing service such as Shrink Pictures.

    Follow the instructions above to change the URL to that of your image.

  • To Change the Background Color of Your Custom Blogger Template
    If there is no option to change the background color of your Blogger template in Layout > Fonts and Colors you can still change the color manually.

    1. Follow steps 1 to 4 as above

    2. Find the line beginning with :

      background-color: #

    3. The hex color will be different for each template. We will change the color only

      background-color: #change hex color code to your chosen color;

    4. Replace the existing hex color code with the value of your chosen hex color. List of web safe hex colors. For example insert the following code to change the background color to:

      Denim Blue
      background-color: #336699;

      Black
      background-color: #000000;

      White
      background-color: #ffffff;

    5. Use the Preview button to see the effect of each color before you save it.

    6. Once you are satisfied go ahead and click on Save Template

Today's Blogger tutorial (Blogspot tutorial) aimed at Blogger beginners continues the series on CSS styling for Blogger. You have learned how to add the background image to your Blogger template or change the existing background image. To help you gain confidence in changing the background image I have provided some sample images for you to practise with. Also in this Blogger tutorial you have learned how to change the color of your Blogger background if you prefer a plain solid background color rather than a background image. As always if you strike any problems implementing the tips in this tutorial please let me know.

Related Articles
List of Blog Know How Tutorials for Blogger Blogs
How to Add, Delete or Remove Blogger Image Borders
How to Align and Justify Posts in Blogger
How to Add a Divider Between Blogger Posts